Omeka S Workshop
This tutorial was designed for a ZKAV workshop, but can be adapted to other organizations and workshop environments.
This tutorial walks through setting up a local Omeka S development instance for the ZKAV workshop. It include information about:
- Docker bootstrap
- Module installation
- Guest contributions
- Internet Archive sync
- Admin dashboard configuration
Repositories
- omeka-instance-zkav — instance wrapper (modules, themes, compose wiring)
- GhentCDH/Omeka-S-Docker — upstream Docker base
Part 1 — Docker setup
Omeka instance: ZKAV
The following walks through how to use omeka-instance-zkav (a custom Omeka S instance wrapper).
This instance wrapper is not a standalone instance, but rather a configuration modification for use with a fresh clone of GhentCDH/Omeka-S-Docker. You will need to clone the Ghent repository and then copy the contents of this repository into the Ghent repository following the instructions below.
This wrapper includes module/theme recipes (Internet Archive sync, Contribute enhancements, Freedom theme fork) and Docker wiring so GitHub Release ZIPs download and install on first boot.
This repository is also designed for a workshop environment. Participant information is included in below and also available here in the instance repository.
What is included:
- This Guide (README.md) - Local setup and daily use
- OMEKA_ADMIN_SETUP.md - Admin dashboard setup after first boot
- DEPLOYMENT.md - Setting up a production server
- DEVELOPMENT.md - Custom module/theme releases
Custom repos:
Prerequisites
- Docker + Docker Compose v2
git- A browser
Quick start
In a new folder:
mkdir -p ~/projects/zkav-omeka && cd ~/projects/zkav-omeka

git clone https://github.com/c-host/omeka-instance-zkav.git config
git clone https://github.com/GhentCDH/Omeka-S-Docker.git Omeka-S-Docker

cp config/.env.example Omeka-S-Docker/.env
cp config/compose.yaml Omeka-S-Docker/compose.yaml
cp -r config/bootstrap Omeka-S-Docker/bootstrap
cp -r config/entrypoint Omeka-S-Docker/entrypoint
cat config/omeka-docker.gitignore >> Omeka-S-Docker/.gitignore

# Edit admin password (required) and ports if needed
nano Omeka-S-Docker/.env

cd Omeka-S-Docker
docker compose build    # uses OMEKA_S_VERSION + PHP_VERSION from .env
docker compose up -d
docker compose logs -f omeka
Wait for Module install finished. and Apache/php-fpm running. Then open:
- Omeka admin - http://localhost:8090/admin
- Public site - http://localhost:8090
- PHPMyAdmin - http://localhost:8091
- Mailpit - http://localhost:8026
Log in with OMEKA_S_ADMIN_EMAIL / OMEKA_S_ADMIN_PASSWORD from .env.
NOTE: OMEKA_S_INSTALL_MODULES must always stay 0 when ZIP URLs are in OMEKA_S_MODULES.
What this repo adds to Ghent Docker
Ghent out of the box downloads modules from OMEKA_S_MODULES but cannot install GitHub ZIP URLs (module:install expects folder names).
.env.example- Instance recipe: modules, themes, ports, admin, install flagscompose.yaml- Replaces upstream:omeka-datavolume + bind-mount modules/themes onlybootstrap/local.config.php- Seeded into Docker volume on first boot (entrypoint 55)bootstrap/install-modules.sh- Installs modules fromOMEKA_S_MODULES(boot entrypoint 81 + manual re-run from host)entrypoint/55-seed-local-config.sh- Copieslocal.config.phpinto volume if missingentrypoint/81-install_modules_by_folder.sh- Runs install script whenOMEKA_S_AUTO_INSTALL_MODULES=1
One module list:
OMEKA_S_MODULESin.env- Ghent downloads it
- entrypoint 81 installs folder names derived from it (
EasyAdmin:3.4.38→EasyAdmin,…/Foo.zip→Foo)
Data layout after docker compose up (Docker creates data/omeka/modules/ and themes/ automatically):
Omeka-S-Docker/
├── .env
├── compose.yaml          ← from this repo
├── bootstrap/            ← from this repo
├── entrypoint/           ← from this repo
└── data/omeka/
    ├── modules/          ← on host (IDE)
    └── themes/           ← on host (IDE)

Docker volume omeka-data   ← config, uploads, logs (not on host)
Versions (Omeka / PHP)
Set in .env only:
OMEKA_S_VERSION=4.2.1
PHP_VERSION=8.2
Then rebuild the image:
docker compose build omeka
docker compose up -d omeka
compose.yaml uses upstream-style fallbacks (4.1.1 / 8.1) if a variable is missing; .env is the pin for this instance. You do not need to edit version numbers in compose.yaml.
Daily commands
cd Omeka-S-Docker
docker compose up -d          # start
docker compose stop           # stop
docker compose logs -f omeka  # logs
Adding or upgrading a module
- Add to
OMEKA_S_MODULESin.env(dirname or GitHub Release ZIP URL). - Re-download and install:
docker compose stop omeka
rm -rf data/omeka/modules/ModuleName   # omit for new modules
docker compose up -d omeka- Admin → Modules → Upgrade if replacing an existing module.
Themes: same pattern under data/omeka/themes/.
First site
After Docker boots and modules install, follow OMEKA_ADMIN_SETUP.md (listed bellow and also available here) for the full workshop configuration (site, guest accounts, Collecting, IA sync, CleanUrl, and more).
Quick version:
- Admin → Sites → Add — title e.g.
ZKAV, slug e.g.zkav, theme Freedom → http://localhost:8090/s/zkav - Admin → Settings → Display — set Default site to your workshop site (required for public CleanUrl paths)
- Continue with the step-by-step guide below
Additional Docker Commands and Considerations
Full reset (destroys database)
Proceed with caution. This will destroy the database and all data.
docker compose down -v # will destroy the database and all data
docker compose up -d # will rebuild the image and start the container
Security (local dev)
Do not commit .env. Default passwords are for local use only. See DEPLOYMENT.md before exposing services publicly.
Part 2 — Admin dashboard setup
Omeka admin setup (ZKAV workshop)
This guide covers what a workshop admin should do in the Omeka S admin dashboard after the Docker stack boots successfully.
It assumes:
- You already have the stack running (see above / README.md).
- All modules/themes listed in
.envwere downloaded and installed on first boot. - Participants may have no Internet Archive collection of their own.
Where you see [your-site-slug], replace it with your site’s actual slug.
Before you start (quick checks)
1) Confirm you can log in
- Admin Login URL: http://localhost:8090/login
- Log in using
OMEKA_S_ADMIN_EMAILandOMEKA_S_ADMIN_PASSWORDfromOmeka-S-Docker/.env.
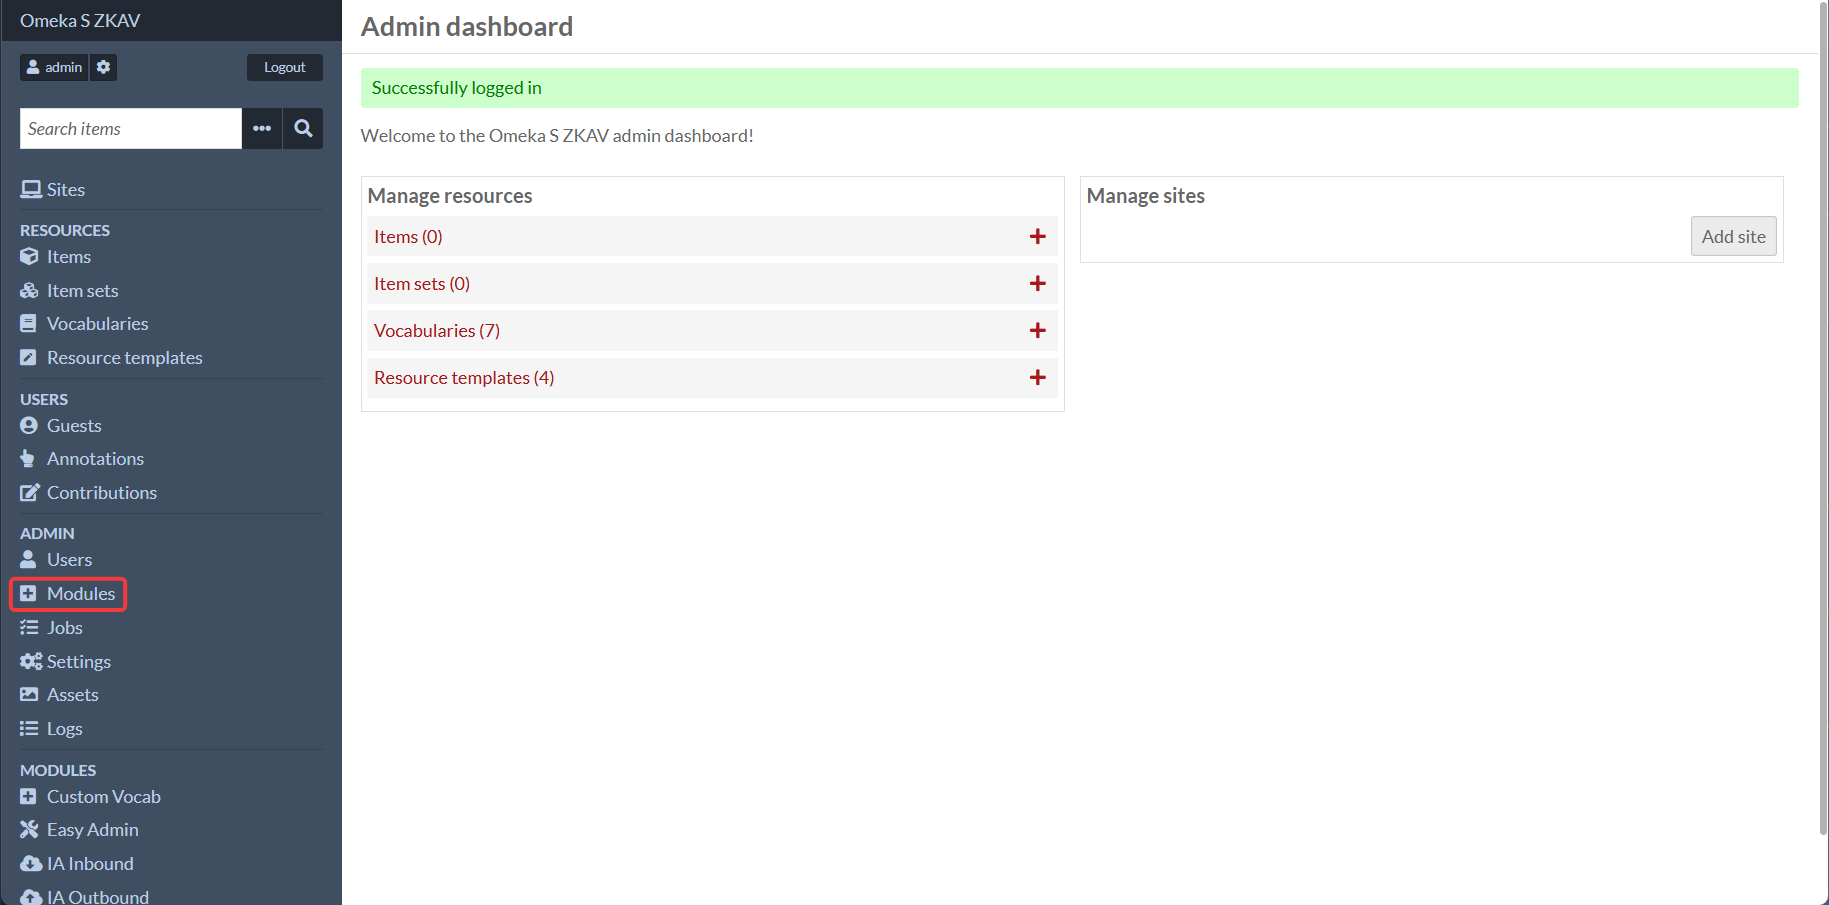
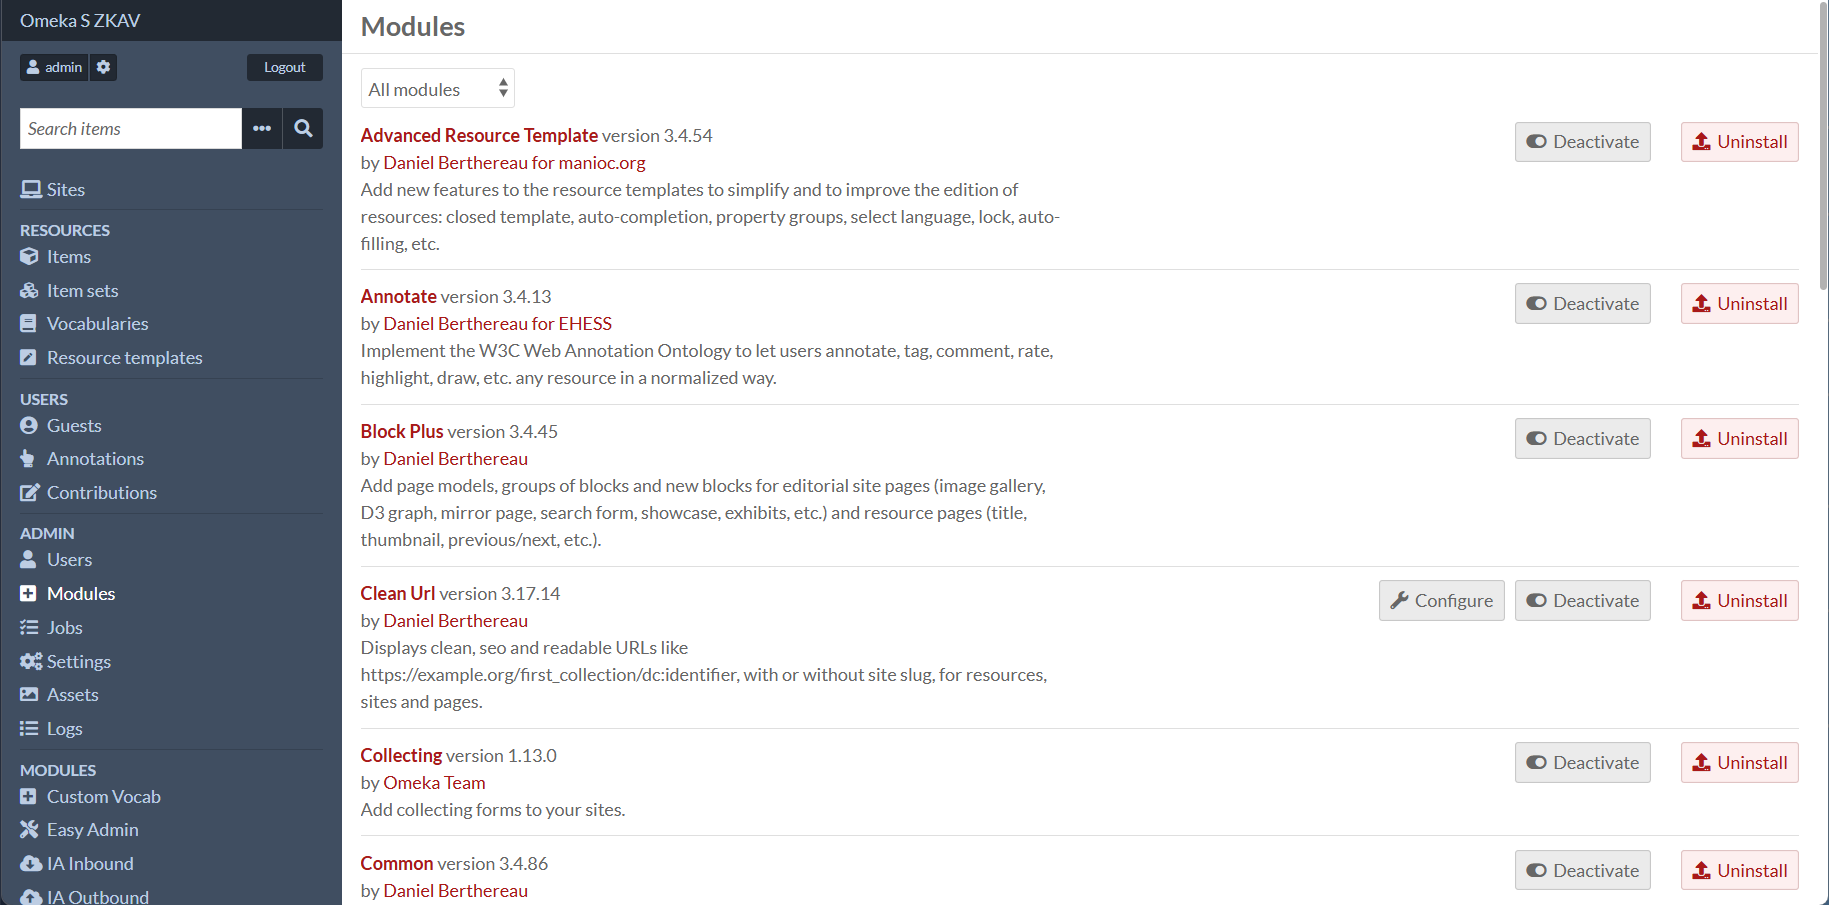
2) Confirm modules are installed and active
In the admin menu:
- Go to Modules.
- Confirm these are installed and active (at minimum for this workshop flow):
- Common
- Guest
- Collecting
- Contribute
- ContributeEnhancements
- AdvancedResourceTemplate
- RoleBasedNavigation
- Mapping
- InternetArchiveInboundSync
- InternetArchiveOutboundSync
- CleanUrl
- MetadataBrowse
- BlocksDisposition
If anything is missing: stop and fix the Docker/module install first (don’t try to work around it in the UI).
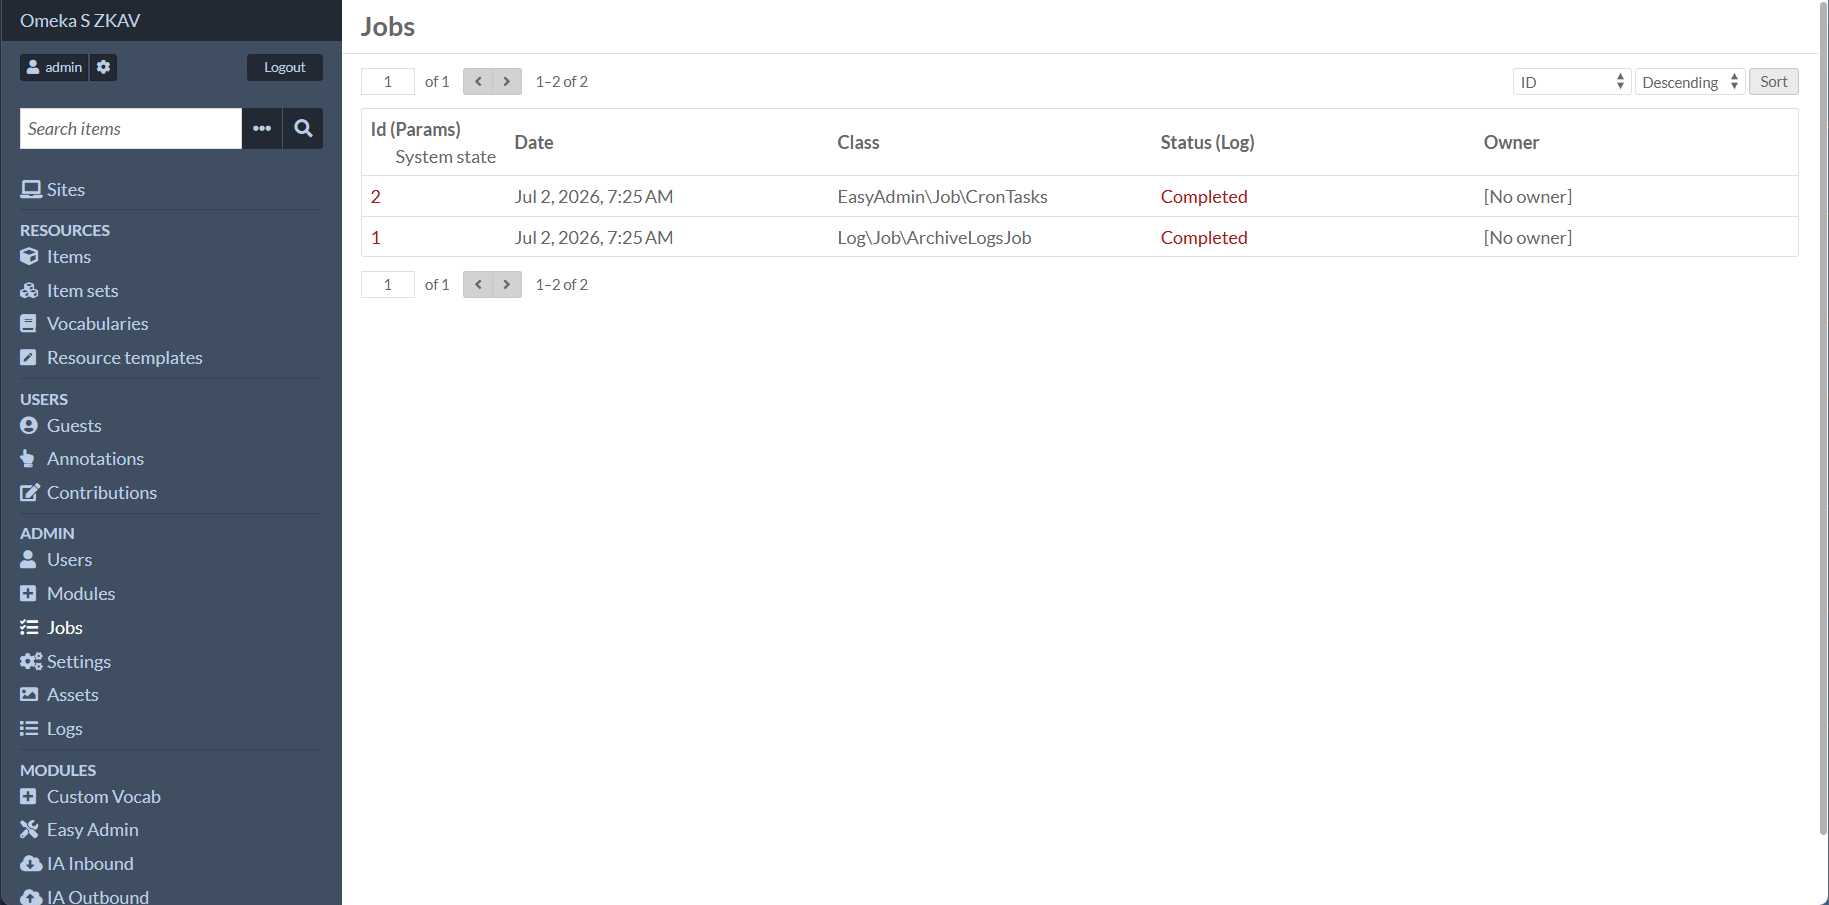
3) Confirm background jobs aren’t stuck
- Go to Jobs.
- If jobs are continuously failing, fix that first (IA sync relies on jobs for import/publish).
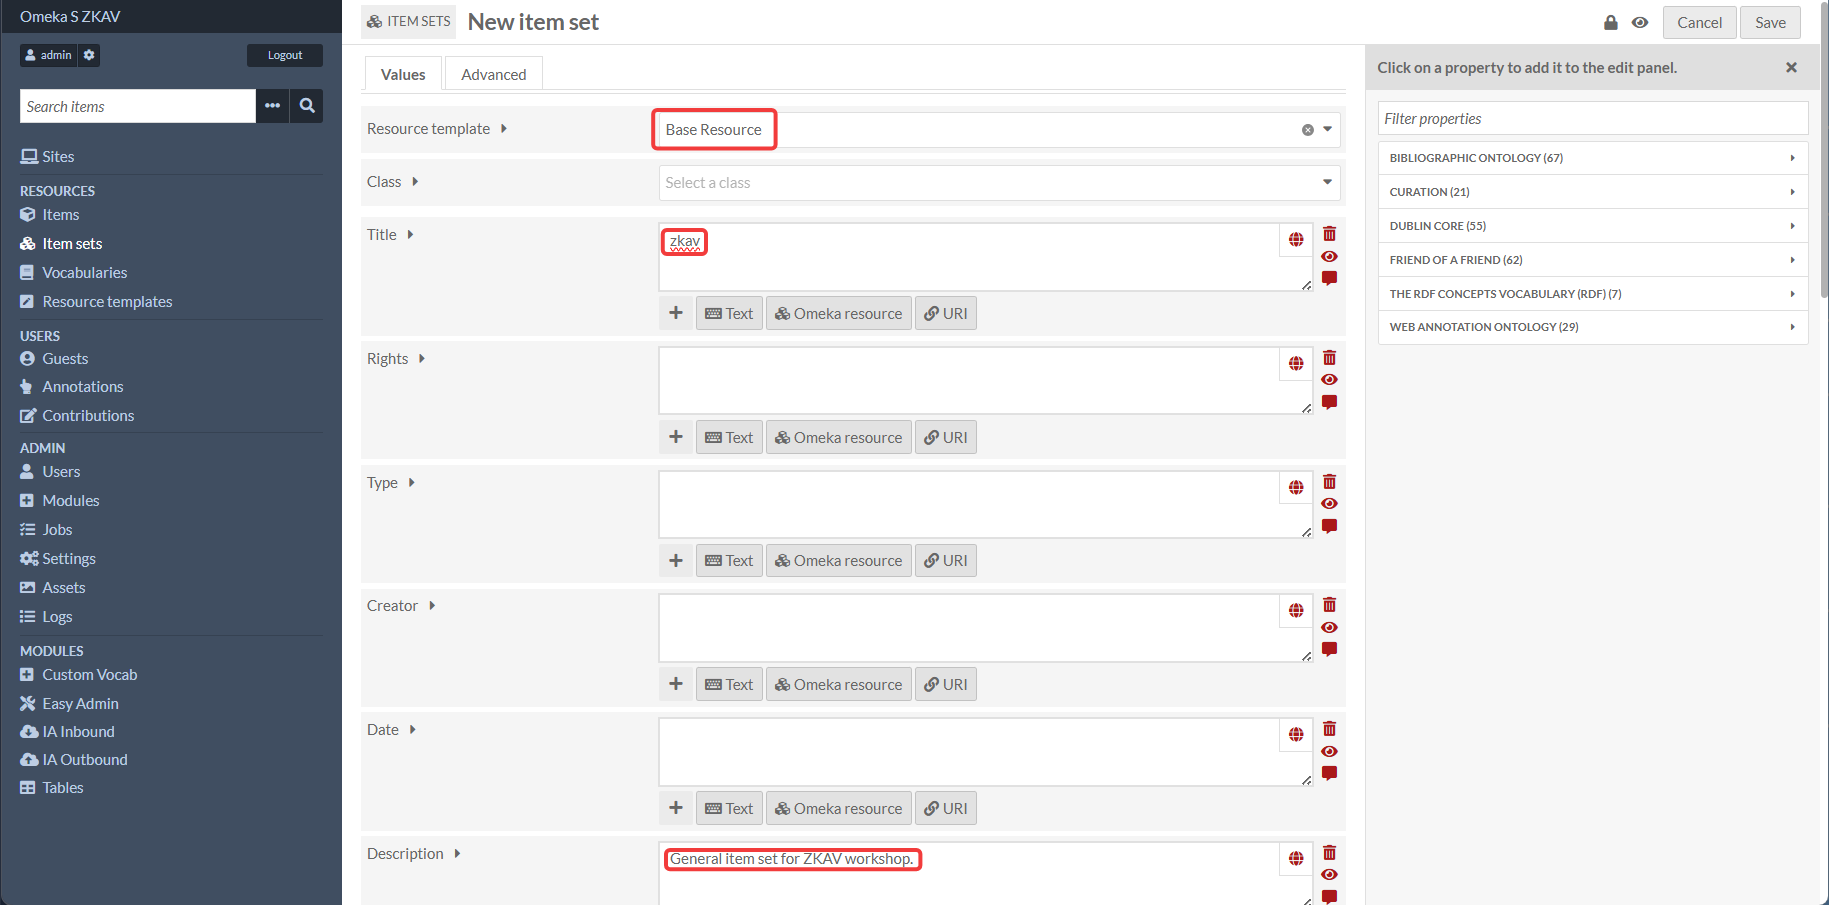
Create a General Item Set
For use with modules, it is recommended to create a general item set that all items in your site will be added to.
- Go to Item sets → Add new item set
- Resource template:
Base Resource(Base Resource is the default resource template for Omeka S, and is the most common resource template for items.) - NOTE: You can change the resource template later, but in most cases it isn't necessary.
- Class: You can leave this blank (for most purposes, a class is not necessary)
- Title:
zkav(or similar) - Description:
General item set for ZKAV workshop(or similar) - Save.
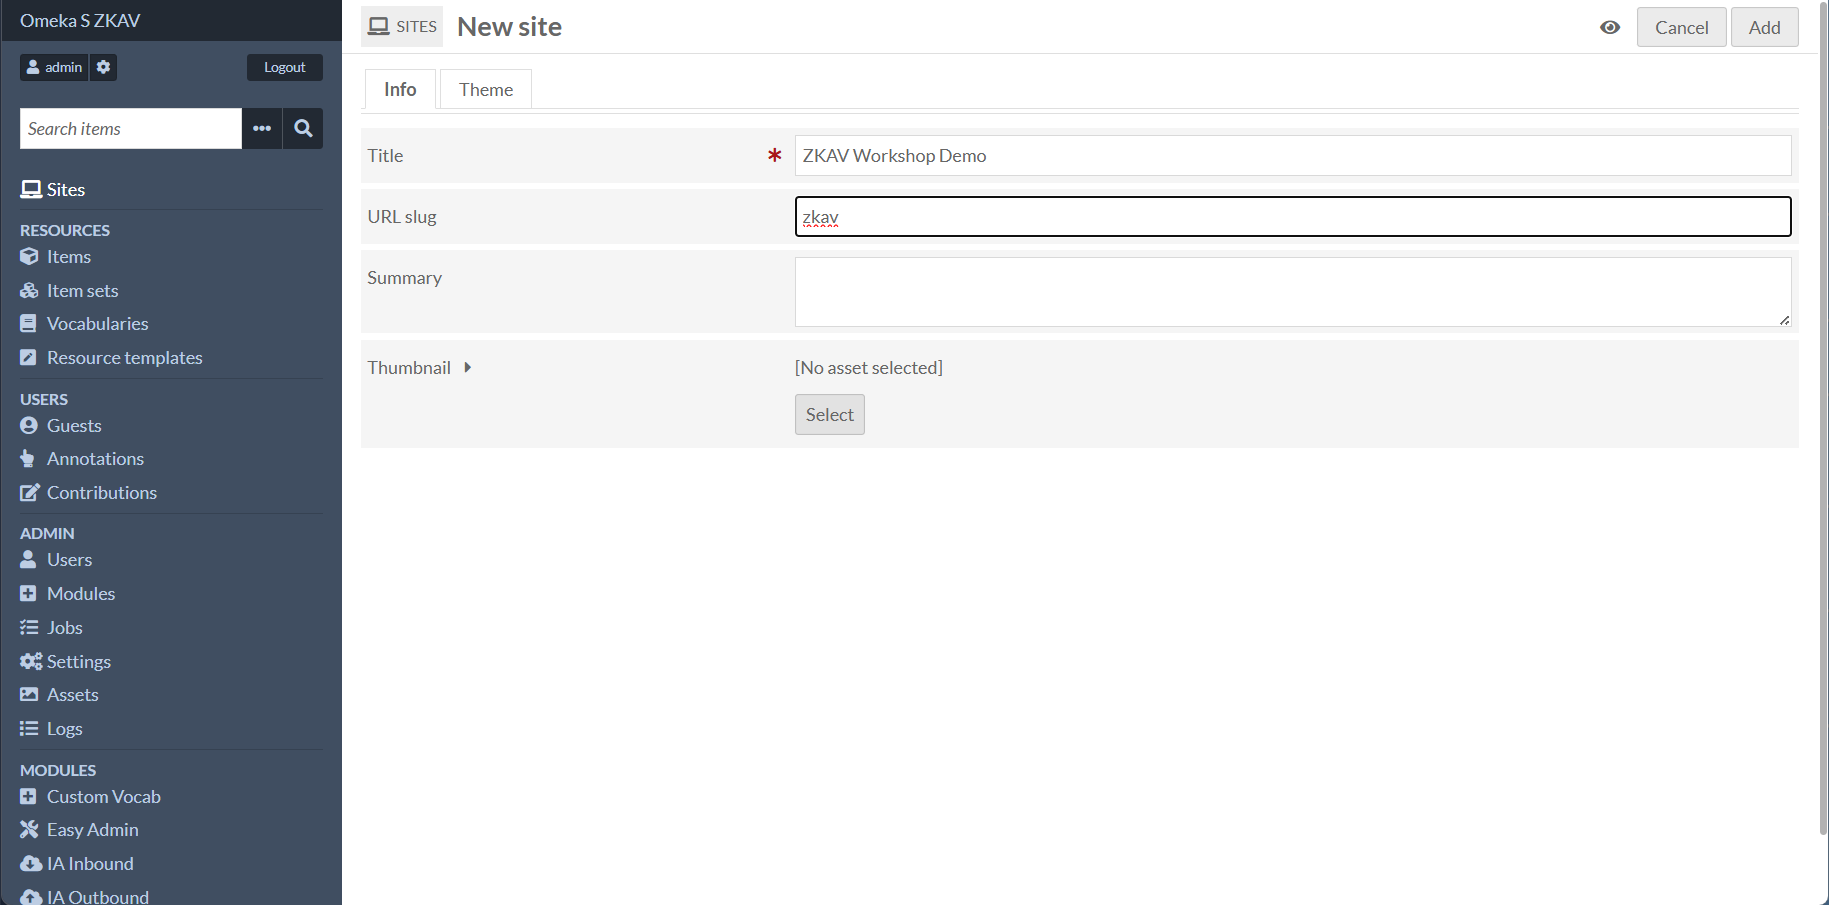
Create a site (and assign the theme)
1) Create the site
- Go to Sites.
- Click Add new site.
- Set:
- Title: choose any workshop-friendly name (e.g. “ZKAV Workshop Site”)
- Slug: choose a short slug (e.g.
zkav)
You’ll use the slug in URLs like:
http://localhost:8090/s/[your-site-slug]
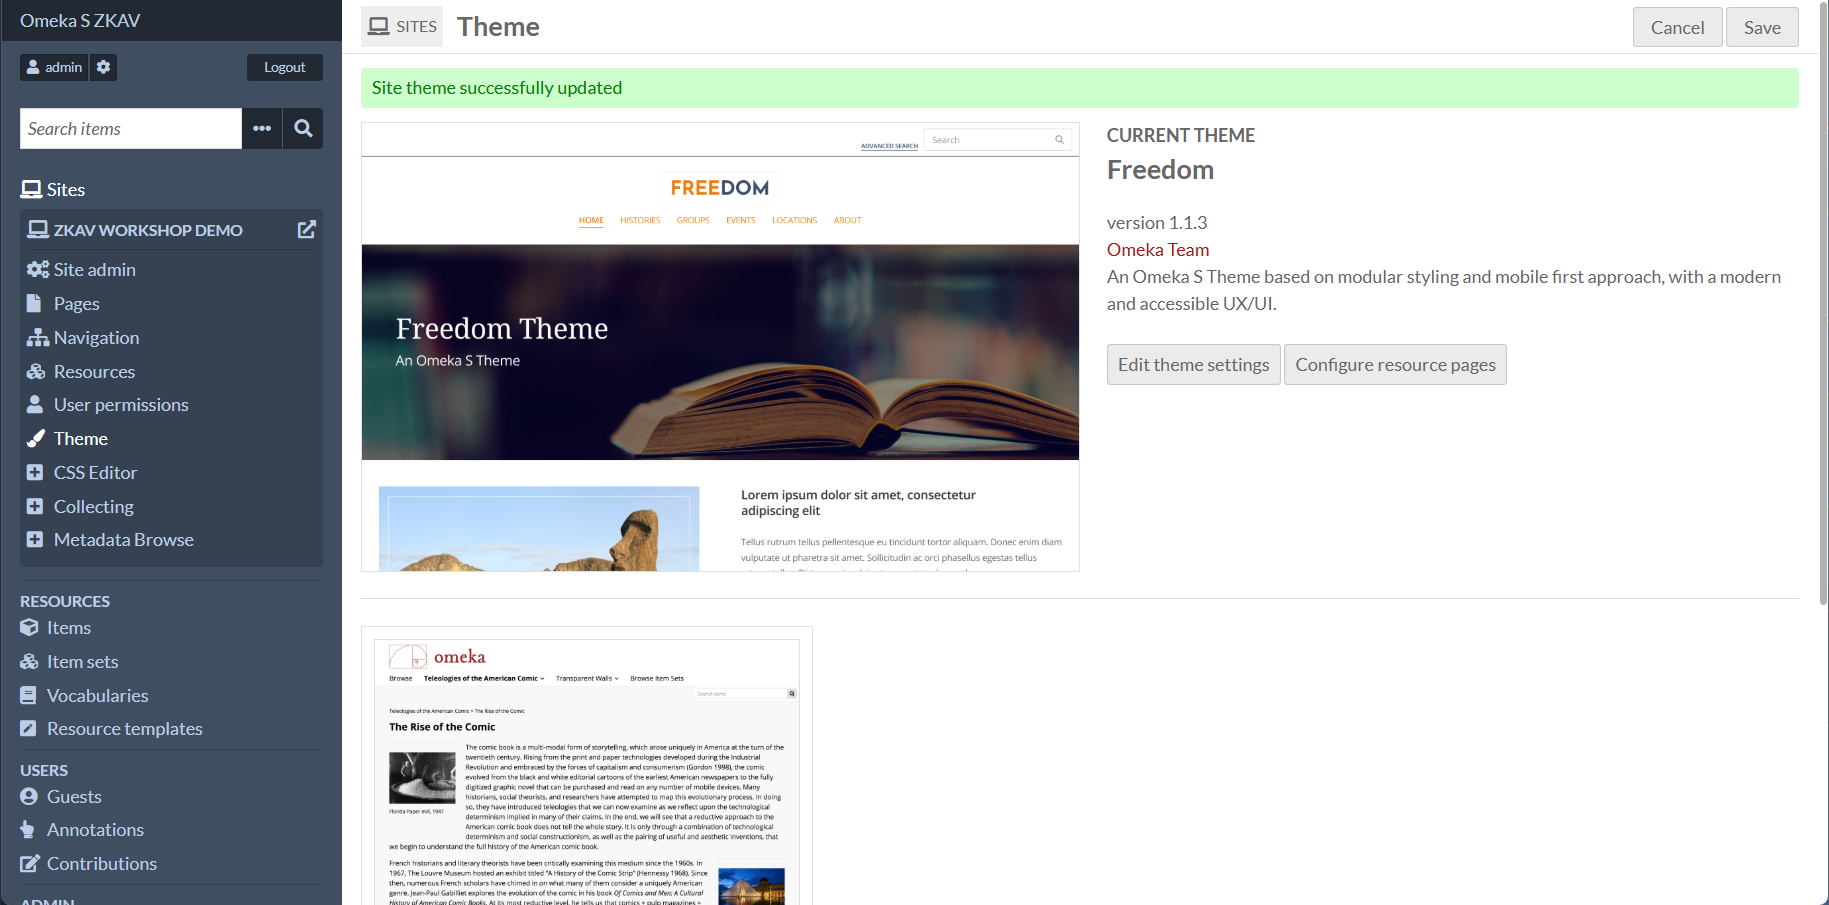
2) Choose the theme
- Go to Sites → [your site] → Theme.
- Select Freedom (the custom Freedom theme fork).
- Save.
Guest accounts (registration + login/logout)
Workshop default:
- Participants create their own account (open registration)
- The Contribute page is visible only when logged in
- Submissions can still be anonymous inside Collecting (form toggle)
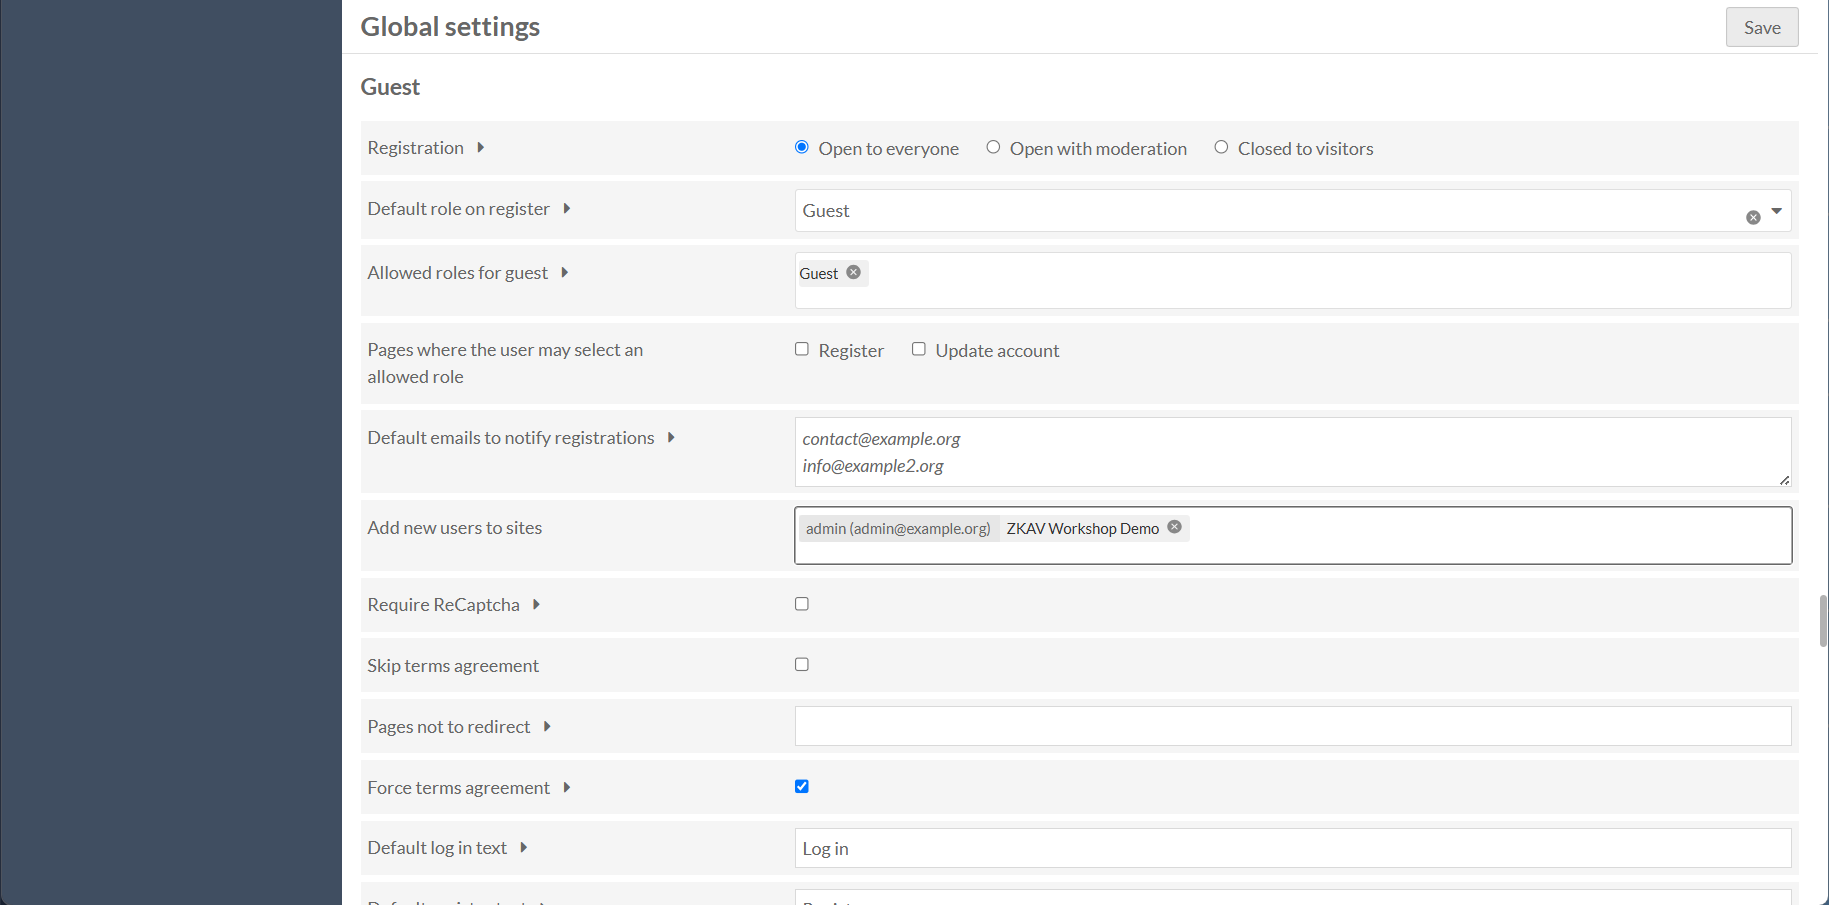
1) Enable registration on the site
- Go to Admin → Settings → Guest → Registration.
- Enable site registration ("Open to everyone").
- Save.
If you are using Mailpit (local dev email catcher), you can verify confirmation emails at:
http://localhost:8026
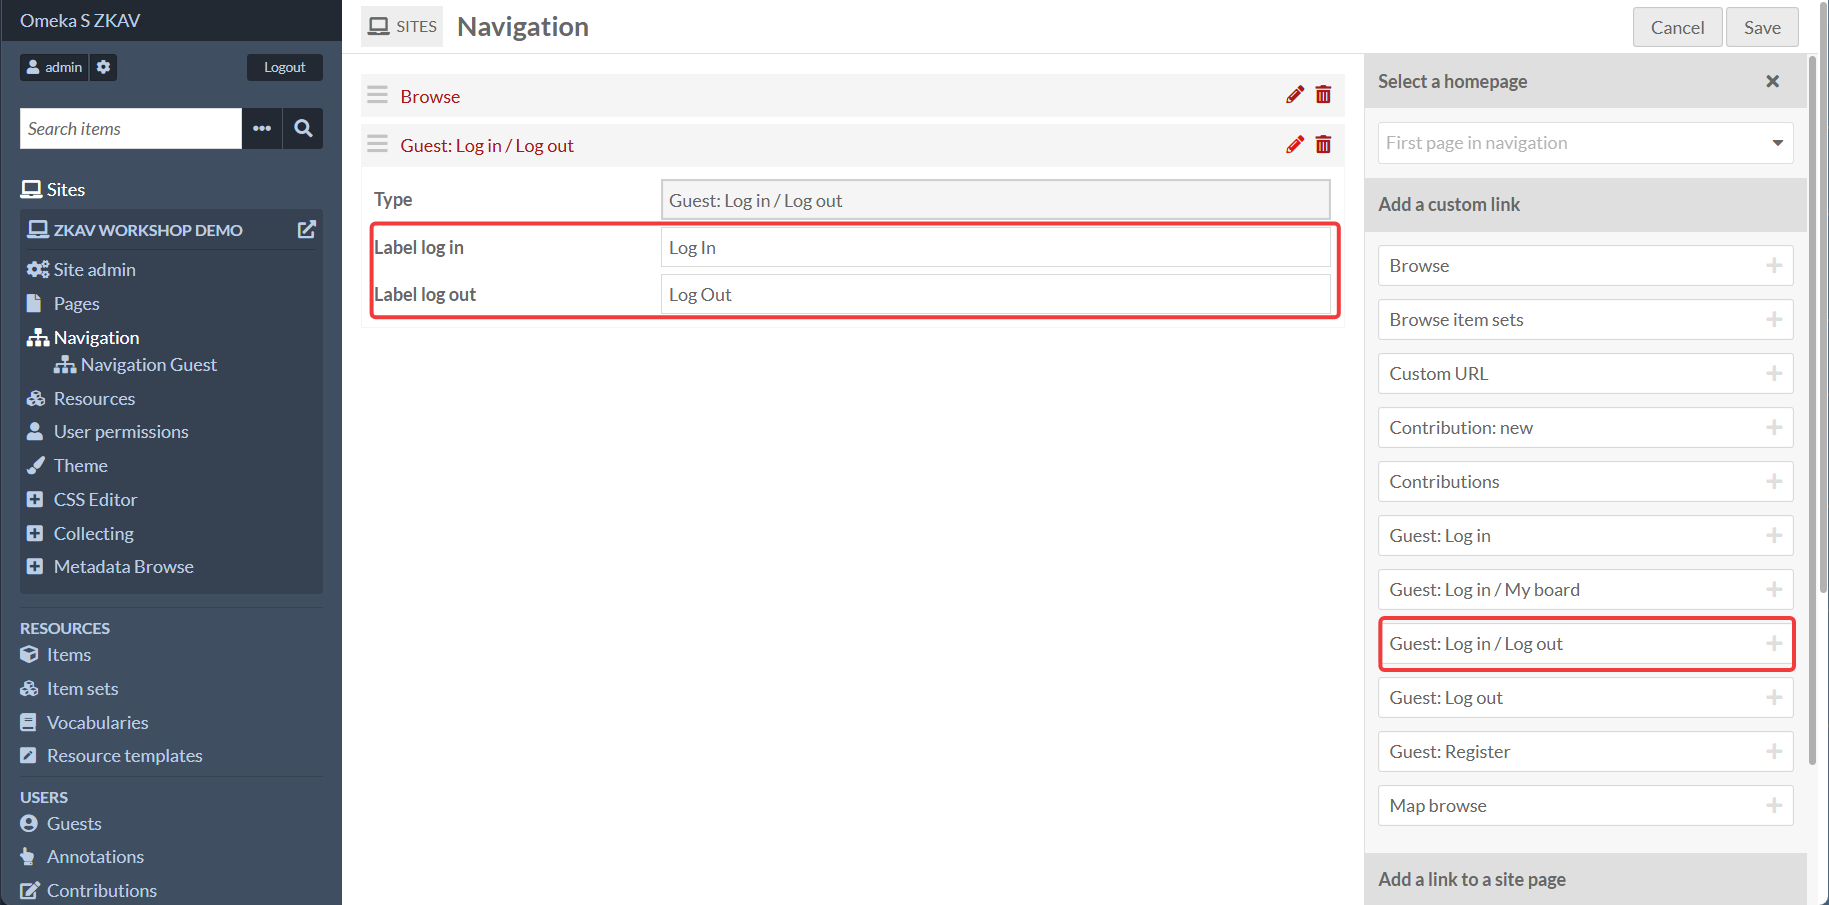
2) Add Login / Logout links to navigation
- Go to Sites → (pencil icon) → Navigation.
- In the right sidebar “Add a custom link”, use the prebuilt Guest links:
- Add: Guest: Log in / Log out
- Change Label log in to "Log in"
- Change Label log out to "Log out"
- Save the navigation.
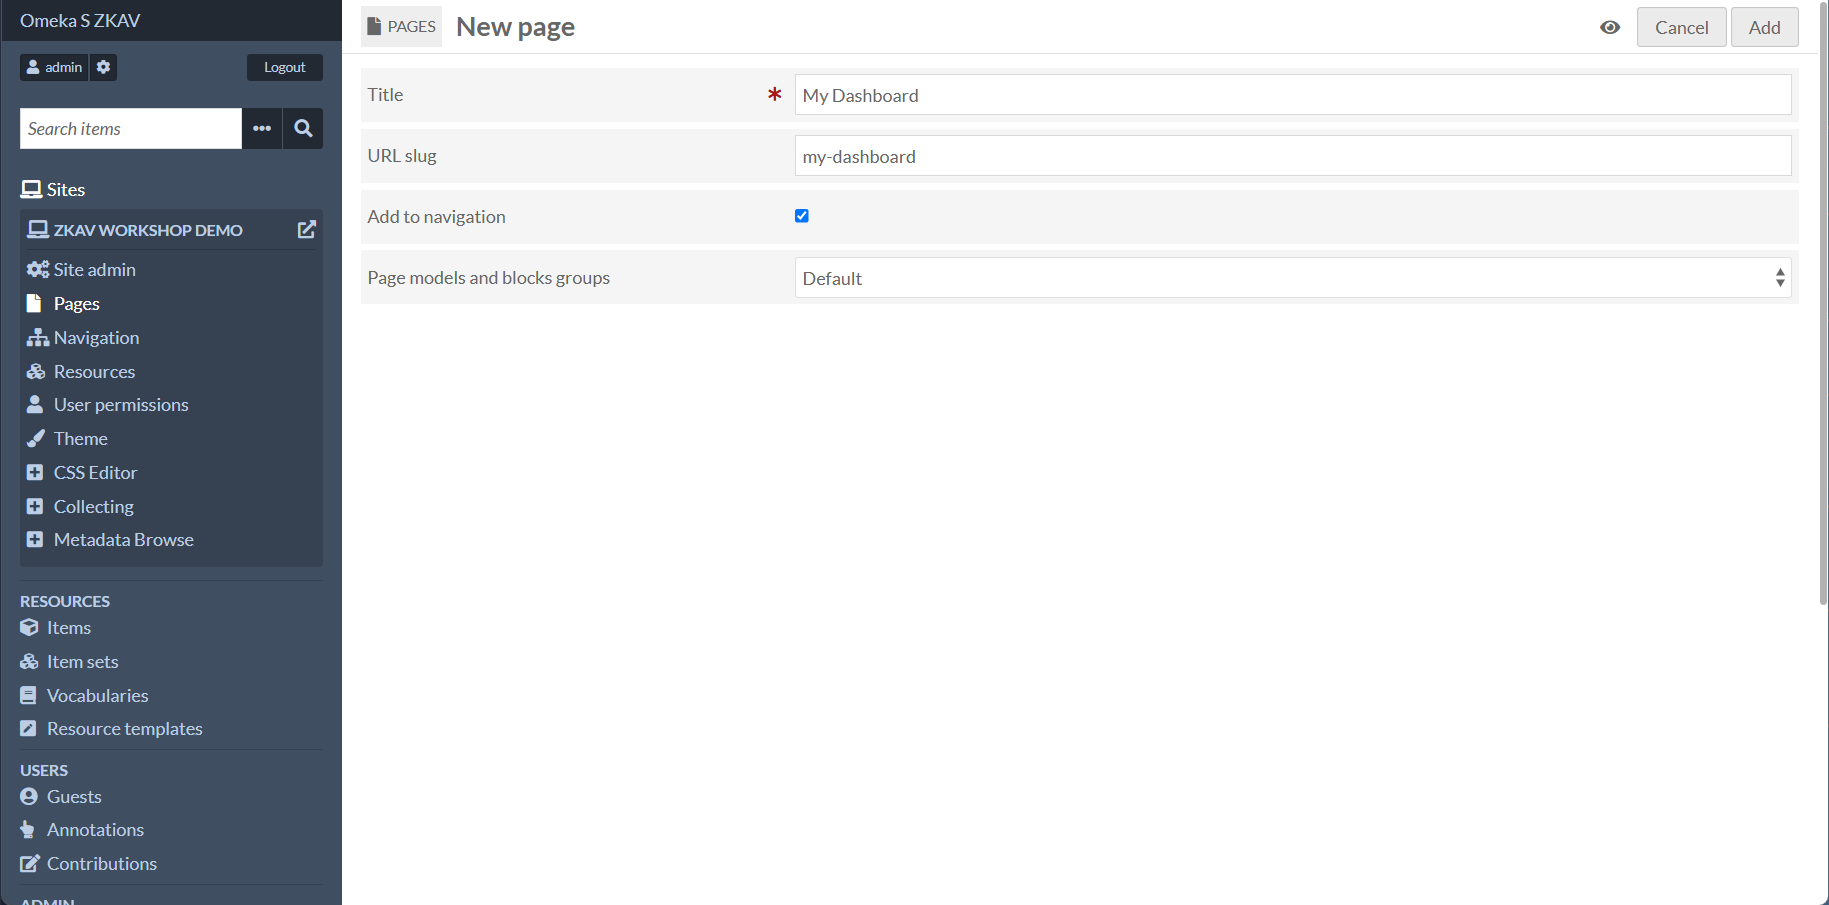
Create the “My Dashboard” page (custom HTML)
The default Guest “My board” / dashboard links may not match the pages we want. For this workshop, create a custom page named “My Dashboard” with an HTML block.
1) Create the page
- Go to Sites → (your site) → Pages.
- Click Add new page.
- Set:
- Title:
My Dashboard - Slug:
my-dashboard
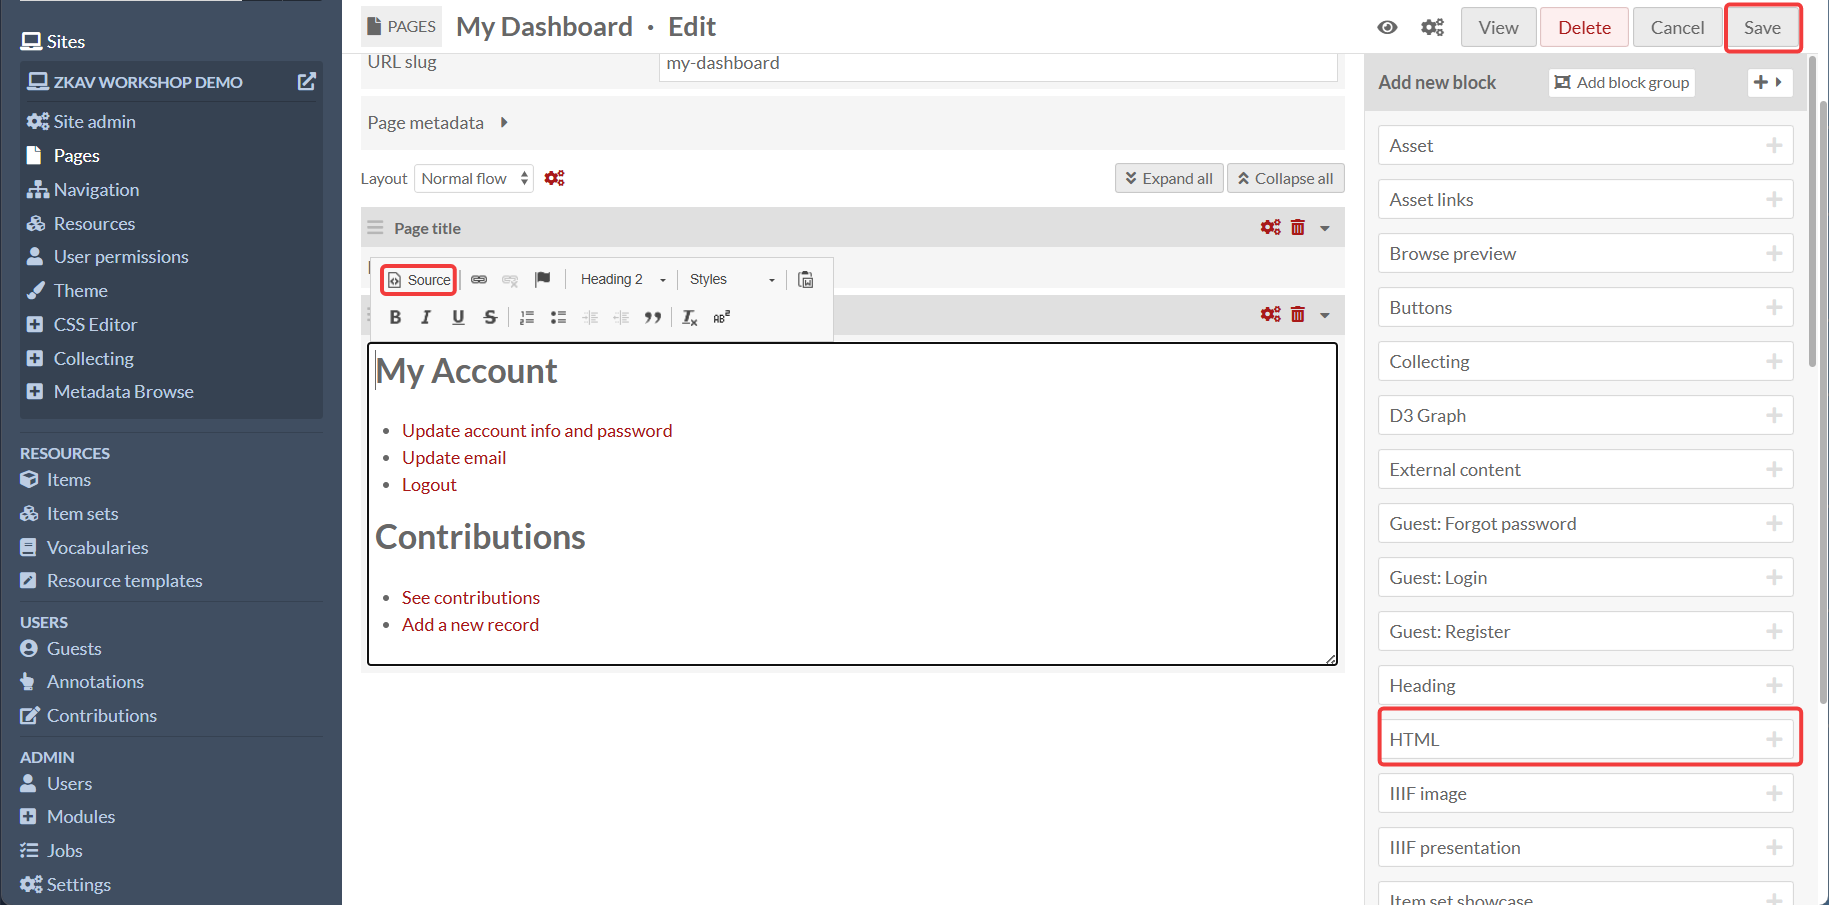
2) Add an HTML block with these links
On the page layout editor, add an HTML block and paste this (then replace [your-site-slug]):
<h2>My Account</h2>

<ul>
  <li><a href="http://localhost:8090/s/[your-site-slug]/guest/update-account">Update account info and password</a></li>
  <li><a href="http://localhost:8090/s/[your-site-slug]/guest/update-email">Update email</a></li>
  <li><a href="http://localhost:8090/s/[your-site-slug]/guest/logout">Logout</a></li>
</ul>

<h2>Contributions</h2>

<ul>
  <li><a href="http://localhost:8090/s/[your-site-slug]/guest/contribution">See contributions</a></li>
  <li><a href="http://localhost:8090/s/[your-site-slug]/page/contribute">Add a new record</a></li>
</ul>
Save the page.
3) Add “My Dashboard” to navigation (authenticated only)
- Go to Sites → [pencil icon] → Navigation.
- Add a link to the page you just created.
- Set Roles filter → Authenticated users only.
- Save.
Role-based navigation (show links only after login)
This instance includes RoleBasedNavigation, which adds a Roles filter selector to core navigation links (Page, URL, Browse Items, Browse item sets).
Use it to ensure pages like “Contribute” (yet to be created) and “My Dashboard” (created in the previous step) appear only for authenticated users.
Important limitation: Role-based navigation is a display filter, not a permission system. If a user knows a URL, they may still reach it unless permissions also block it.
How to use the Roles filter in navigation
- Go to Sites → [pencil icon] → Navigation.
- Click the pencil icon on a navigation link to edit it.
- In Roles filter:
- Leave empty → visible to everyone
- Select roles → visible only to those roles
- Role filter: Authenticated users only
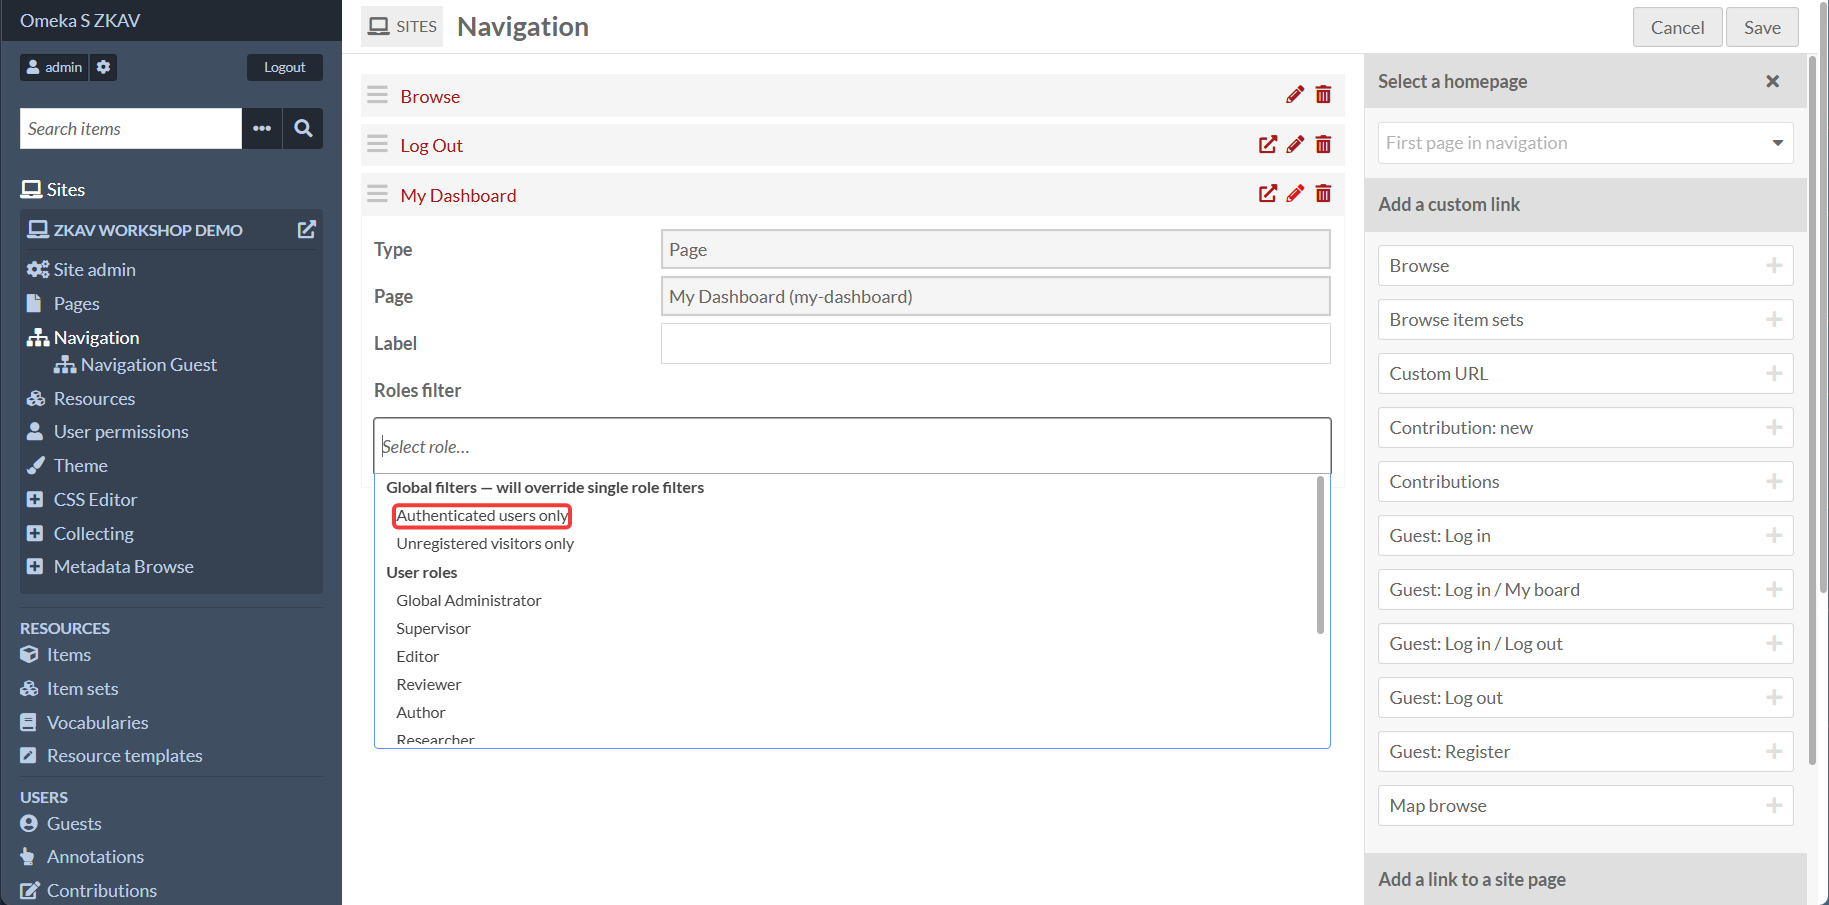
NOTE: The screenshot shows the navigation page with the Roles filter set to "Authenticated users only" for the custom "My Dashboard" page. You should repeate this step after creating the custom "Contribute" page with your Collecting Module form (see below).
Build the Contribute page (Collecting form on a custom page)
In this workshop, the “Contribute” page is a custom site page containing the Collecting form block.
Goal
- Only logged-in users can see the Contribute page
- The Collecting form can still allow anonymous submissions (useful when someone is logged in but submits “as anonymous”)
- Submissions should not be public until reviewed
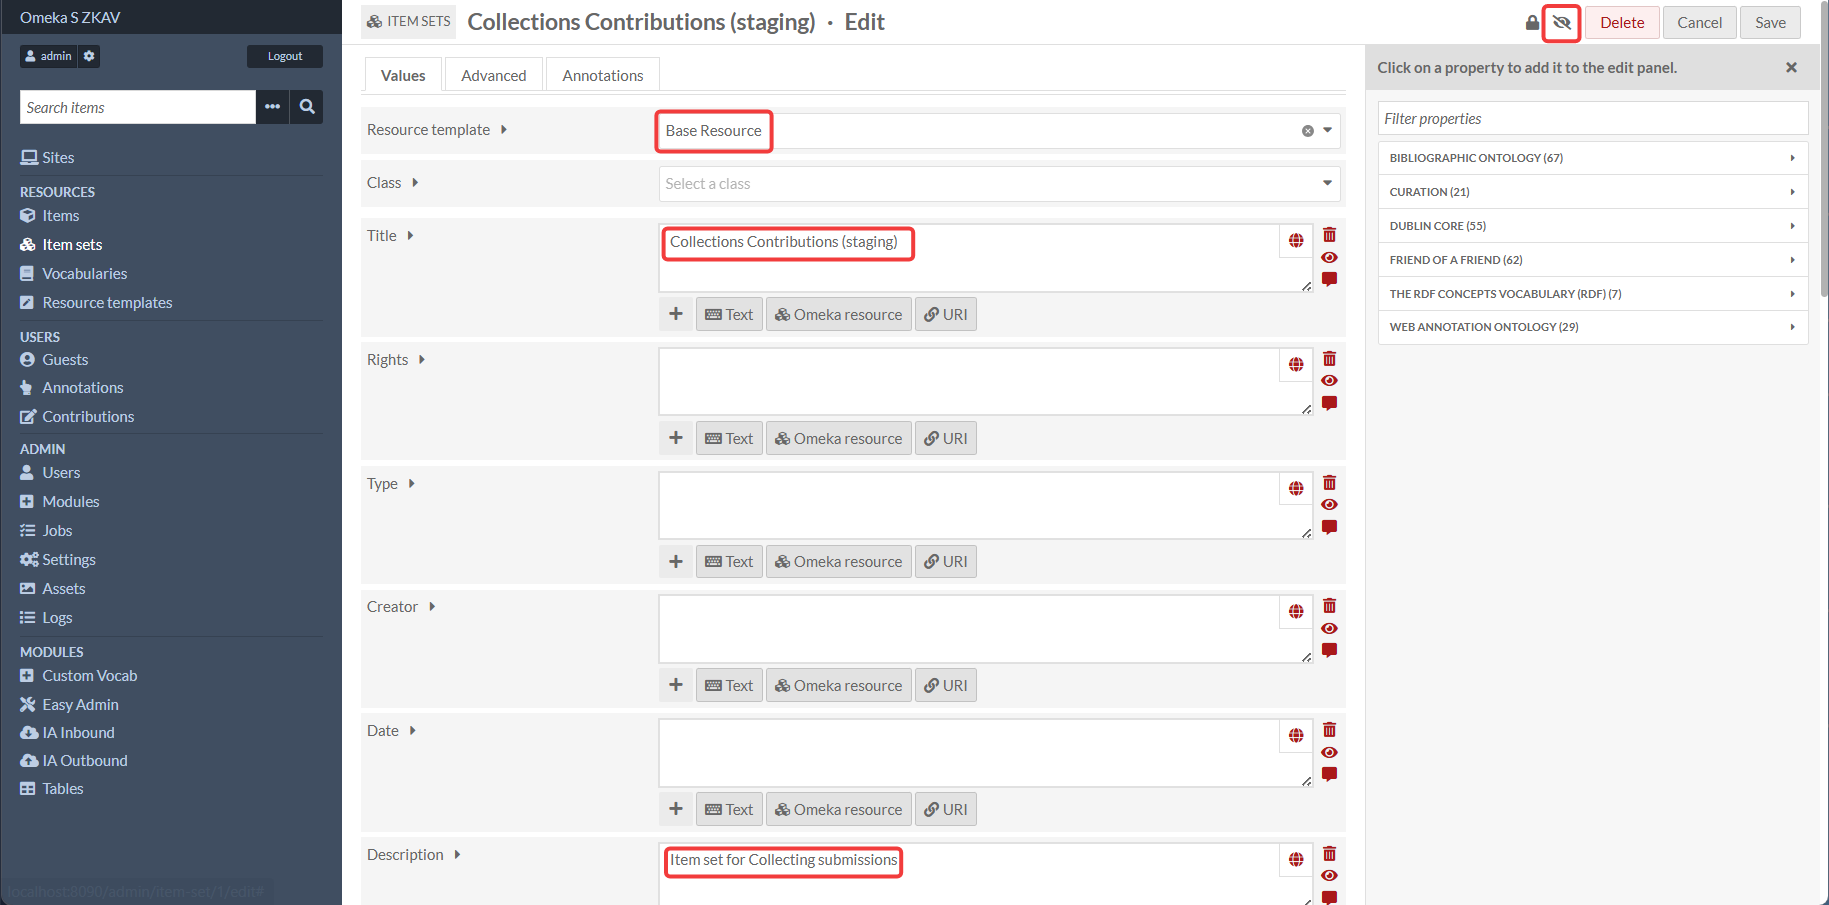
1) Create an item set for Collecting submissions (recommended)
- Go to Item sets → Add new item set.
- Resource template:
Base Resource(Base Resource is the default resource template for Omeka S, and is the most common resource template for items.) - Class: You can leave this blank (for most purposes, a class is not necessary)
- Title:
Collections Contributions (staging)(or similar) - Description:
Item set for Collecting submissions(or similar) - Important: Click the Eye Icon to make the item set PRIVATE.
- This makes sure that items submited for review are not visible to the public until they are reviewed.
- Site administrators will however see private items on the front end website.
- If you want to see how the site will appear for a non-loggend in visitor, you must log out.
- Save.
This item set will hold items created by the Collecting form.
2) Create a Collecting form
- Go to Sites → [your site] → Collecting.
- Click Add a form.
- Configure:
- Item set: choose your staging item set
- Anonymous submissions: enable (this is the Collecting toggle)
- Keep other settings simple for the workshop
- Add fields needed for the workshop (title, description, date, etc.) by clicking the "Add prompt" button.
- **Important**: you MUST add a media upload option. The IA Outbound Module will not work without a media item attached to the submission.
- Click "Add prompt"
- For "Prompt type", select "Item Media"
- For "Media type", select "Upload Multiple"
- Add prompt text
- Tick the "Required?" checkbox
- Click "Add changes"
- Save the form.
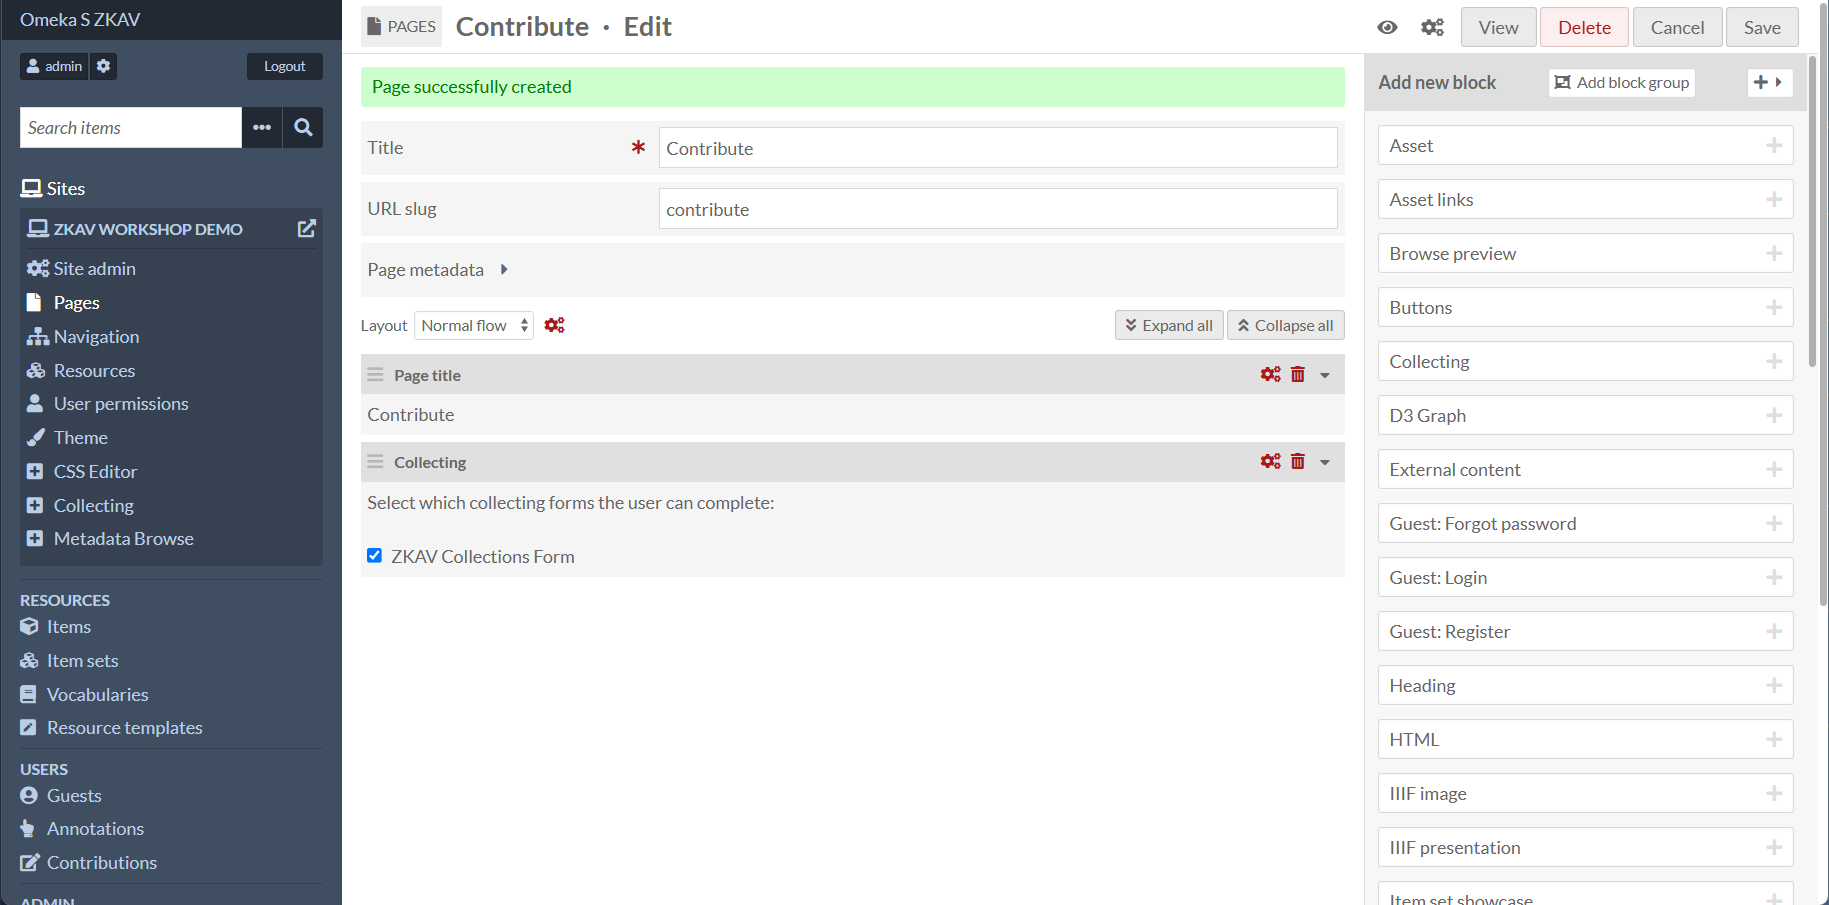
3) Create a page called “Contribute” that embeds the Collecting form
- Go to Sites → [your site] → Pages → Add new page.
- Set:
- Title:
Contribute - Slug:
contribute
4) Add “Contribute” to navigation (authenticated only)
- Go to Sites → (pencil icon) → Navigation
- Add the
Contributepage - Set Roles filter → Authenticated users only
- Save.
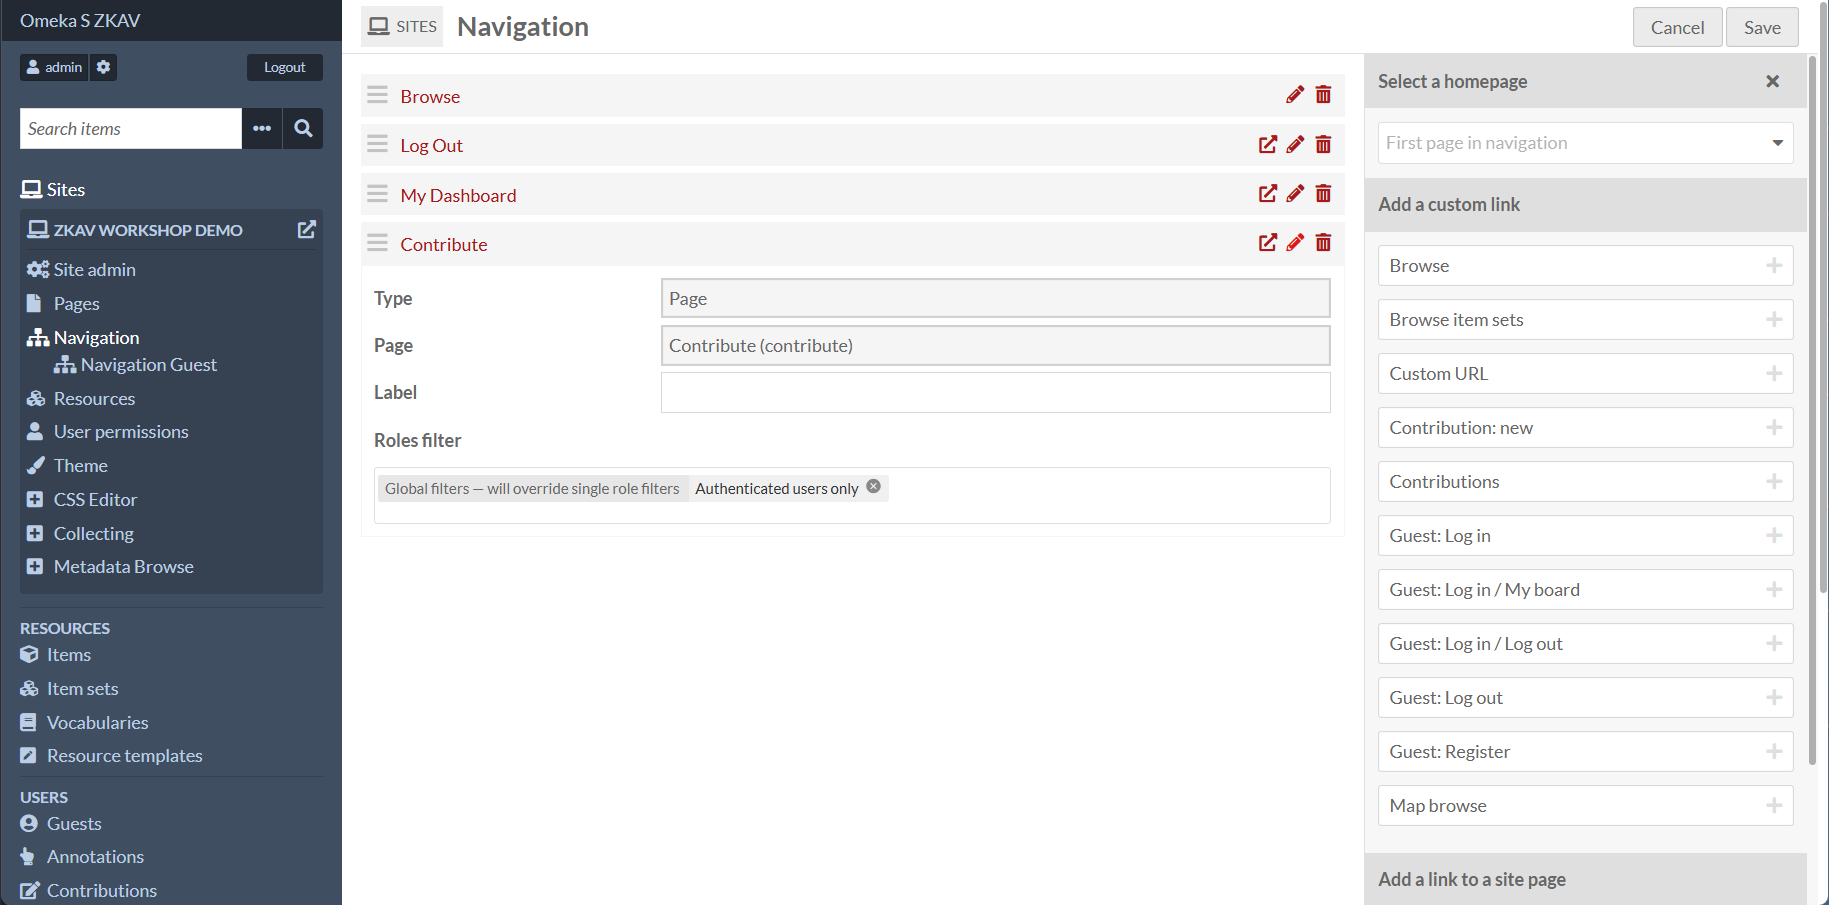
You may also rearrange the order of the navigation items by dragging and dropping.
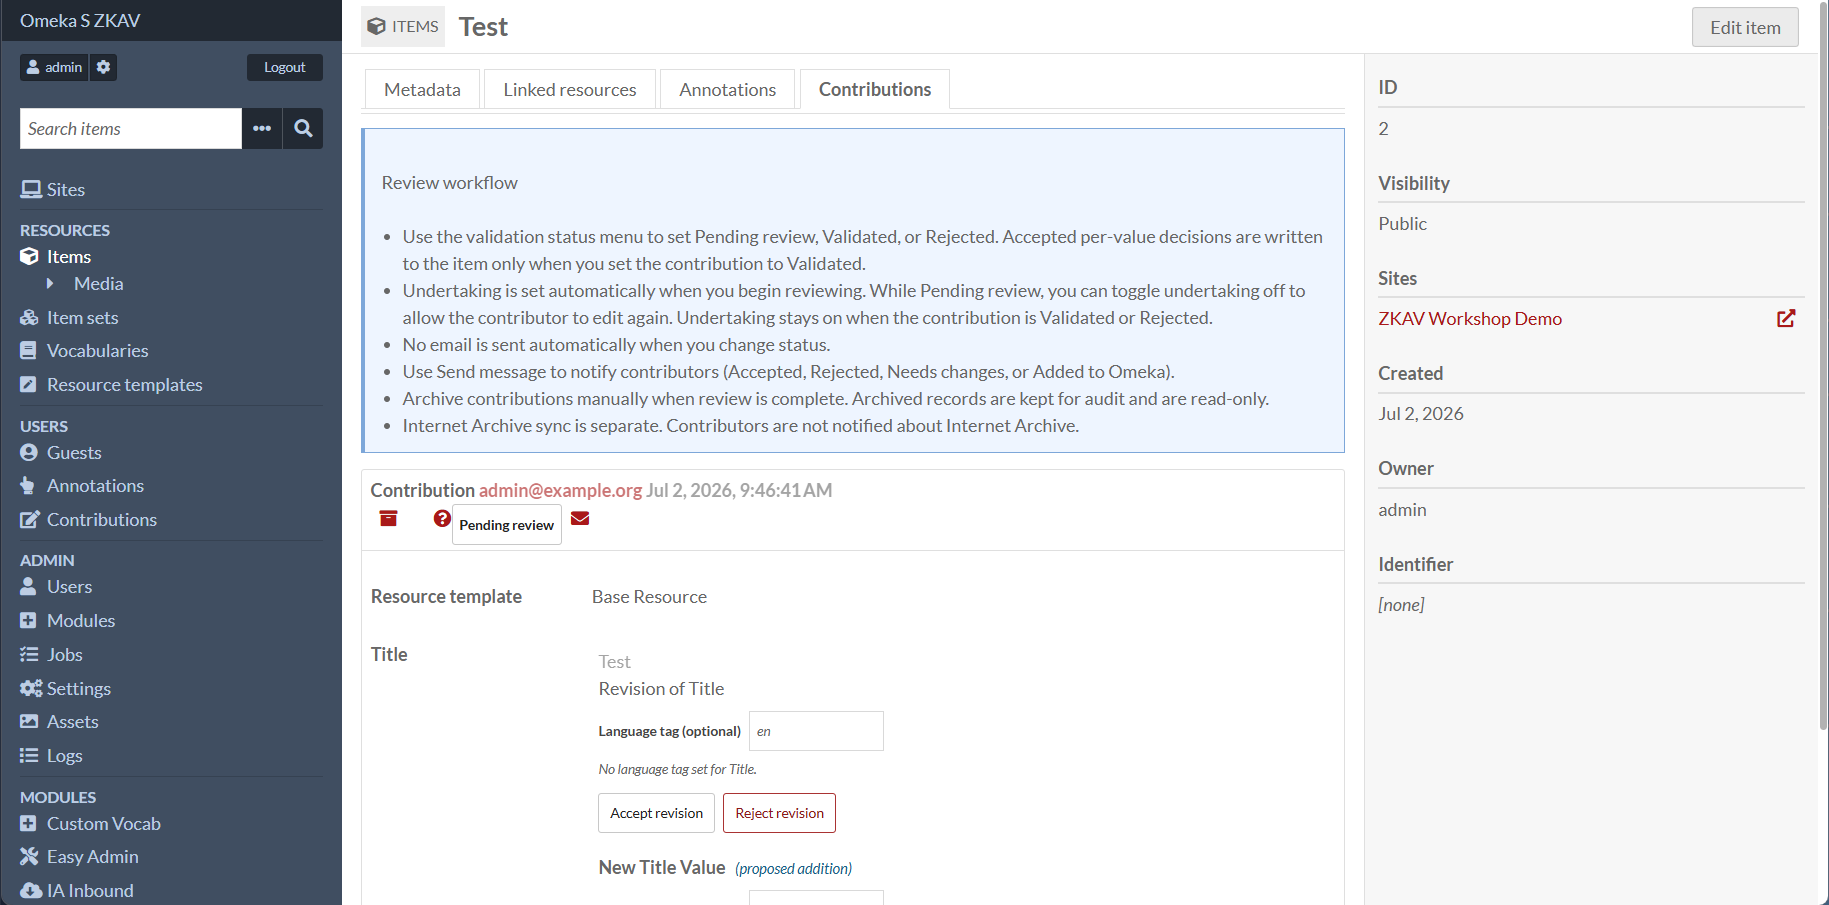
Contribute module (metadata revisions workflow)
The Contribute module supports *editing* contributions (metadata revisions). In this workshop, this workflow is treated as an advanced optional lab, because it works best when items are already linked to Internet Archive identifiers.
Minimum expectation for the workshop:
- Contribute is installed and active
- “Base Resource” resource template exists (default Omeka S template)
If Contribute asks you to pick a resource template for contributions, choose Base Resource.
Mapping (map browse + item map)
If you want a map browse experience:
1) Create a Map browse page/link
- Go to Sites → (pencil icon) → Navigation
- Add a navigation link:
- Type: Map browse (if available), or a page that includes a Mapping block
- Save.
To see items on the map, you must add mapping data to an item in Omeka S. See the Mapping Module documentation for more details.
Enabling The Contribution Module (Contribute)
The Contribute module is used to create contributions to already existing items in Omeka S. This is useful for letting guests submit/propose metadata revisions to items in Omeka S.
1) Enable the Contribute module
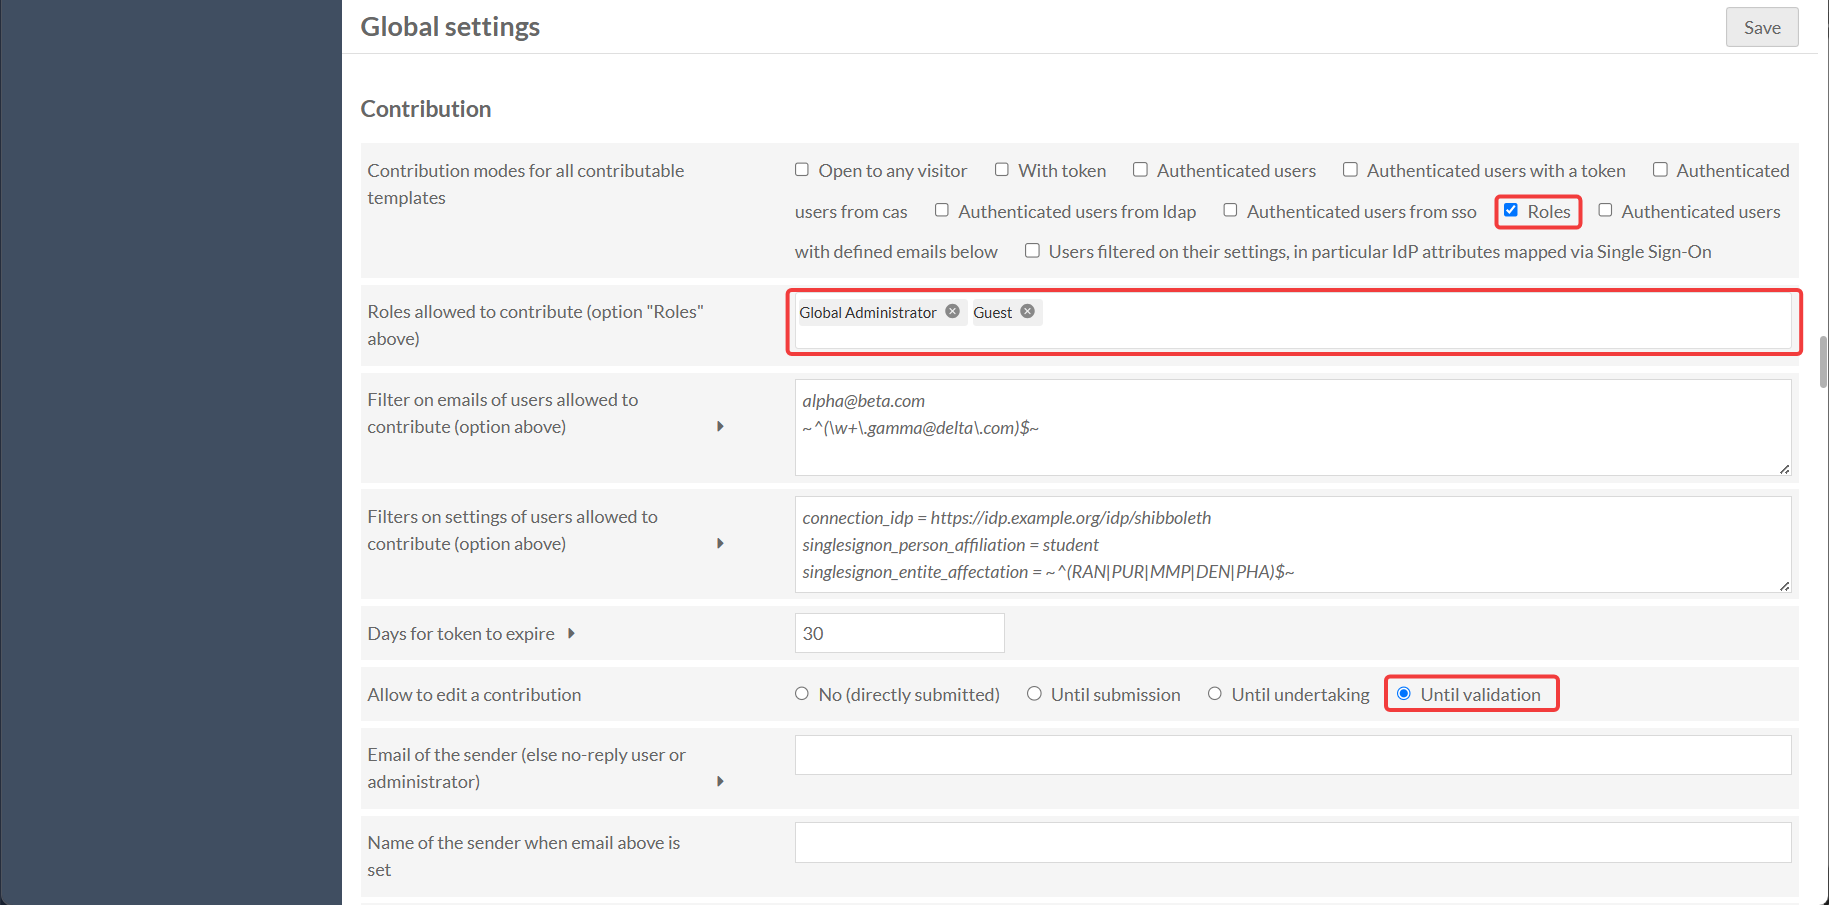
- Go to Admin → Settings → Contribution
- Select "Roles" for "Contribute modes for all contributable templates"
- For "Roles allowed to contribute", select Global Administrator and Guest
- For "Allow to edit a contribution", it is recommended to select "Until validation"
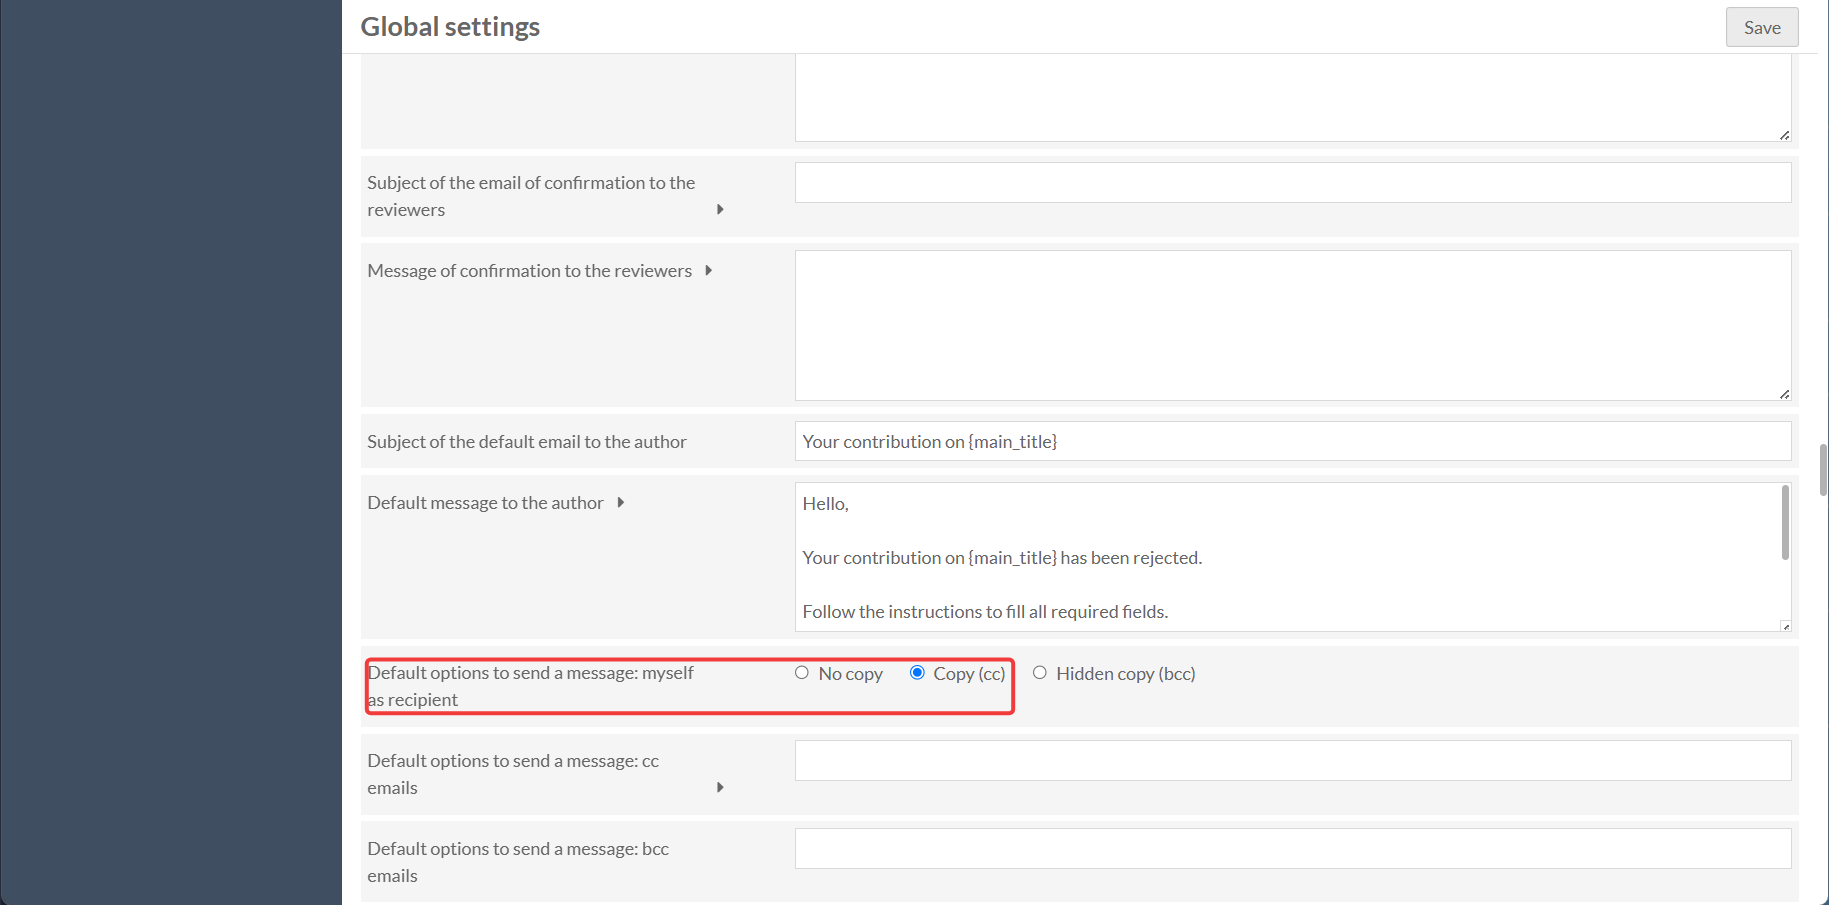
- You must also change "Default options to send a message: myself as recipient" to either Coppy (cc) or Hidden copy (bcc).
- You can adjust settings further to preference, but this is sufficient for the workshop.
- Save.
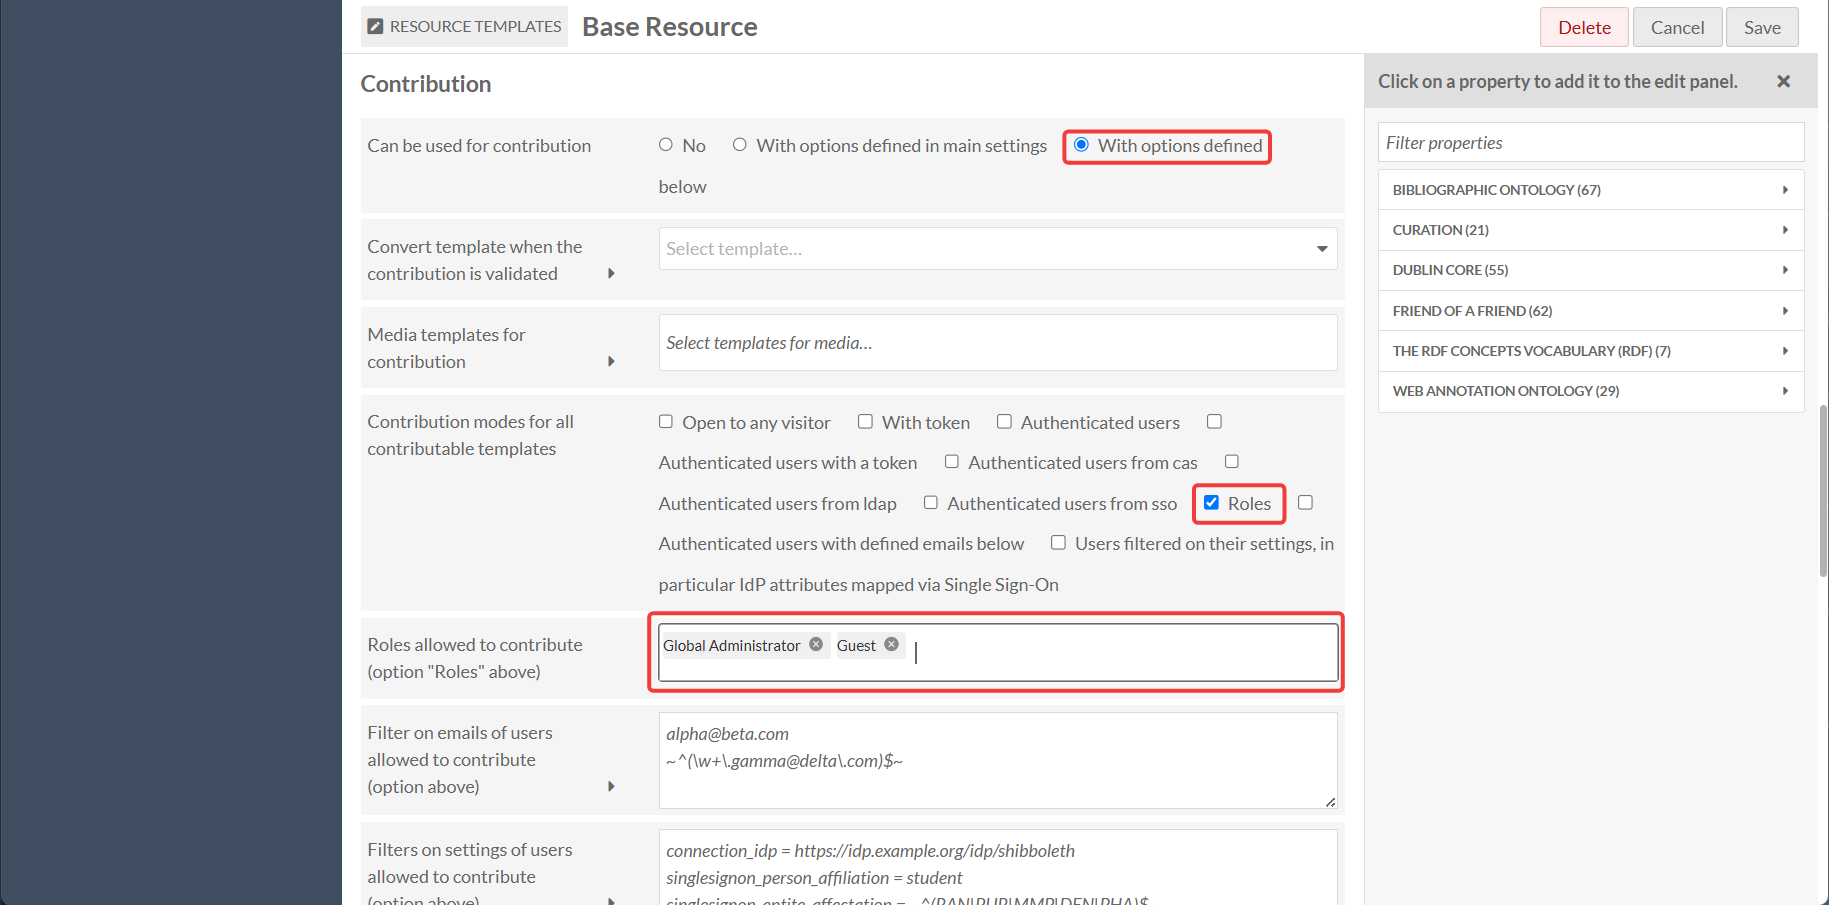
2) Enabling the Contribution module on specific pages and resources
- Go to Resources → Resource Templates → Base Resource → (pencil icon) → Template Settings → Contribution
- For "Can be used for contributions", select "With options defined below"
- For "Contribution modes for all contributable templates", select "Roles"
- For "Roles allowed to contribute", select Global Administrator and Guest
- Save.
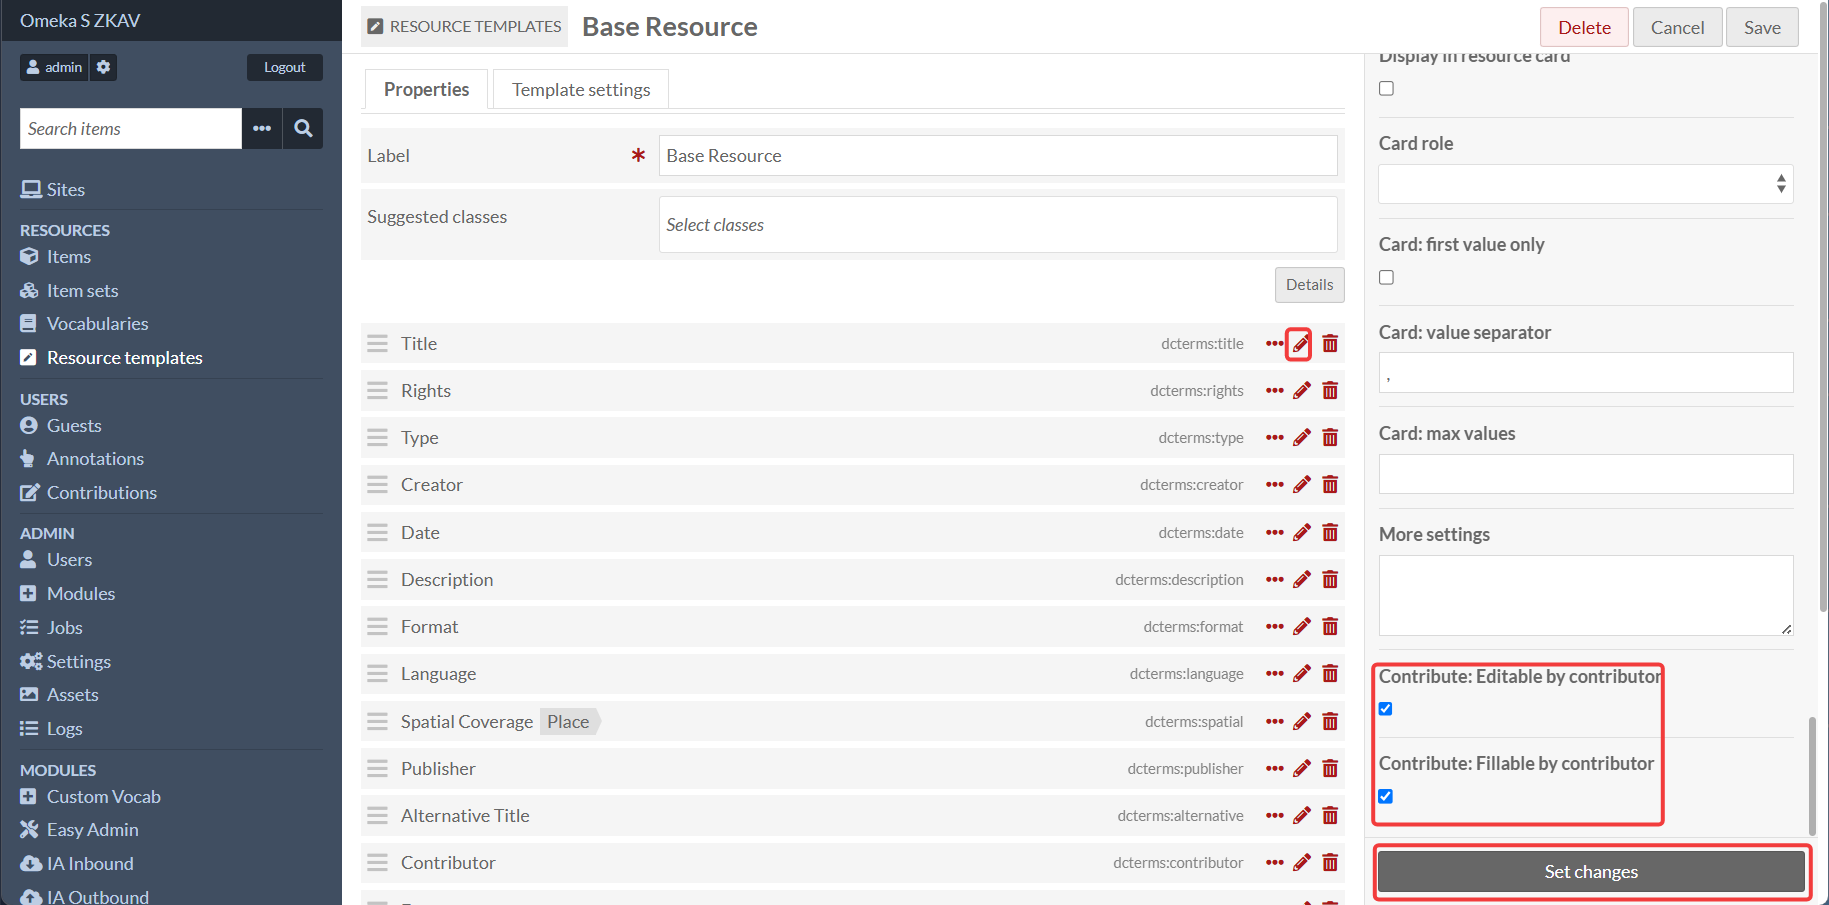
3) Selecting when metadata is editable and fillable via the Contribute module
- Go to Resources → Resource Templates → Base Resource → (pencil icon)
- On each metadata field, click the "Edit" button to open the field editor (pencil icon).
- For every metadata item you want to be editable, scroll down to the bottom of the field editor and select Contribute: Editable by contributor"
- Editable fields are fields that can be edited by the contributor.
- For every metadata item you want to be fillable, scroll down to the bottom of the field editor and select Contribute: Fillable by contributor"
- Fillable fields are fields where the contributor can add new values to a field.
- Set changes and save.
4) Restricting the Contribute module to specific pages and resources
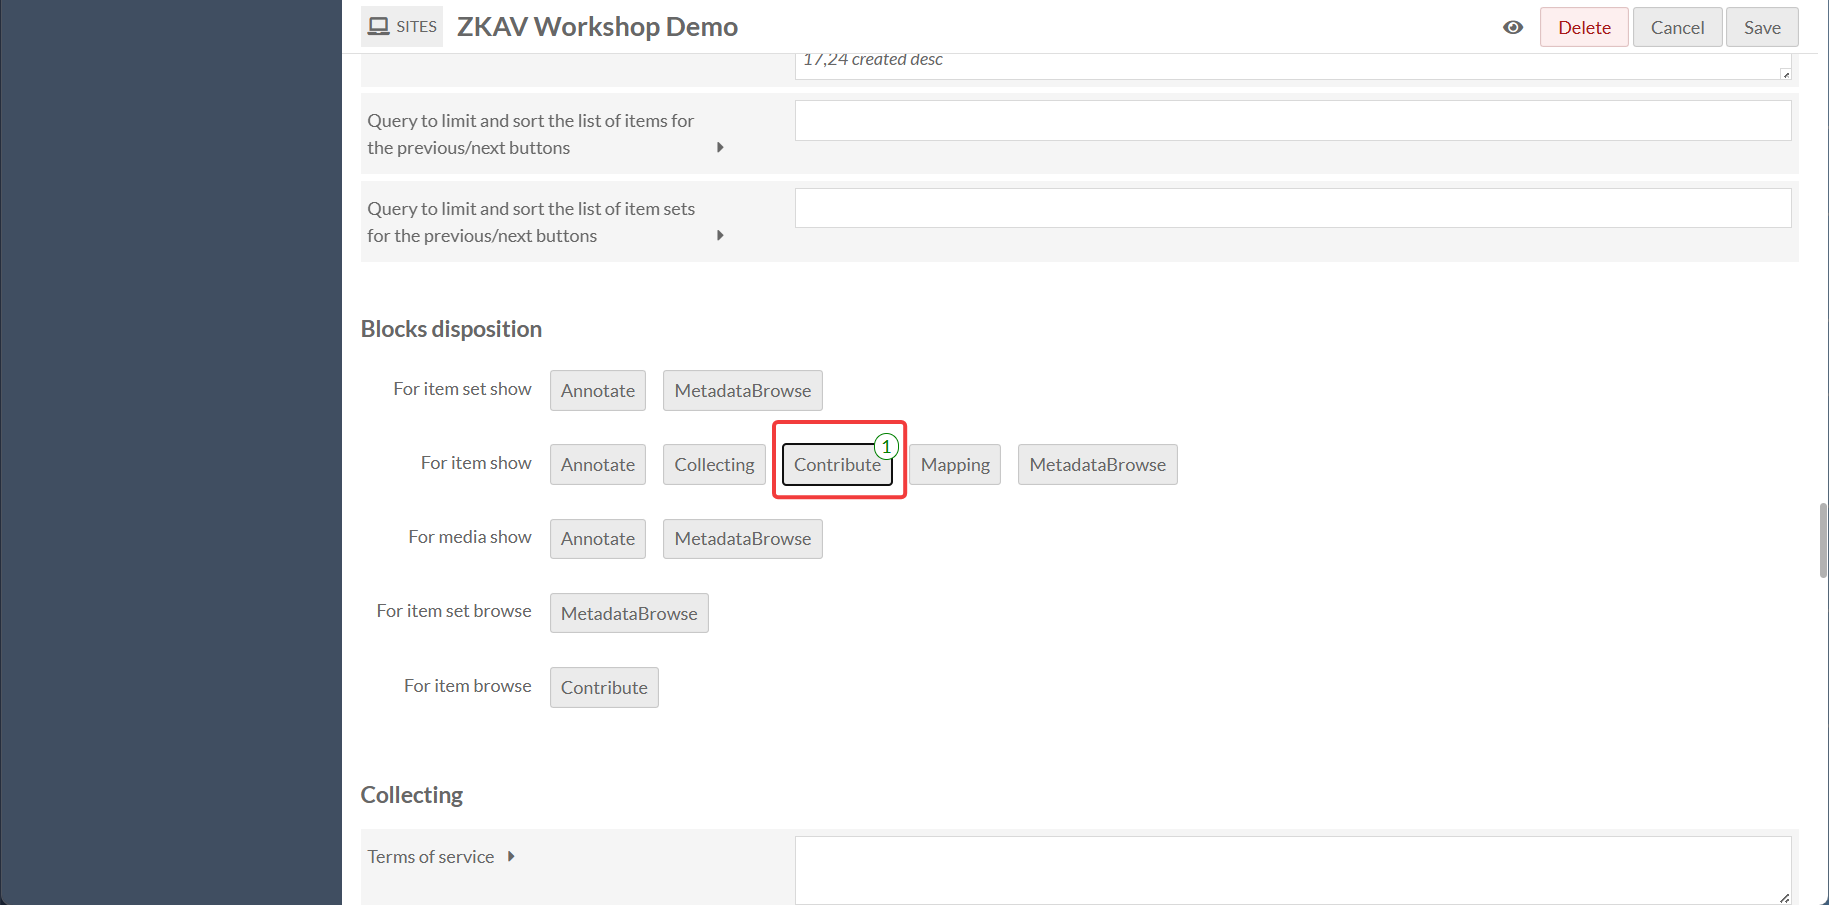
To restrict contributions to specific pages (for example: resource items, while excluding resource item sets) you must have the Blocks Disposition module installed.
- Go to Sites → (pencil icon) → Site Admin → Settings → Blocks Disposition
- Select "Contribute" for "For item show"
- This enables the Contribute module on the item show page only.
- Save.
5) Testing the Contribute module
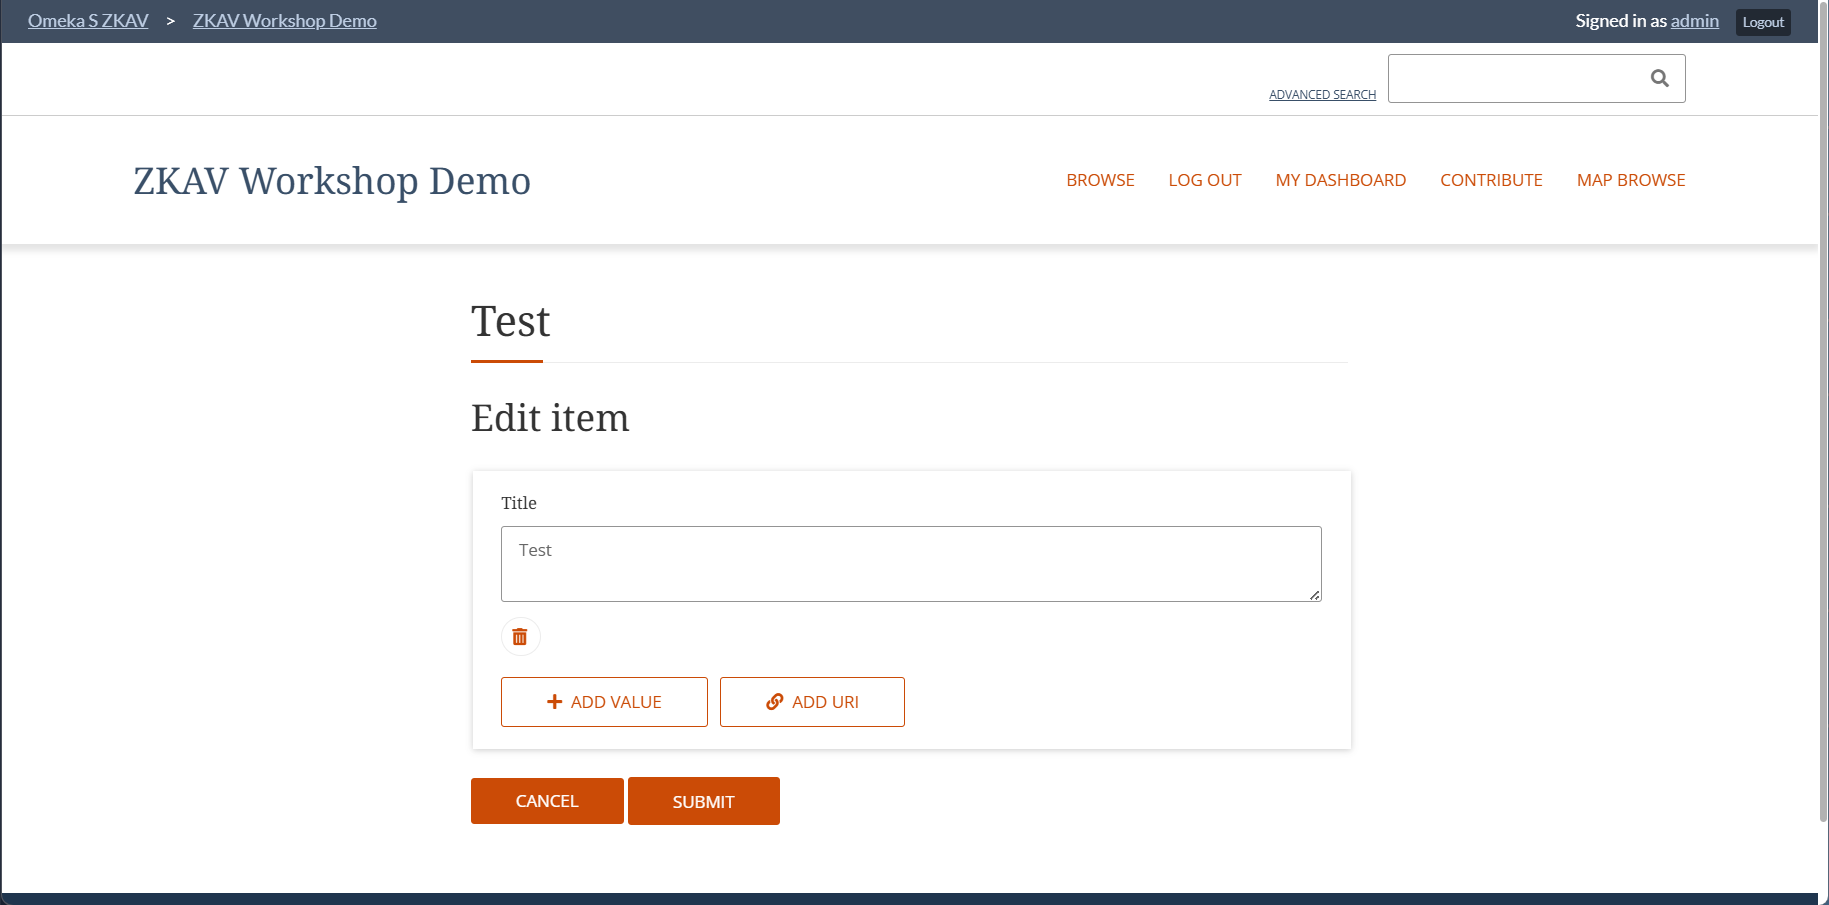
To test that the Contribute module is working, you can create a new item and try to edit it.
To create a new item:
- Go to Items → Add new item
- For the resource template, select "Base Resource"
- Create a new item with metadata. (Add at least one field to the item, such as a title, description, or date.)
- Save the item.
- Visit the website and log in as a guest user (or edit as an administrator)
- Visit the browse page, select an item, go to the bottom of the page and you should see an "Edit this record" link under "Contribute".
- Click this link and you should be redirected to the Contribute page.
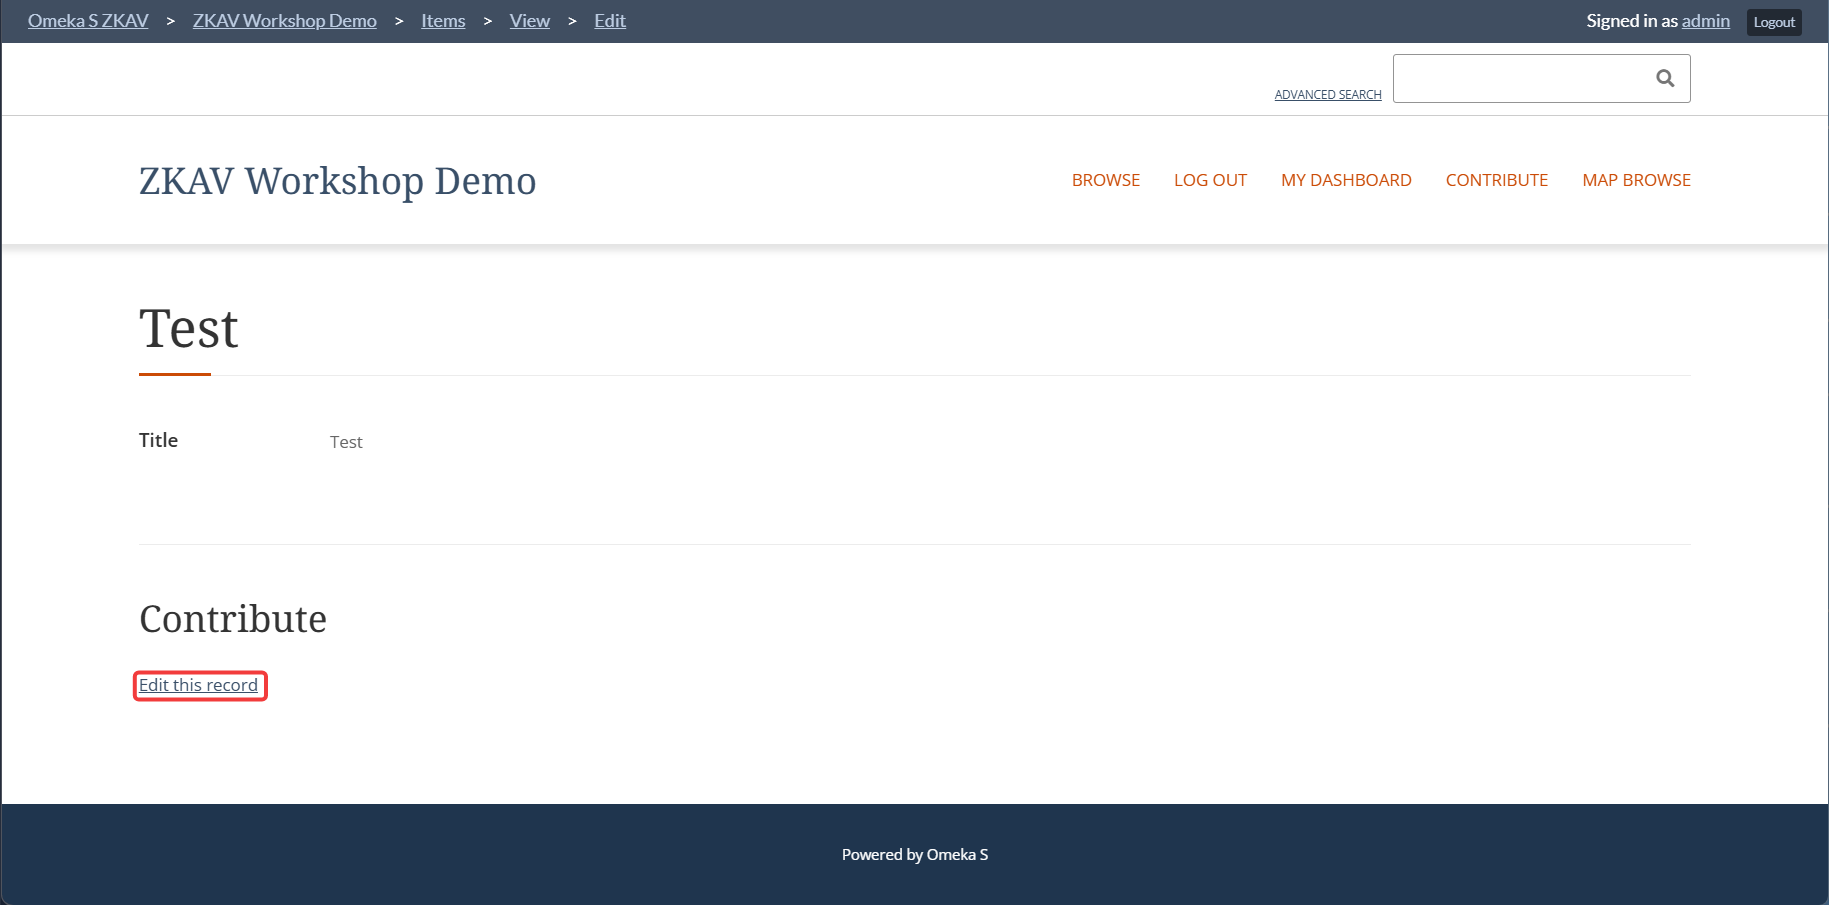
- On the contribute page, you should see the metadata you added to the item.
- You should be able to edit the value if editable.
- You should be able to add a new value to a field if fillable.
- Can can then Submit the contribution.
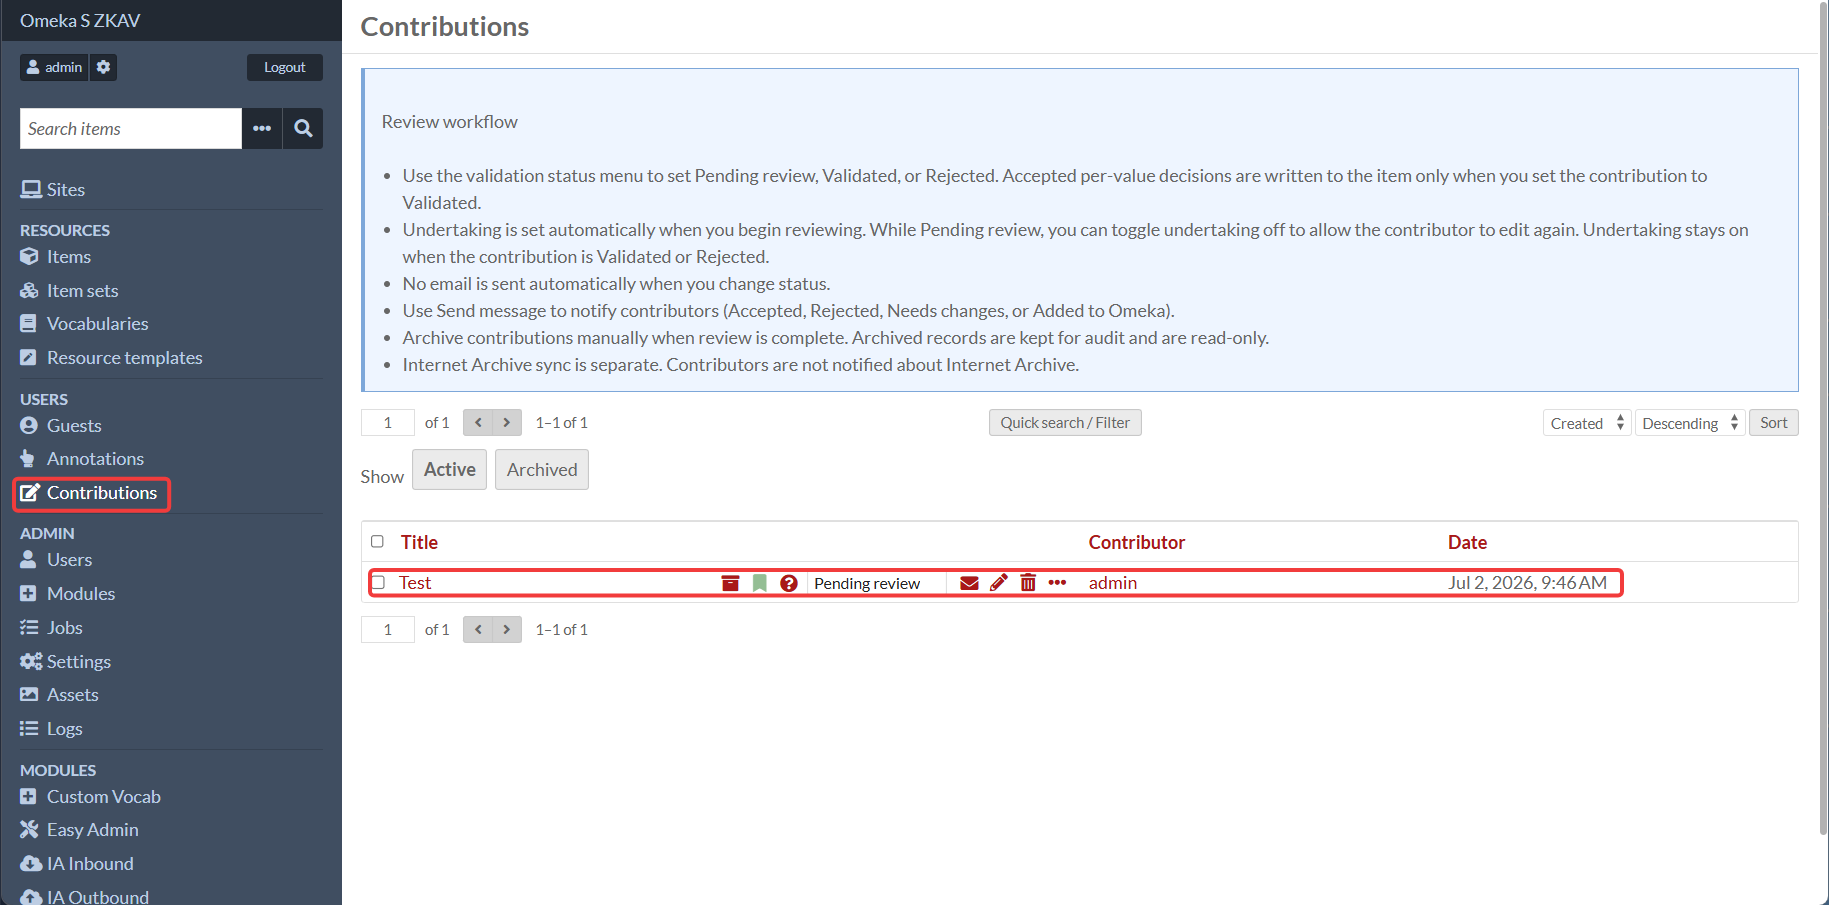
Submitted contribution proposals should appear in the Contributions page of the website for the user if they are logged in. They can access this page (http://localhost:8090/s/[your-site-slug]/guest/contribution) through the custom My Dashboard page you created earlier.
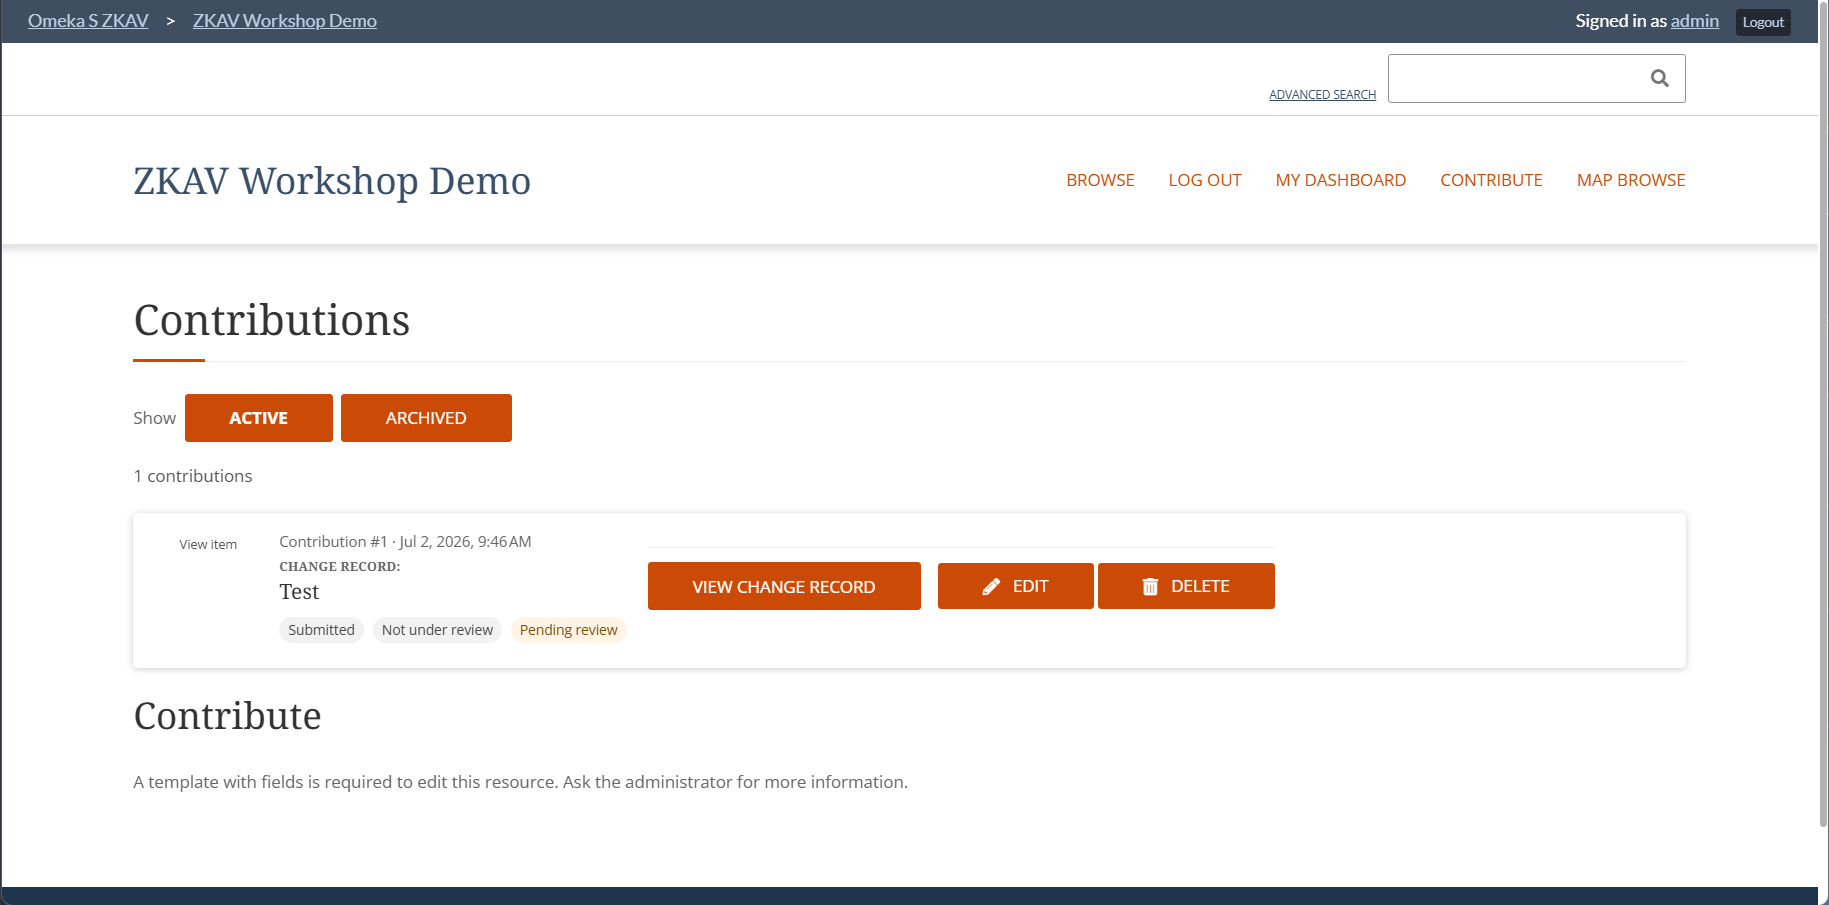
Submitted contributions should also appear in the Admin Dashboard in the Users → Contributions page.
For more information on working with the Contribution page, see both the Contribute Module documentation and the ContributeEnhancements Module documentation.
The ContributeEnhancements module is not installed by default, but it is recommended to install it for a more user-friendly experience for both admins and guests.
Internet Archive: account + S3 keys (everyone must do this)
Each participant should create an Internet Archive account and generate IA-S3 keys.
1) Create an Internet Archive account
Sign up and log in on archive.org.
2) Generate IA-S3 keys
Visit:
https://archive.org/account/s3.php
They will generate:
- S3 access key
- S3 secret key
3) Put keys in Omeka-S-Docker/.env (recommended)
Add:
IA_S3_ACCESS_KEY="your-access-key"
IA_S3_SECRET_KEY="your-secret-key"
This instance also enables a workshop-safe publish override:
IA_PUBLISH_TEST_COLLECTION=test_collectionSecurity note: treat these keys like passwords. Do not paste them into notes, chat logs, or commit them to git.
Restart Omeka after editing .env:
docker compose up -d omekaIA Inbound (InternetArchiveInboundSync): import from Internet Archive
IA Inbound imports items from Internet Archive into Omeka.
- Go to Modules → InternetArchiveInboundSync → Configure
- Ensure the default template is Base Resource.
- Ensure the default item set is set to the general item set you created earlier (zkav recommended).
- For "Default sites, tick the checkbox for the site you created earlier.
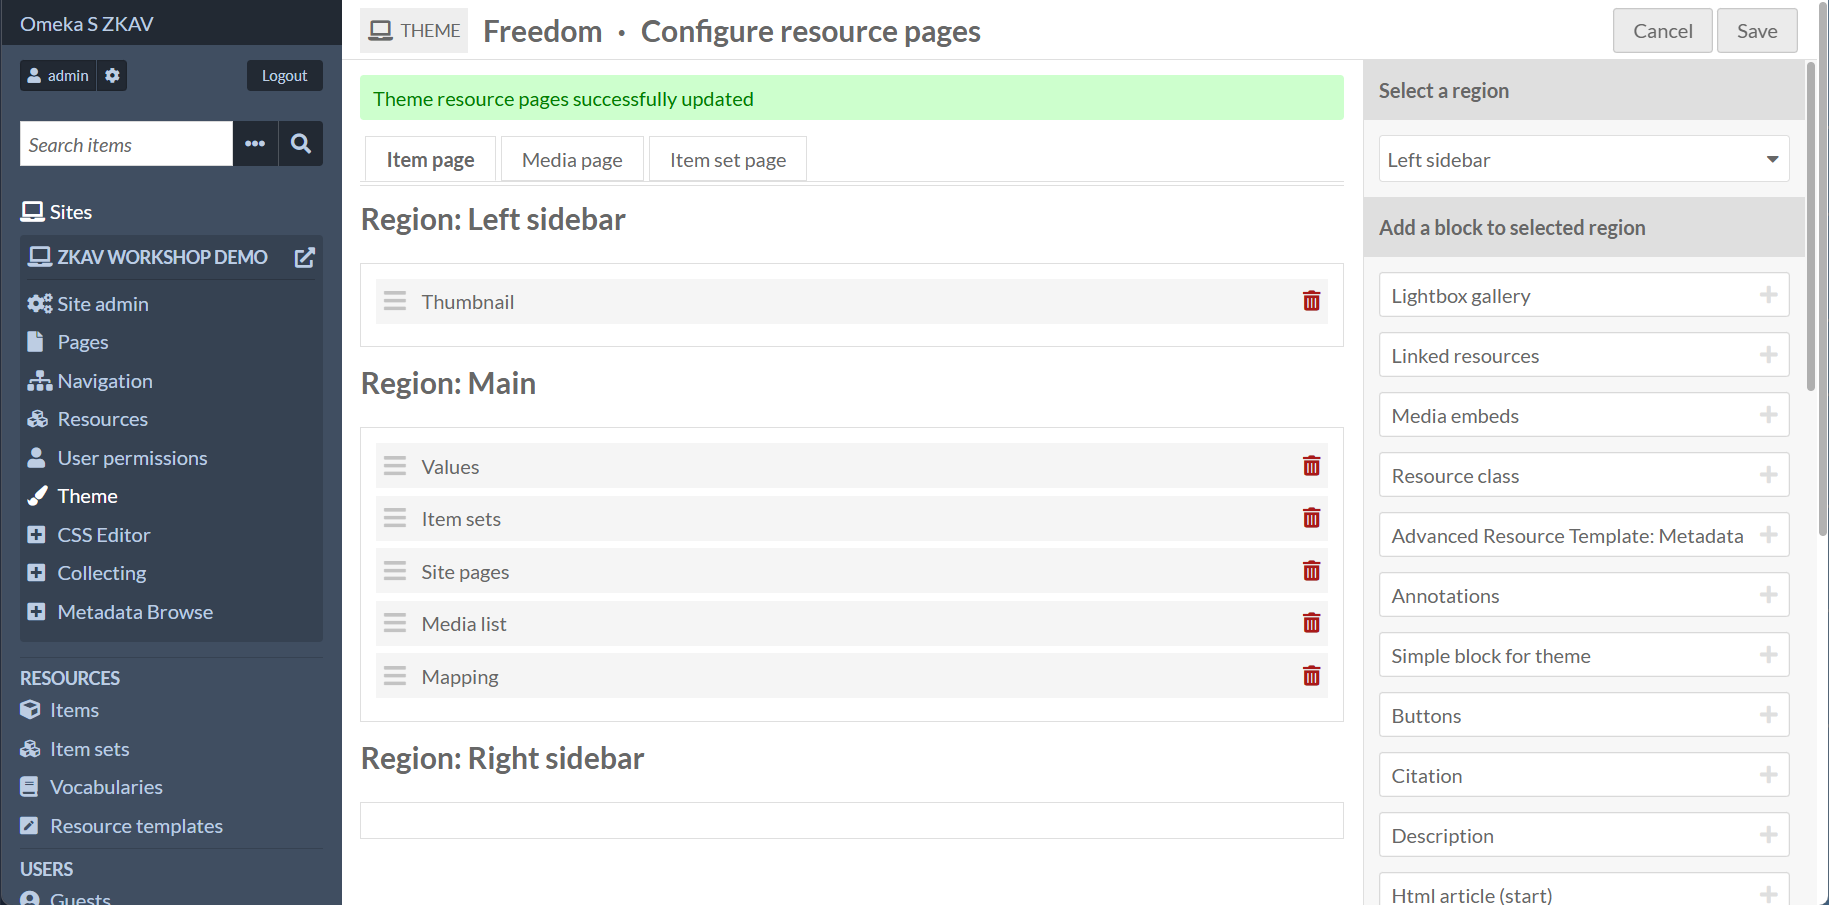
You may also need to ensure that your site's resource pages include a Media render block for media pages.
- Go to Sites → (pencil icon) → Themes → Configure resource pages → Media page (tab) → Add Media render to Main
- Save.
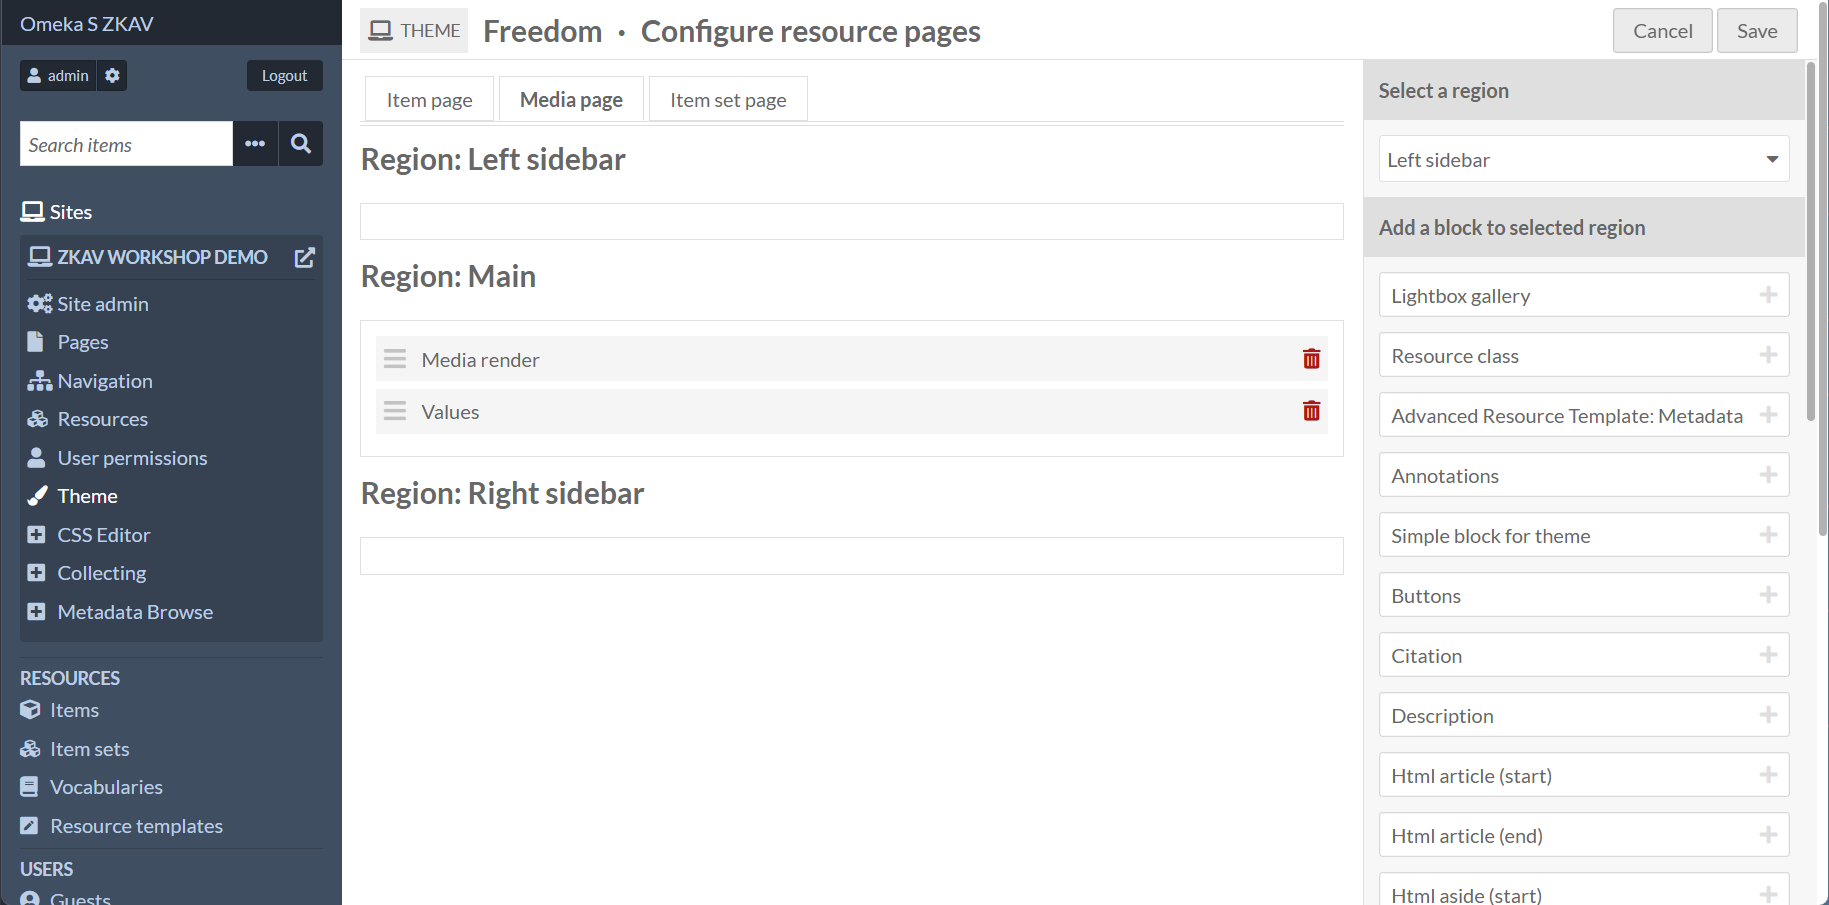
While you are here, you can also customize how Item pages are displayed. Below is the recommended configuration for the ZKAV workshop.
- Go to Sites → (pencil icon) → Themes → Configure resource pages → Item page (tab) → Add Item render to Main
- Set the following options:
- Region: Left Sidebar
- Thumbnail
- Region: Main
- Values - Item sets - Site pages - Media list - Mapping
- Save.
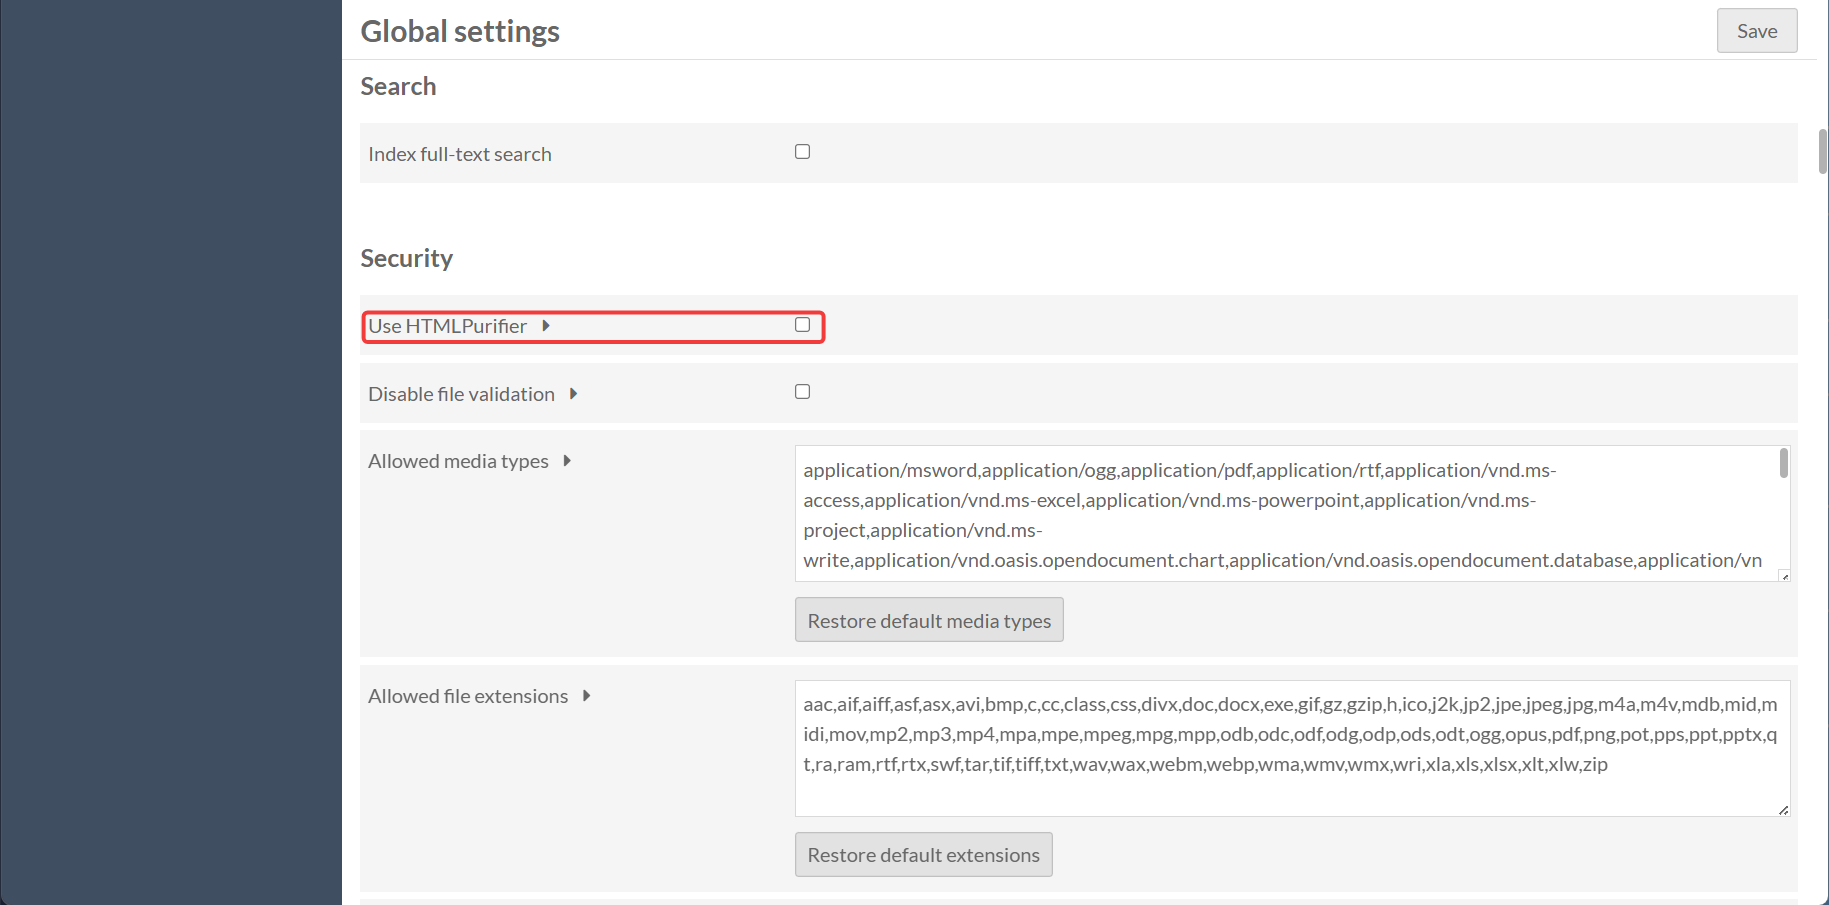
You must also ensure that Omeka S's HTML purifier settings are configured to allow embeds for IA viewers. Otherewise, IA viewers will not be displayed on the item/resource's media pages.
- Go to Admin → Settings → HTML Purifier
- For "Use HTMLPurifier, ensure the box is NOT ticked
- Save.
Import workflow (small, controlled)
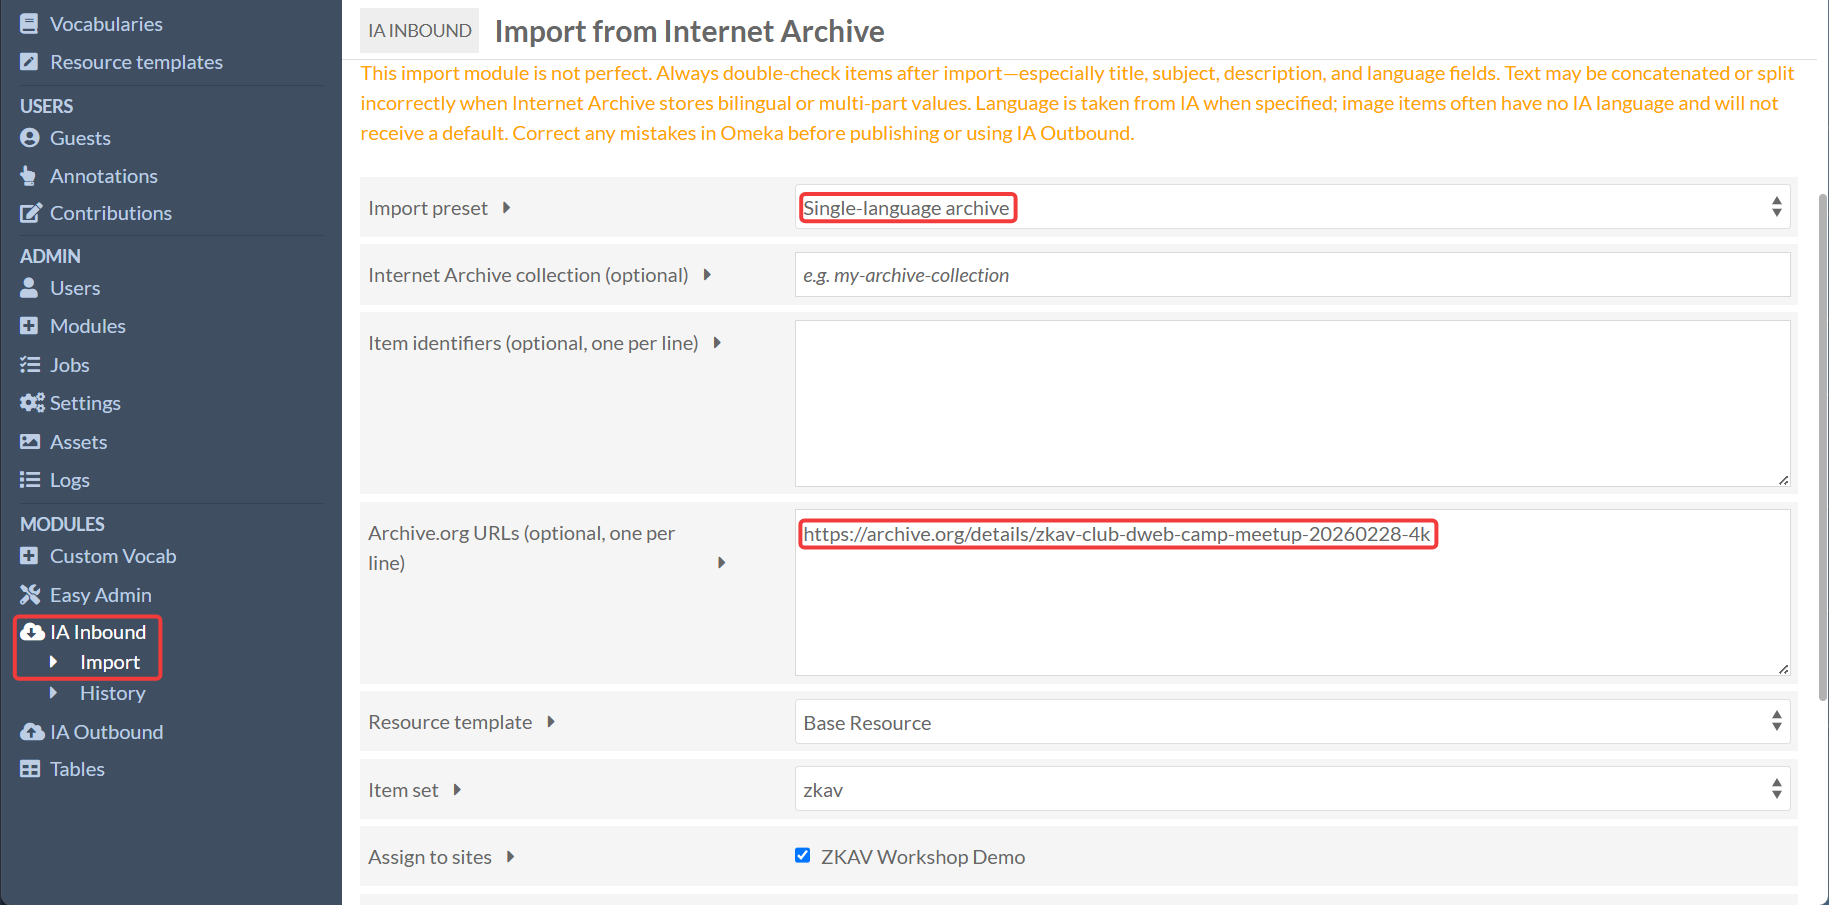
- Go to Modules → IA Inbound → Import
- For "Import preset", select "Single-language archive"
- The bilingual archive preset is only testing for another instance of Omeka S, and is not tested for languages outside of English and Georgian.
- Leave "Internet Archive collection" blank
- For "Archive.org URLS), add one or more Archive.org URLs that you want to import
- The Resource template, Item set, and Assign to sites options should be automatically configured based on the configurations made earlier, but if not, set them to Base Resource, the general item set, and tick the created site.
- To test that the IA Inbound import module is working, you can tick the Dry run option and click Run import.
- If the dry run works, you can then untick the option and Run import.
- The update metadat on exisiting items is used if you have already imported an item from the Internet Archive and want to update the Omeka S item.
- This will not be used often, and is generally handled by the IA Outbound module when user submited metadata edits are validated and pushed to the Internet Archive.
- The Repair Internet Archive embed media on existing items is used in two cases:
- If the HTML Purifier setting was not properly configured before running the IA Inbound import
- If the IA embed media is not working on the item/resource's media pages.
- This will run import, but only focused on media assets for the item/resource
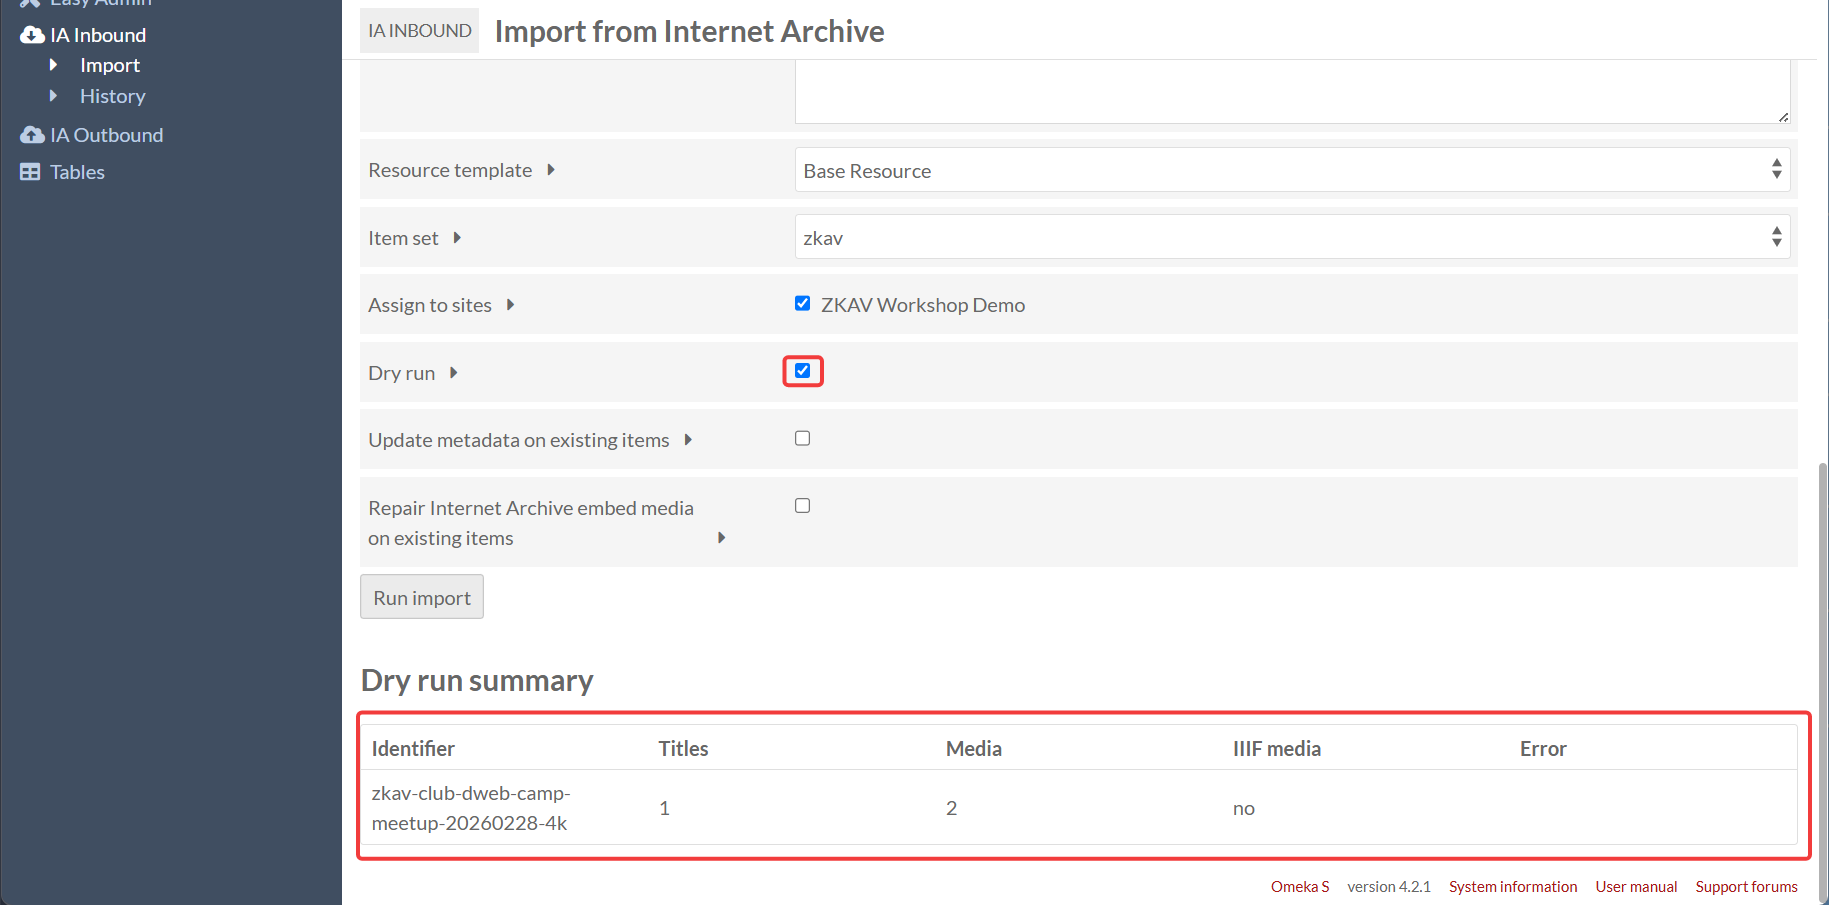
After running the import, you can visit the item/resource's page on the site, and see the correct metadata and the correct media.
Note: This import module is not perfect, and may bring in metadata in unexpected ways. Always double-check items. Correct any mistakes in directly in Omeka S, especially before using IA Outbound to update Internet Archive metadata.
IA Outbound (InternetArchiveOutboundSync): three workflows
IA Outbound supports three different workflows. All three should be possible in this instance, but not all are equally “easy” without a real IA collection.
Workshop reality about collections
- A personal or project collection is optimal for real publishing.
- Internet Archive collections can only be created by the Internet Archive if you have 50 or more items to be added to a collection. See here for more information about creating a collection on the Internet Archive.
- The current iteration of the IA Outbound module assumes that you already have a collection, though future development will look to support publication to a default Internet Archive collection.
- All uploads go to your personal account and are added to the collection you define in Omeka S. It is not currently possible to publish to a collection that is not defined in Omeka S.
- For workshops,
test_collectionis acceptable and safe. - Important: IA Outbound does not publish anywhere if no collection is configured. There is no “community upload” fallback.
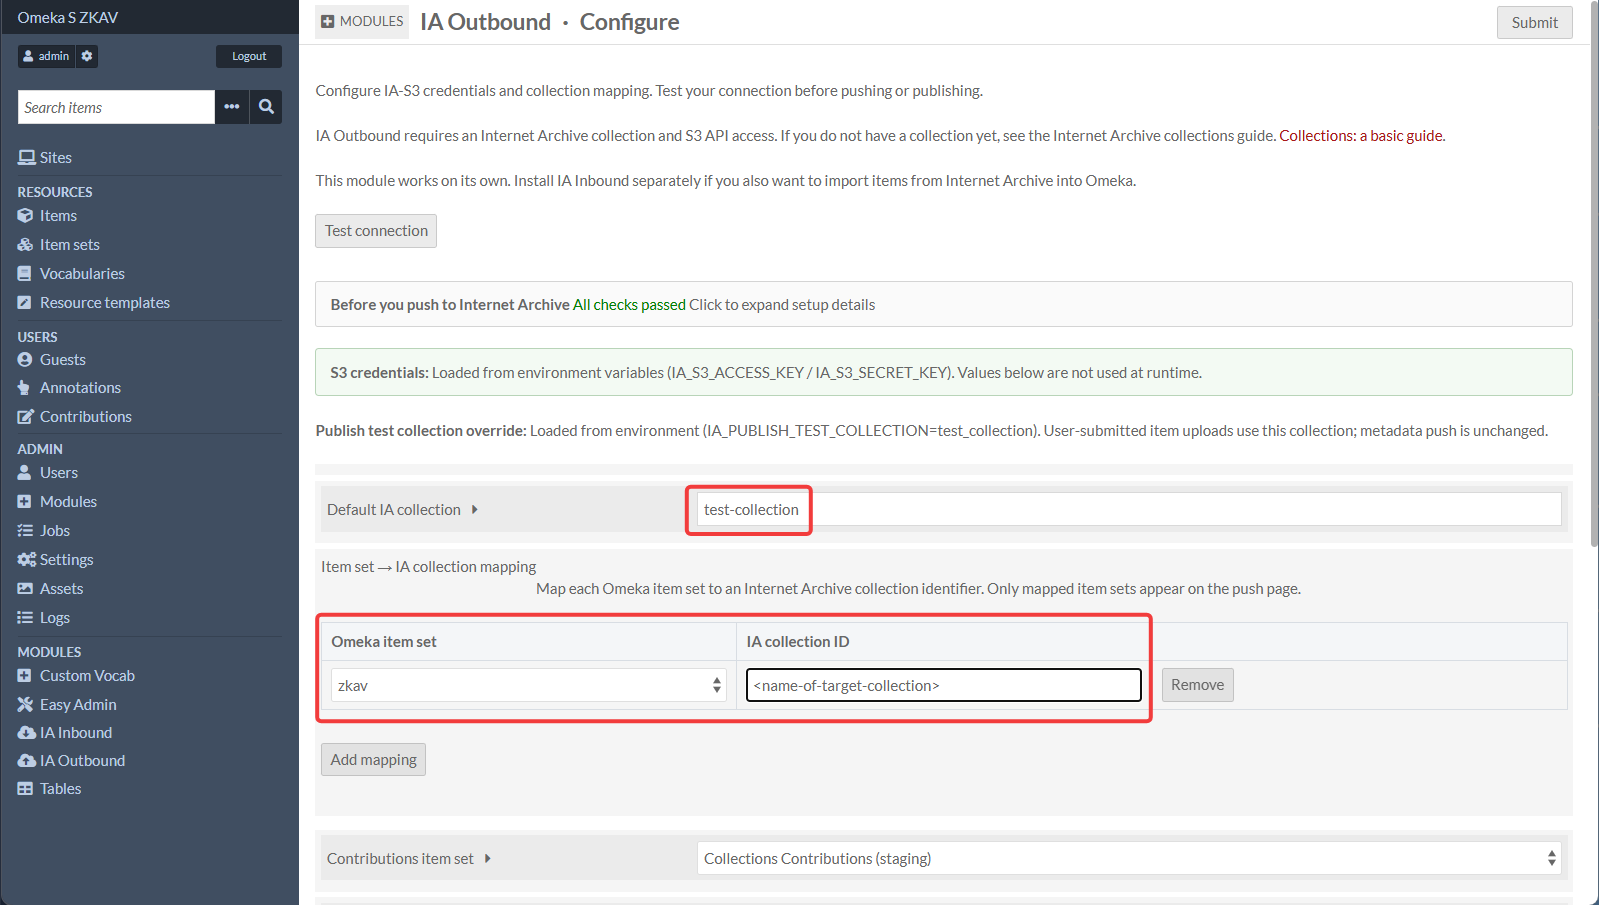
0) Configure IA Outbound and test the connection
- Go to Modules → InternetArchiveOutboundSync → Configure
- Confirm:
- Credentials are loaded (prefer env vars)
- Set "Default IA collection to "test-collection"
- Map Item set to IA collection:
- Set Omeka item set to "zkav" (this is for pushing metadata changes in Omeka S to already esxiting items on the Internet Archive)
- Set "IA collection ID" to "test-collection"
- You may need to change this value to a collection name associated with the item you want to push to the Internet Archive
- You must have upload access to the collection you are pushing to the Internet Archive
- You will still be able to see a preview of changes that would be pushed to the Internet Archive, but your metadata push will likely fail without upload access.
- Set "Contributions item set" to "Collections Contributions (staging)" (or which ever item set you created for Collecting submissions - this is for pushing user-submitted items to the Internet Archive)
- Set "New item identifier" suffix to "zkav" (optional)
- Tick the "Enable metadata push to Internet Archive" option
- Leave all other defaults as they are.
- Test connection passes
- Submit to save configuration.

Workflow 1 — Publish user-submitted items (Collecting → S3 upload)
This takes items created by Collecting forms (staging) and publishes them to Internet Archive.
Prerequisites:
- IA-S3 keys configured
IA_PUBLISH_TEST_COLLECTION=test_collectionis set (workshop default)- A “staging” item set exists for Collecting submissions
- IA Outbound Configure: set Contributions item set to your staging item set (defined above when you setup the Collecting form; "Collections Contributions (staging)" recommended)
- The Collecting form must have a media upload option
Steps:
- Have a participant submit the Collecting form once (creates an Omeka item).
- As admin, go to IA Outbound → Publish user-submitted items.
- Preview → confirm → publish.
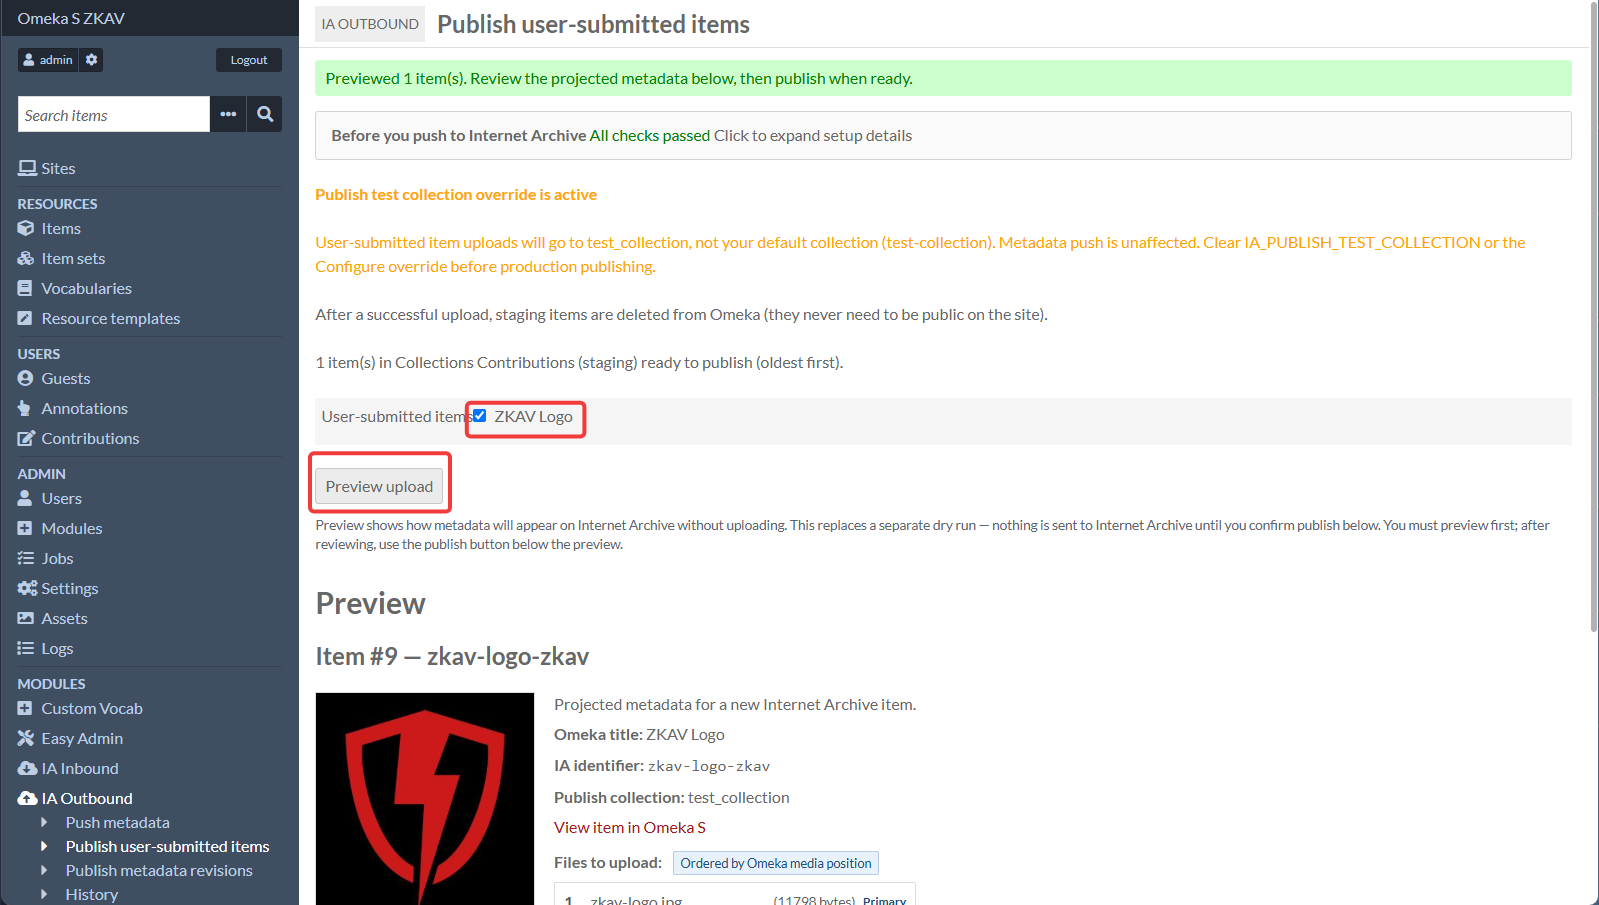
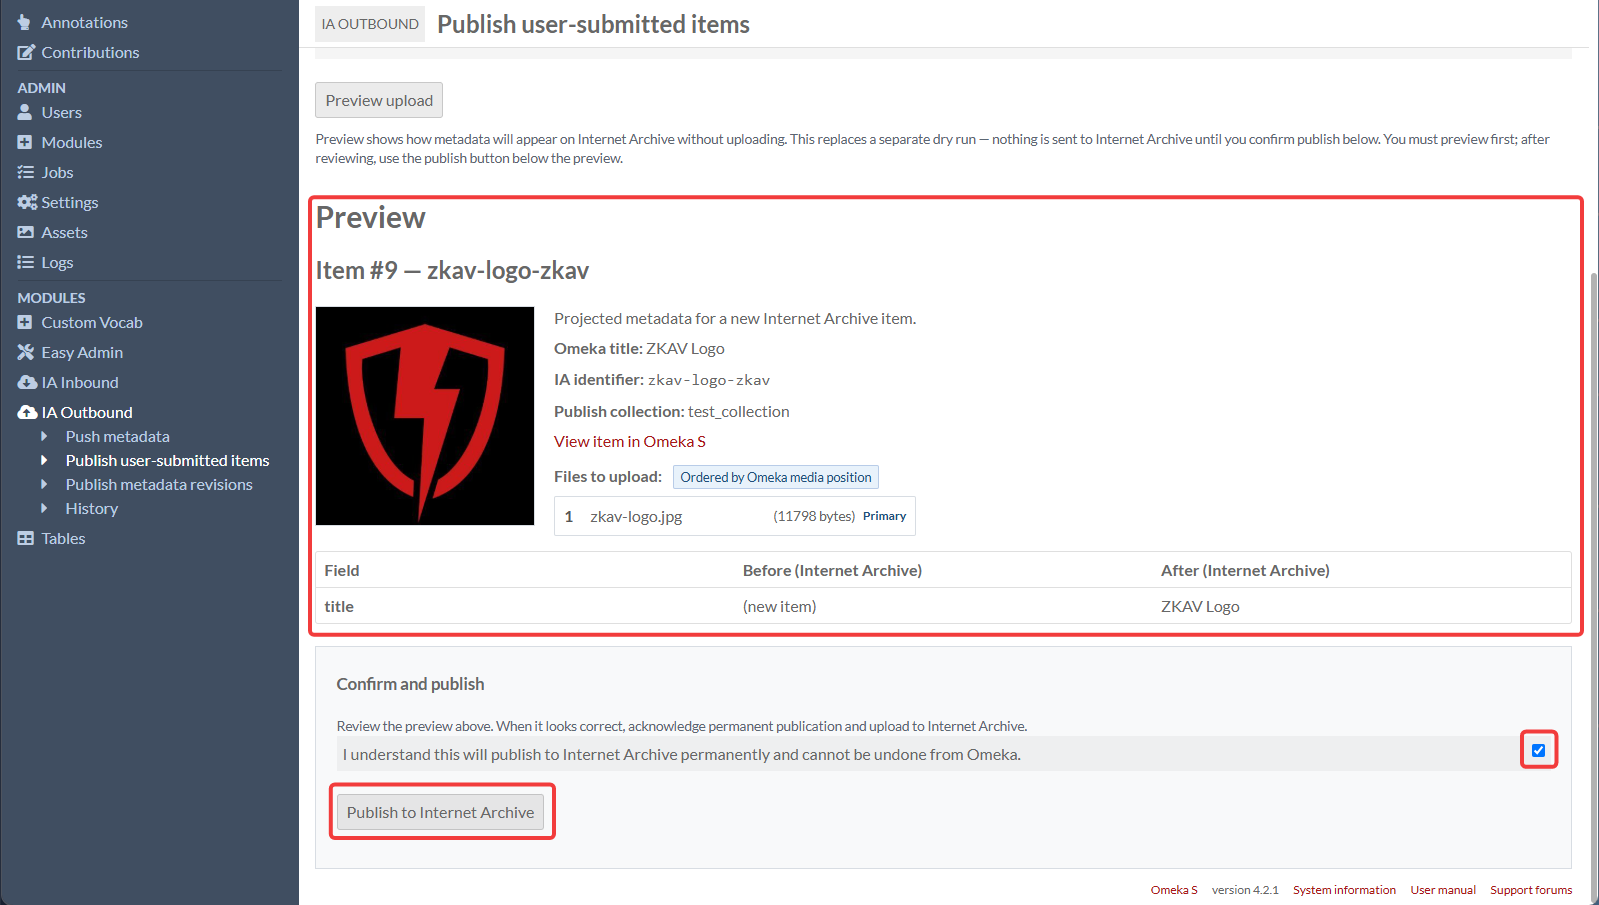
What to expect:
- Upload goes to
test_collection(workshop-safe, auto-removed by IA later). - After success, the module may delete the staging Omeka item (depending on settings).
- This is usually the desireable outcome.
- After uploading to the Internet Archive through this module, it is recommended to use the IA Inbound import module to import the item into Omeka S.
- This allows the Internet Archive to be the source of truth for the item, and Omeka S to be the destination.
- You can also visit the Jobs page to see the status of the job.
- You can also visit the IA Outbound → History page to see the items that have been published and their status.
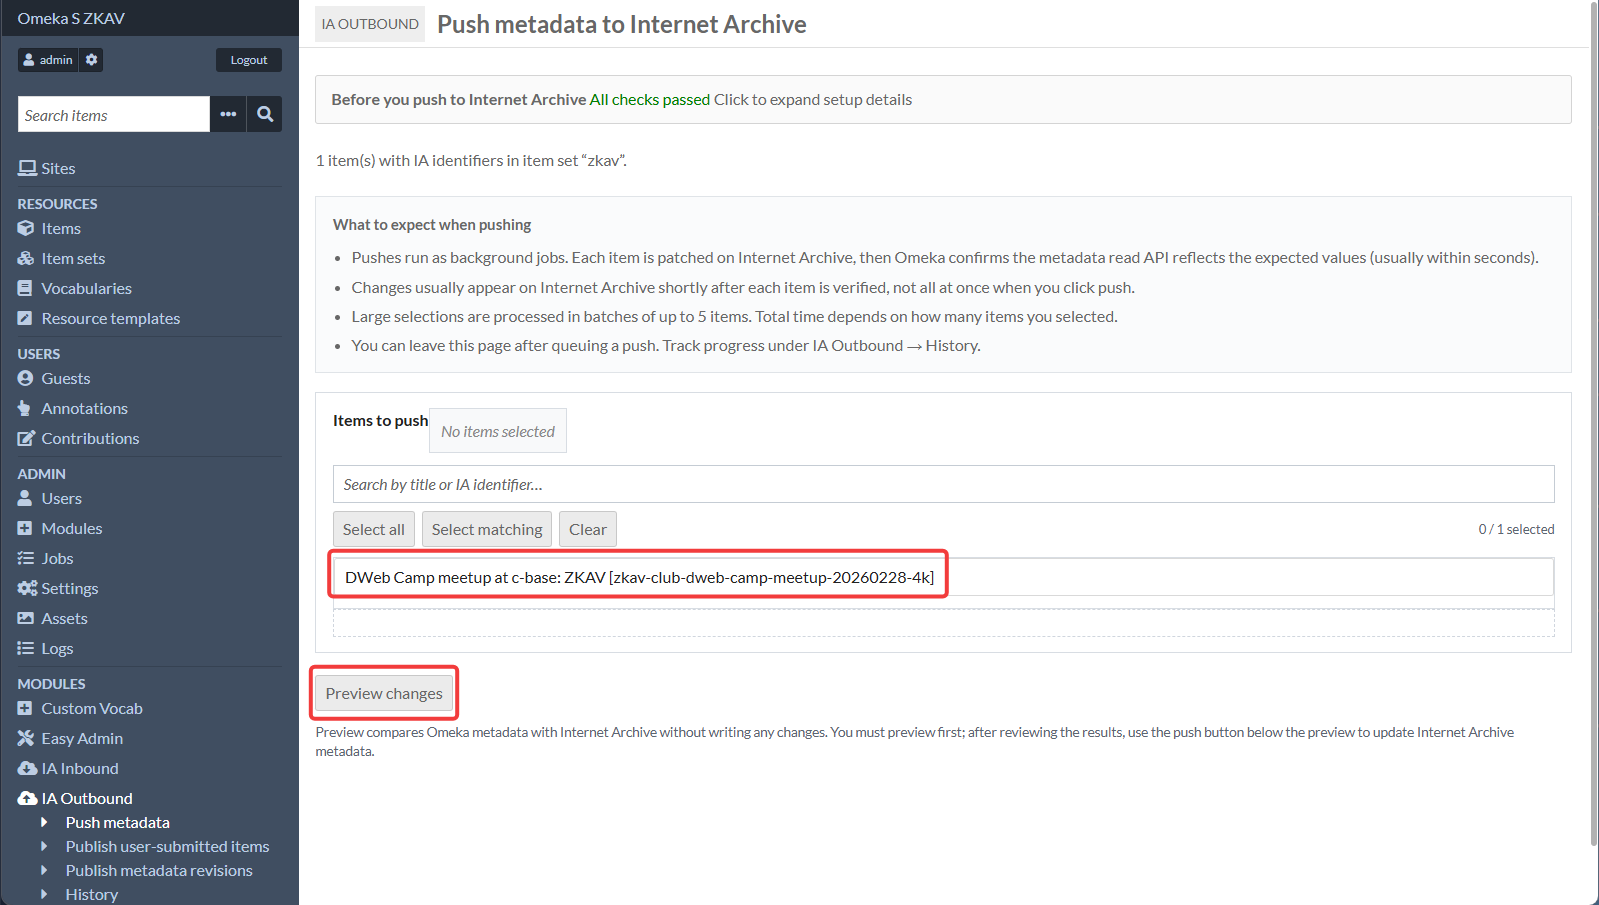
Workflow 2 — Push metadata (Omeka → IA metadata update)
This updates metadata on items that already exist on Internet Archive.
Prerequisites:
- IA-S3 keys configured
- Items in Omeka must be linked to IA identifiers (typically populated via the IA Inbound import module)
- IA Outbound Configure: item set ↔ IA collection mapping set up
- For workshop testing, you may map a set to
test_collection - You must have upload access to the collection you are pushing to the Internet Archive
- Start with Preview only mode
Steps:
- Go to IA Outbound → Push metadata
- Select an item set that is mapped to a collection
- Preview changes
- Subject tags will always be alphabetically sorted
- Only enable live push once you understand the preview output

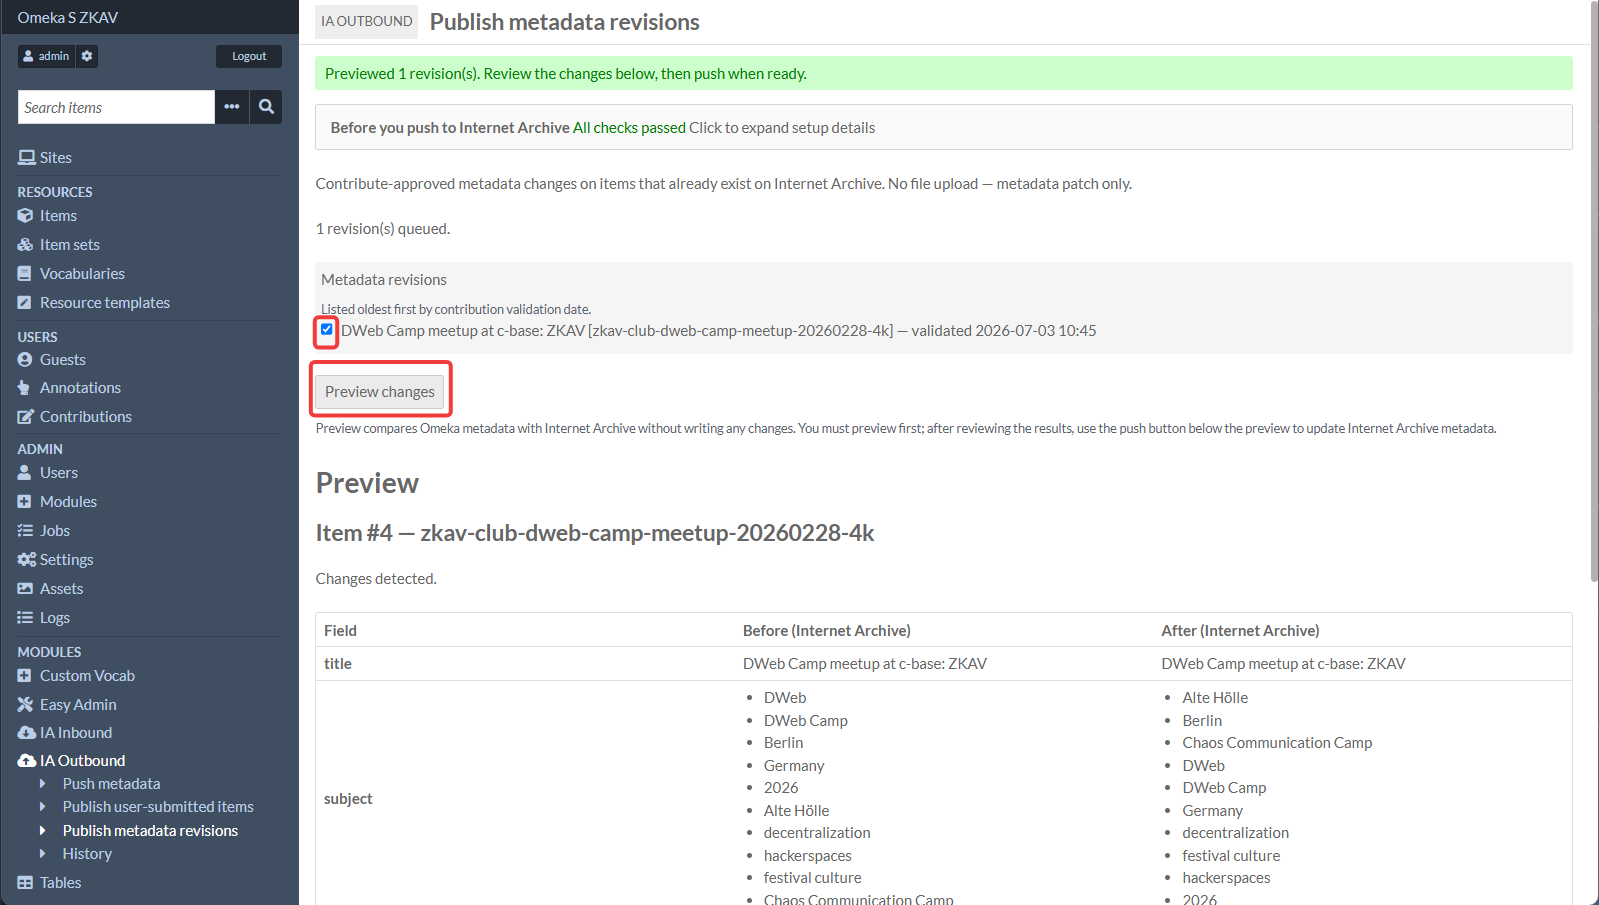
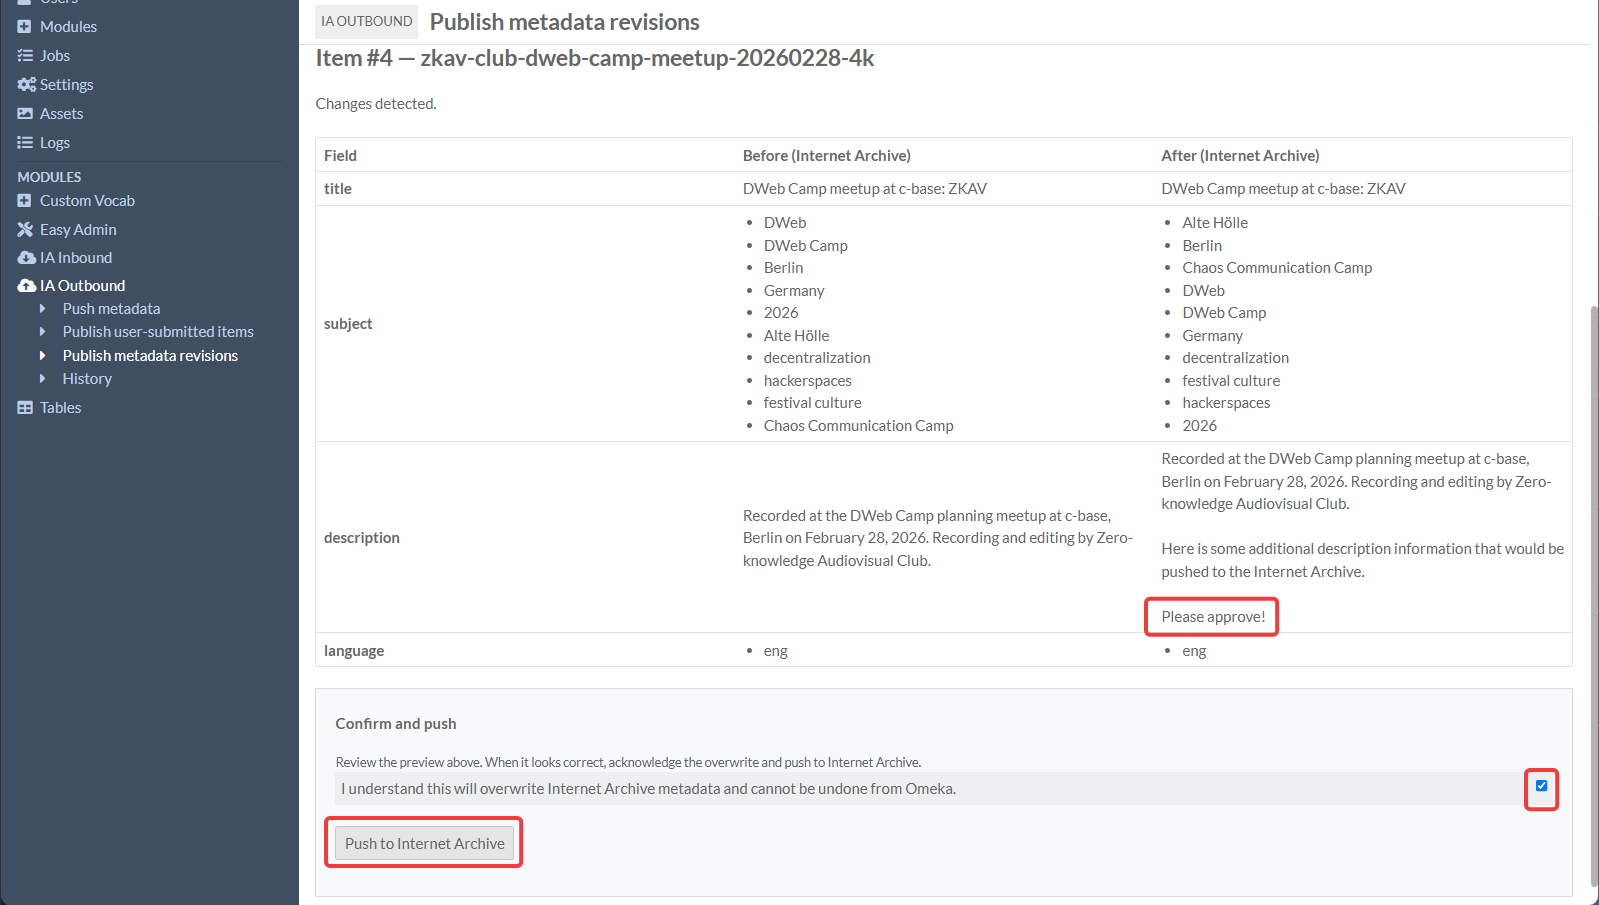
Workflow 3 — Publish metadata revisions (Contribute → IA metadata update)
This is the most complex chain. Treat it as an advanced optional lab.
High-level chain:
- A user proposes metadata edits through Contribute (a “revision”)
- Admin reviews/validates the contribution
- Once validated and undertaken, IA Outbound queues a job to push the updates to IA
Prerequisites:
- Contribute module active and configured
- Items being edited have IA identifiers
- IA Outbound credentials + mapping configured
Suggested lab steps:
- Pick one imported IA item.
- Have a participant propose a small metadata change.
- As admin, validate/undertake it.
- Watch Jobs for the outbound push job.
IIIF: what it is, and what to expect
IIIF stands for International Image Interoperability Framework. It’s a standard that lets viewers request images (and some documents) in a tiled/zoomable way and attach structured “manifests” describing a resource.
In this Omeka setup, IIIF behavior is largely automatic:
- Some imported/published media will show an IIIF viewer (zoom/pan).
- Some will not (depending on the file type and what Internet Archive provides).
Common limitations:
- Not every Internet Archive item generates an IIIF manifest usable by Omeka.
- Some multi-file items may show embeds/thumbnails instead of IIIF.
If you want to support rich public viewing, ensure your site includes a Media render block for media pages.
Cosmetic changes to how the site looks and how information is displayed
Language tags for metadata
By default, Omeka S displayed language tags. This is especially the case when using the IA Inbound import module. This is useful metadata, especially for multi lingual websites, but the front end user often doesn't need to see it.
To disable the display of language tags:
- Go to Sites → (pencil icon) → Site Admin → Settings → Language
- Untick the "Show language labels for values" option
- Save.
Site Pagination
By default, Omeka S uses a simple pagination system. You can decide if it is useful for your site, but for the way this guide is designed, it is recommended to disable pagination.
- Go to Sites → (pencil icon) → Site Admin → Settings → General
- Untick the "Enable pagination" option
- For Page subnavigation display, select "Hide on all pages"
- Save.
Change the default Browse Settings
By default, Omeka S displays the browse page with a grid of items. You can change this to display a list of items. You can also let the user choose which view they want to use. It is recommended to use the grid view by default, and let the user choose which view they want to use.
- Go to Sites → (pencil icon) → Theme → Theme settings → Browse Settings
- For "Display mode", select "Grid"
- Save.
It is also possible to change how Browse items are truncated. By default Omeka S will show the full value of the description field. It is recommended to truncate accordingly:
- Go to Sites → (pencil icon) → Theme → Theme settings → Browse Settings
- For "Truncase Body Propery", set to "Show 4 lines and clip with an ellipsis"
- Save.
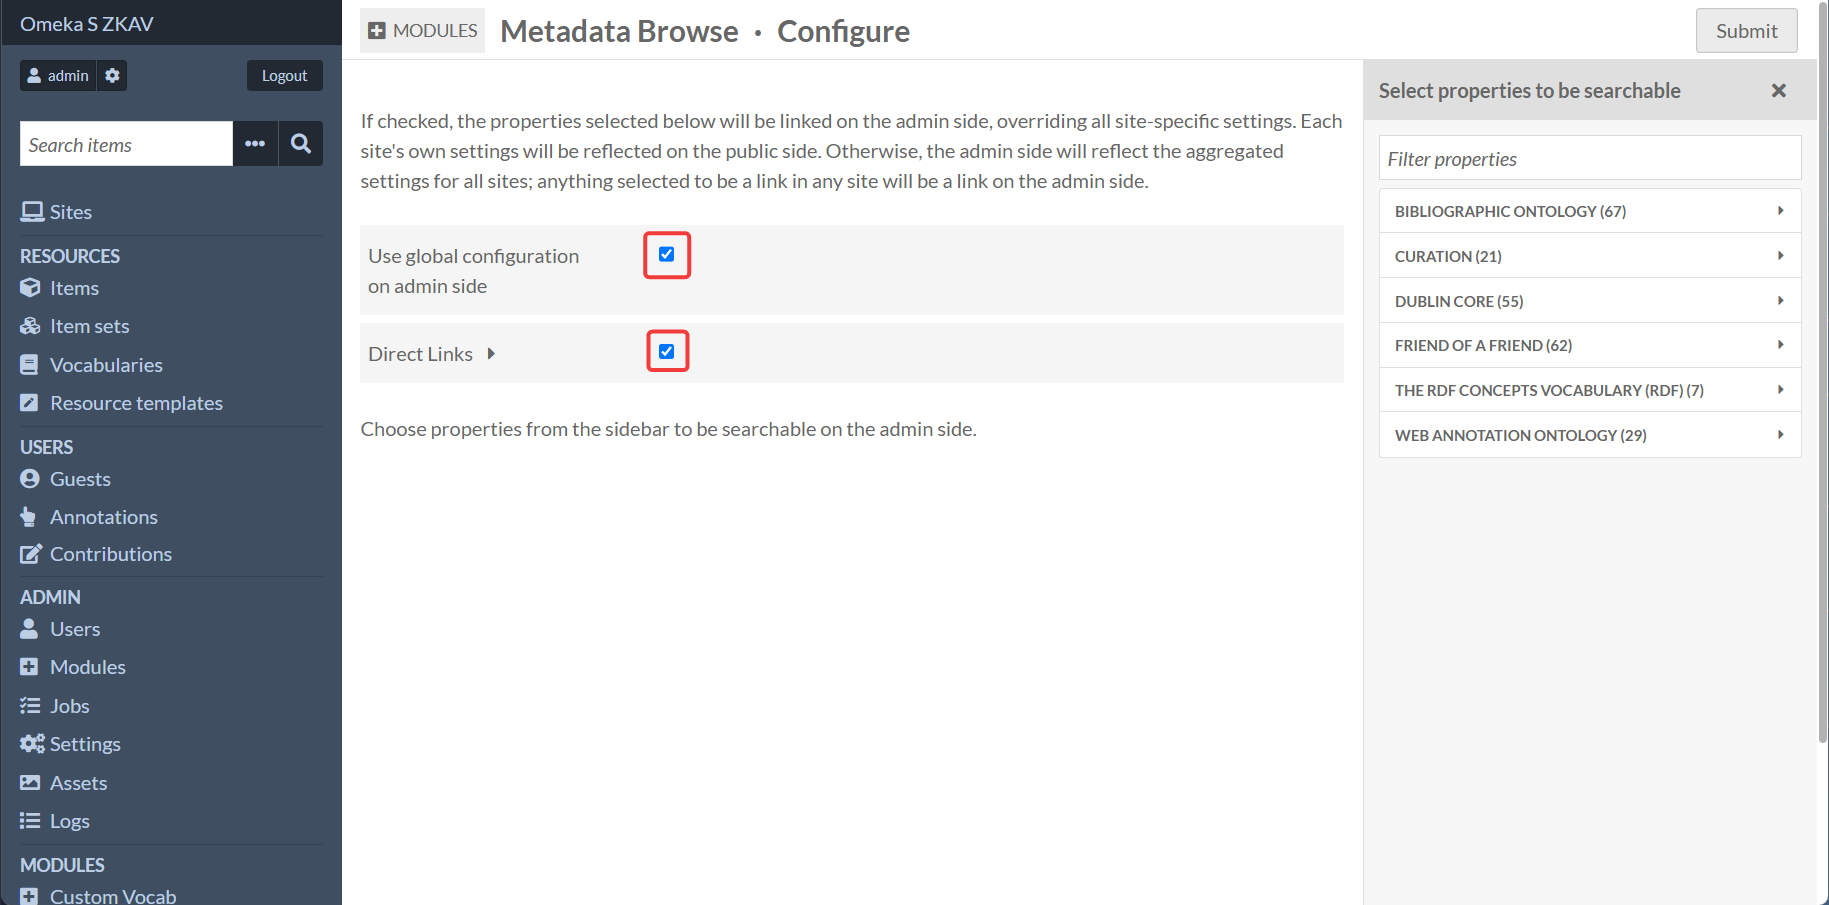
Enabling Metadata search using the Metadata Browse module
Metadata search enables a user to click on selected metadata values and perform an automatic search of the site for items with matching values. By default, Omeka S does not enable metadata search. You can enable this using the Metadata Browse module.
For a single website setup of Omeka S (Omeka S can host multiple website, but this guide is designed for a single website) it is recommended to tick the two checkboxes in the module;s configuration settings.
- Go to Modules → Metadata Browse → Configure
- Tick the "Use global configuration on admin side" and "Direct Links" options
- Submit.
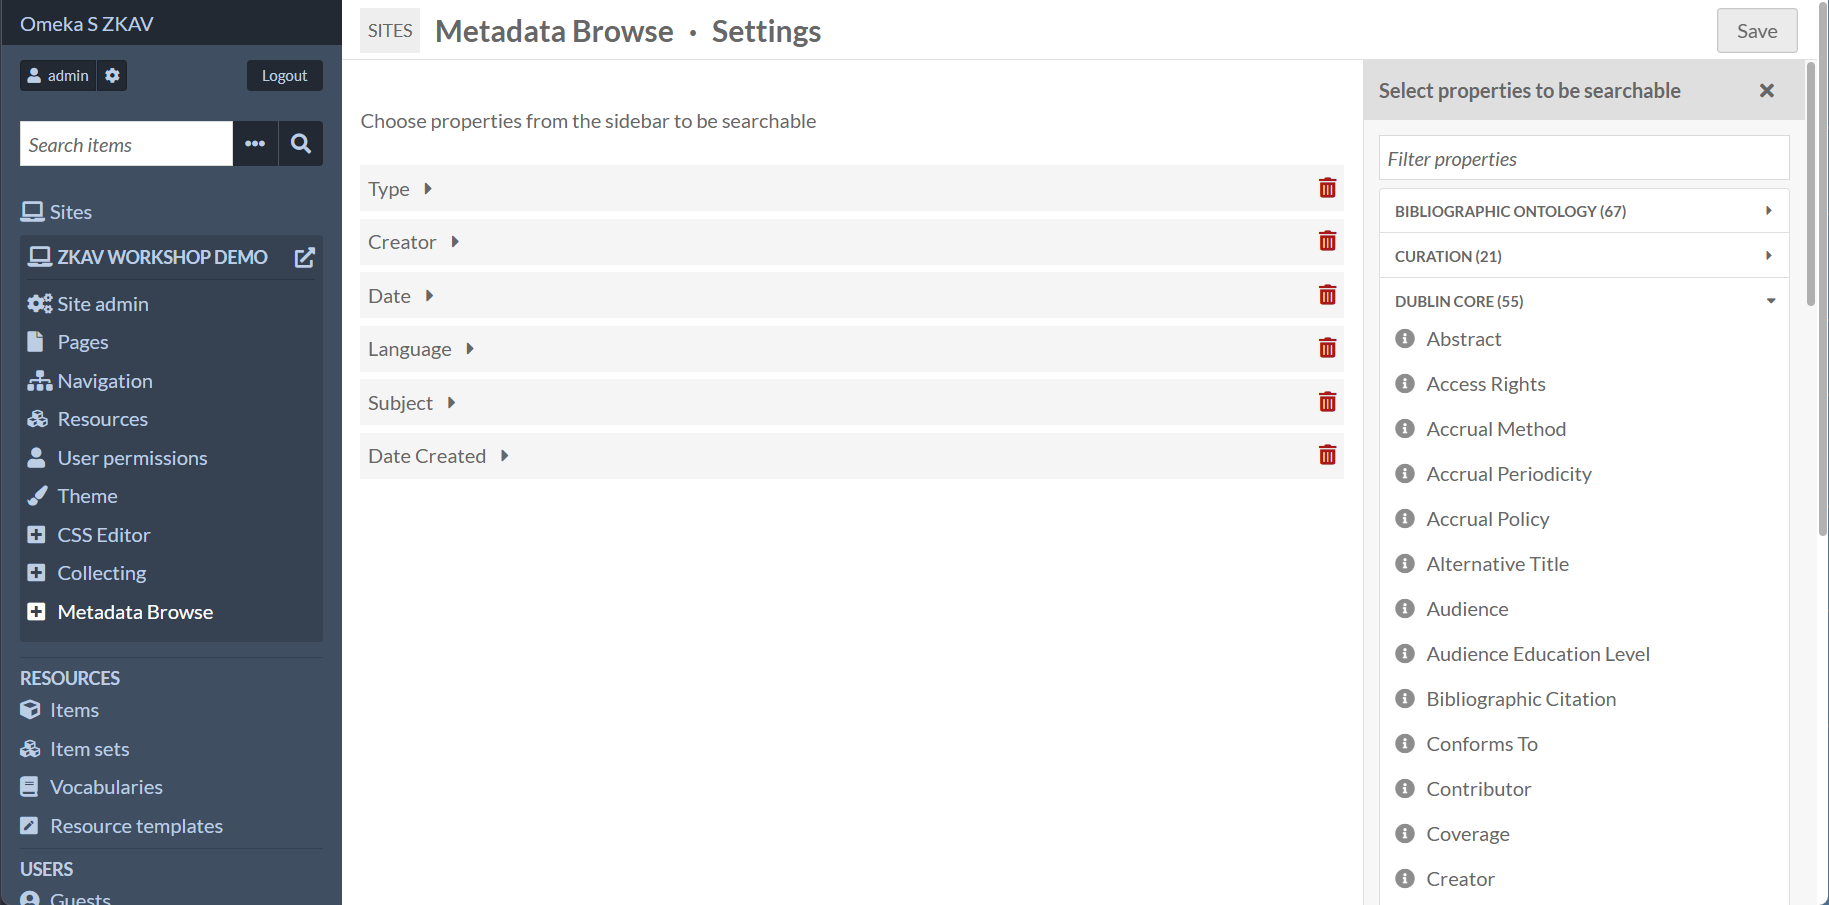
Then you need to select which metadata fields you want to enable metadata search for.
- Go to Sites → (pencil icon) → Metadata Browse
- Choose properties from the sidebar to be searchable. Here are the recommended values:
- Dublin Core: Type
- Dublin Core: Creator
- Dublin Core: Date
- Dublin Core: Language
- Dublin Core: Subject
- Dublin Core: Date Created
- Save.
Enable Clean URLs (CleanUrl module)
The CleanUrl module creates readable public URLs like http://localhost:8090/s/zkav/document/your-item-identifier instead of http://localhost:8090/s/zkav/item/4.
Clean URLs are generated on the public site only. The admin interface may already show clean paths (for example /admin/document/your-item-identifier) even when the public site still uses numeric IDs.
1) Set a default site (required for public clean URLs)
- Go to Admin → Settings → Display
- Set Default site to your workshop site (for example
zkav) - Save
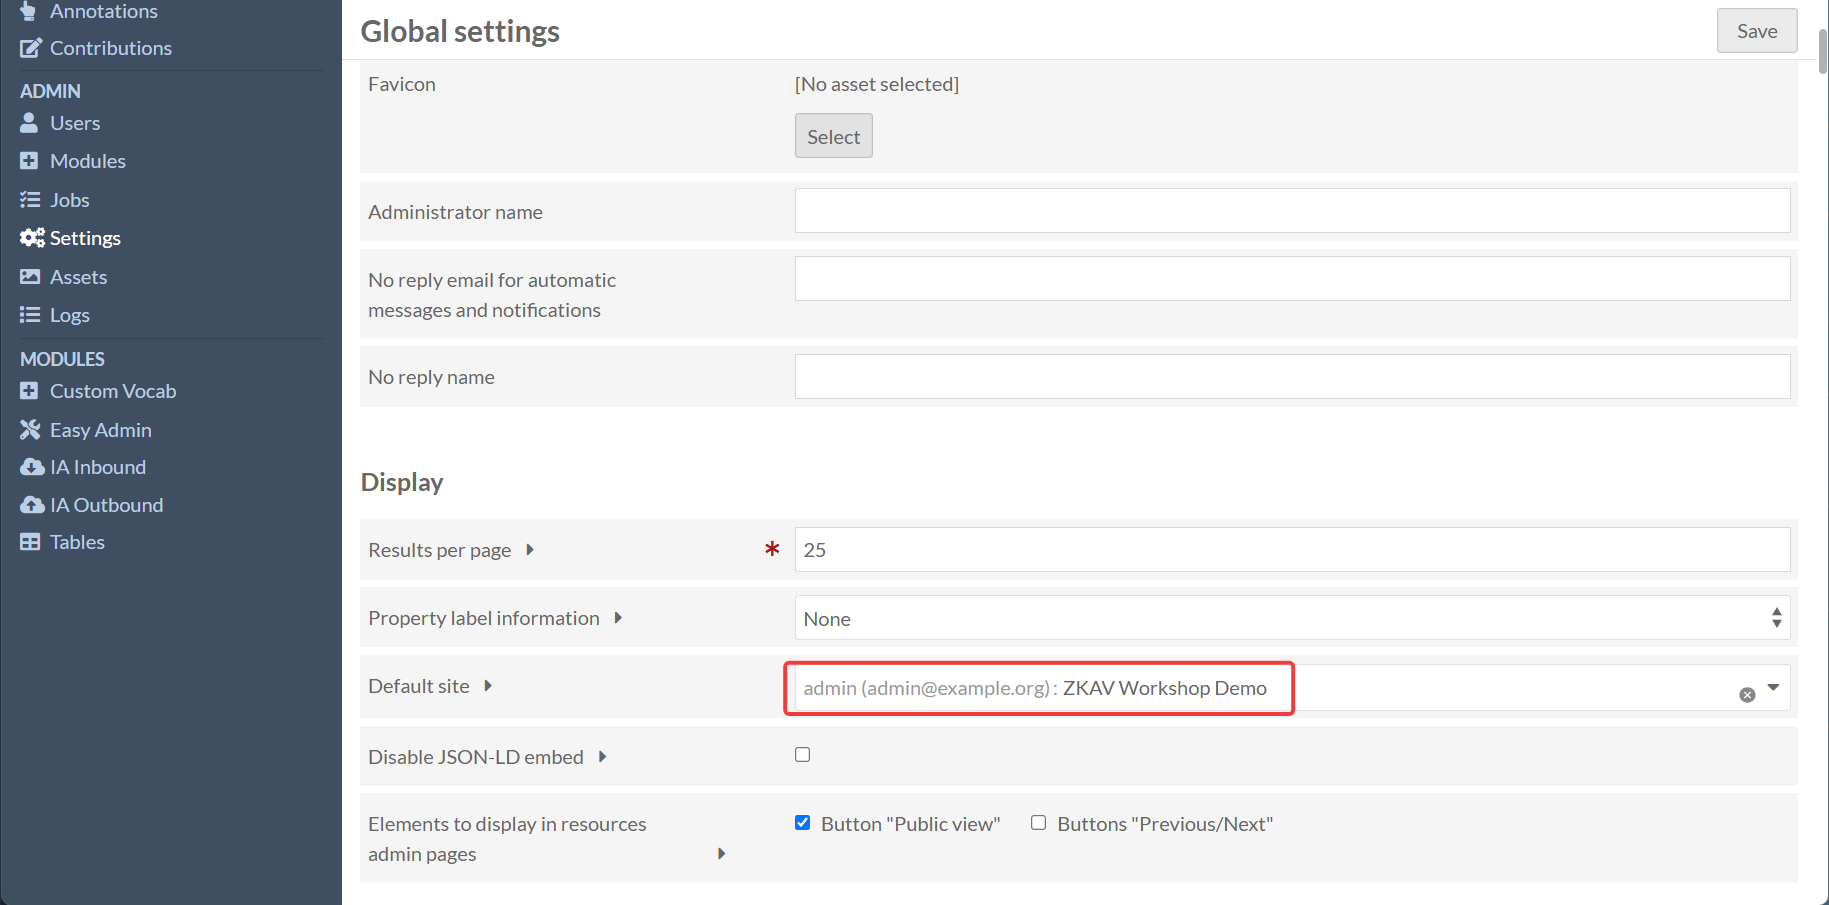
Without a default site, CleanUrl registers admin routes only. Public links stay as /s/{site-slug}/item/{id} and direct visits to /s/{site-slug}/document/{identifier} return 404.
2) Configure the CleanUrl module and rebuild routes
- Go to Modules → CleanUrl → Configure
- Workshop defaults (already suitable for most cases):
- Item sets:
collection/{item_set_identifier} - Items:
document/{item_identifier} - Media:
document/{item_identifier}/{media_id} - Leave Skip "s/site-slug/" for default site unchecked unless you deliberately want main-site URLs without
/s/ - Click Submit — this rebuilds the route cache
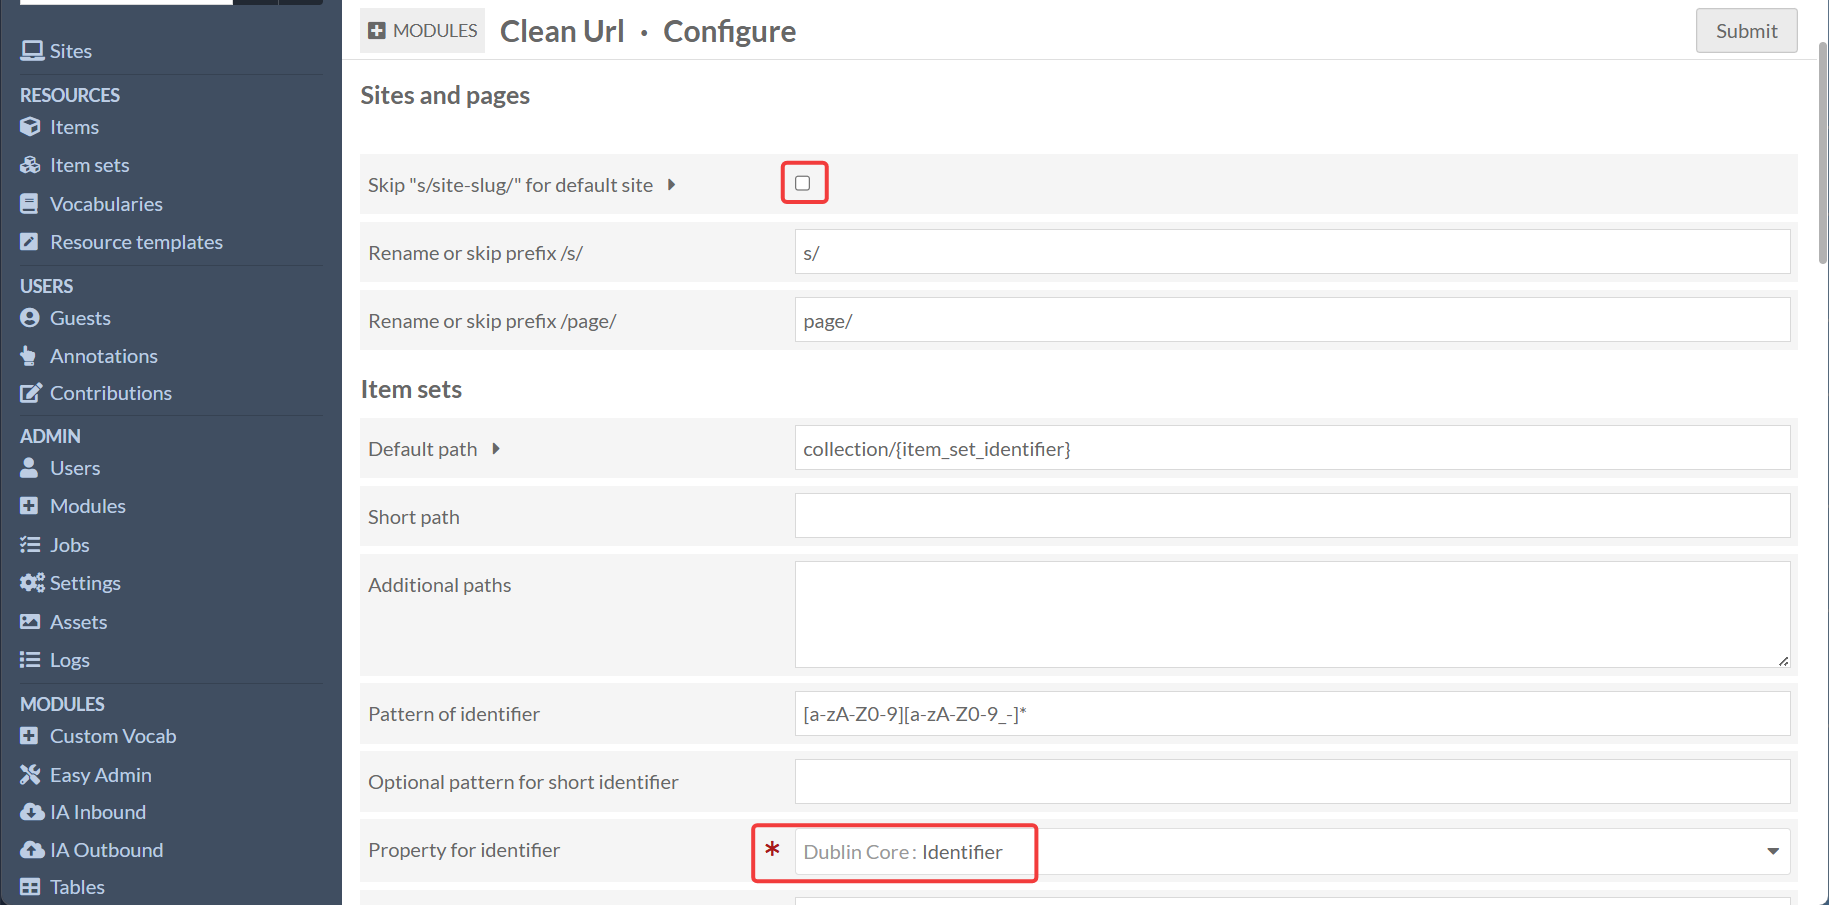
3) Add Dublin Core:Identifier values
Each item needs a literal value in Dublin Core:Identifier (not an external URI). Item sets need identifiers too if you use collection-based paths.
Example identifier: zkav-club-dweb-camp-meetup-20260228-4k
Note: This is already done for you if you used the IA Inbound import module. If not, you can add the identifier manually.
4) Verify on the public site
- Direct URL works:
http://localhost:8090/s/[your-site-slug]/document/[your-identifier] - Browse and item-show links use the clean path (CleanUrl overrides the public
url()helper) - The old numeric URL (
/s/[your-site-slug]/item/4) may still work as a fallback
If admin clean URLs work but public ones do not, re-check Default site and click Save again on the CleanUrl module configuration form.
Final checklist (what “done” looks like)
Stack and modules
- Docker stack is running; you can log in at
http://localhost:8090/login - Required modules are installed and active (Guest, Collecting, Contribute, ContributeEnhancements, RoleBasedNavigation, Mapping, CleanUrl, MetadataBrowse, BlocksDisposition, IA Inbound, IA Outbound)
- Jobs page shows no stuck failures
Site structure
- General item set exists (for example
zkav) using Base Resource - Workshop site exists with slug
[your-site-slug]and Freedom theme - Private staging item set exists for Collecting submissions
- Public site loads at
http://localhost:8090/s/[your-site-slug]
Guest, navigation, and pages
- Guest registration is open (Admin → Settings → Guest → Registration)
- Navigation includes Guest: Log in / Log out with custom labels
- Custom My Dashboard page exists with correct account/contribution links
- Contribute page contains your Collecting form block
- Roles filter hides My Dashboard and Contribute from logged-out visitors
Collecting and Contribute
- Collecting form allows anonymous submissions and assigns to the private staging item set
- A test submission creates an item in the staging item set (not public until reviewed)
- Contribute is configured on Base Resource (roles, editable/fillable fields)
- Blocks Disposition shows Contribute on item show pages
- Guest users can propose edits; contributions appear in Users → Contributions
Internet Archive
- IA account created; S3 keys in
.env(IA_S3_ACCESS_KEY,IA_S3_SECRET_KEY) IA_PUBLISH_TEST_COLLECTION=test_collectionis set- IA Outbound connection test passes; Contributions item set mapped to staging set
- IA Inbound imports at least one item; media renders on resource pages
- HTML Purifier allows embeds (or is disabled per workshop settings)
Display and discovery
- Language labels, pagination, and browse truncation configured to preference
- Metadata Browse enabled with recommended fields searchable
- Clean URLs work on the public site: default site set (Admin → Settings → Display), CleanUrl module configured and saved, items have Dublin Core:Identifier values, and
http://localhost:8090/s/[your-site-slug]/document/[identifier]resolves correctly
Closing Notes
This guide is a starting point for setting up an Omeka S instance for a workshop. It is not a complete guide, and you will need to customize it to your specific needs.
The way the Internet Archive works with Collections poses some complications for working with the custom made Internet Archive modules. The modules were designed for a One Site = One Collection setup.
In the future, the custom modules may be reviewed to handle multiple collections.